The short answer
Check for danger, then read the exact device manual before trying a fix. Stop using and do not charge a vape that is swollen, auto firing, damaged, unusually hot, smells of burning plastic or has liquid in its charging port. Smoke or fire means get out, stay out and call 999.
If there are no stop signs, work through power and lock, charging, airflow and pod seating, liquid and coil, then taste and vapour. Change one thing at a time. Use the symptom finder to jump to the relevant checks, then read the example for your exact device. A charged battery, a visible liquid reservoir and a working coil are three separate things.
Key points
- Safety screening and the exact manual come before power or charging checks.
- A fault code belongs to a particular model. Three red flashes do not mean the same thing on every vape.
- Battery charge does not measure liquid supply or prove that a coil is wet.
- Use only the correct replacement pack, pod or coil. A shared brand name does not establish compatibility.
- Persistent burnt taste, repeated leaking or a fault that remains with a correctly prepared compatible part needs a clear stop point.
- Never open an integrated battery, bridge contacts, force a connector or bypass a protection circuit.
This guide is for adults who already use a vape and need to identify a fault. It covers rechargeable prefilled kits, open refillable pods and a refillable pen. You do not need to read every chapter: start with the safety screen, find your symptom and use the model instructions where they apply.
Keep the device, pod packet and leaflet together. Names such as Plus, Pro, Mini and Go 2 matter because similar looking products can use different parts, charging inputs and warning codes. The examples below use manufacturer instructions where available and identify the narrower checks supported by our catalogue where a full manual could not be verified. They are maintenance examples, not claims from a physical test.
In a prefilled kit, replacing the sealed pod or pod and reservoir pack is the refill procedure. In an open refillable kit, you add suitable bottled liquid through its designated filling hole. Neither procedure involves opening the battery. Read our prefilled pod refill guide if you are unsure which type you have.
Find your symptom
Read the safe check order before trying any fix. If there are no stop signs, use the symptom links to find the relevant chapter. The device examples give model-specific controls, codes and pictures.
- No vapour or the vape is not hitting
- Blinking lights and error messages
- The vape is auto firing or keeps firing
- Burnt taste, including a new pod that tastes burnt
- Weak flavour, thin vapour or a harsh throat hit
- Leaking or gurgling
- Spitting or hot droplets during a draw
- Not charging, charging slowly or stopping part way through
- Battery draining unusually quickly
- Pod not detected, not clicking in or sitting loose
- Liquid level, battery percentage and screen readings seem wrong
- Airflow blocked or the draw suddenly feels tight
- The device is hot
- E-liquid in the mouthpiece or mouth
- Counterfeit concerns or a device damaged on arrival
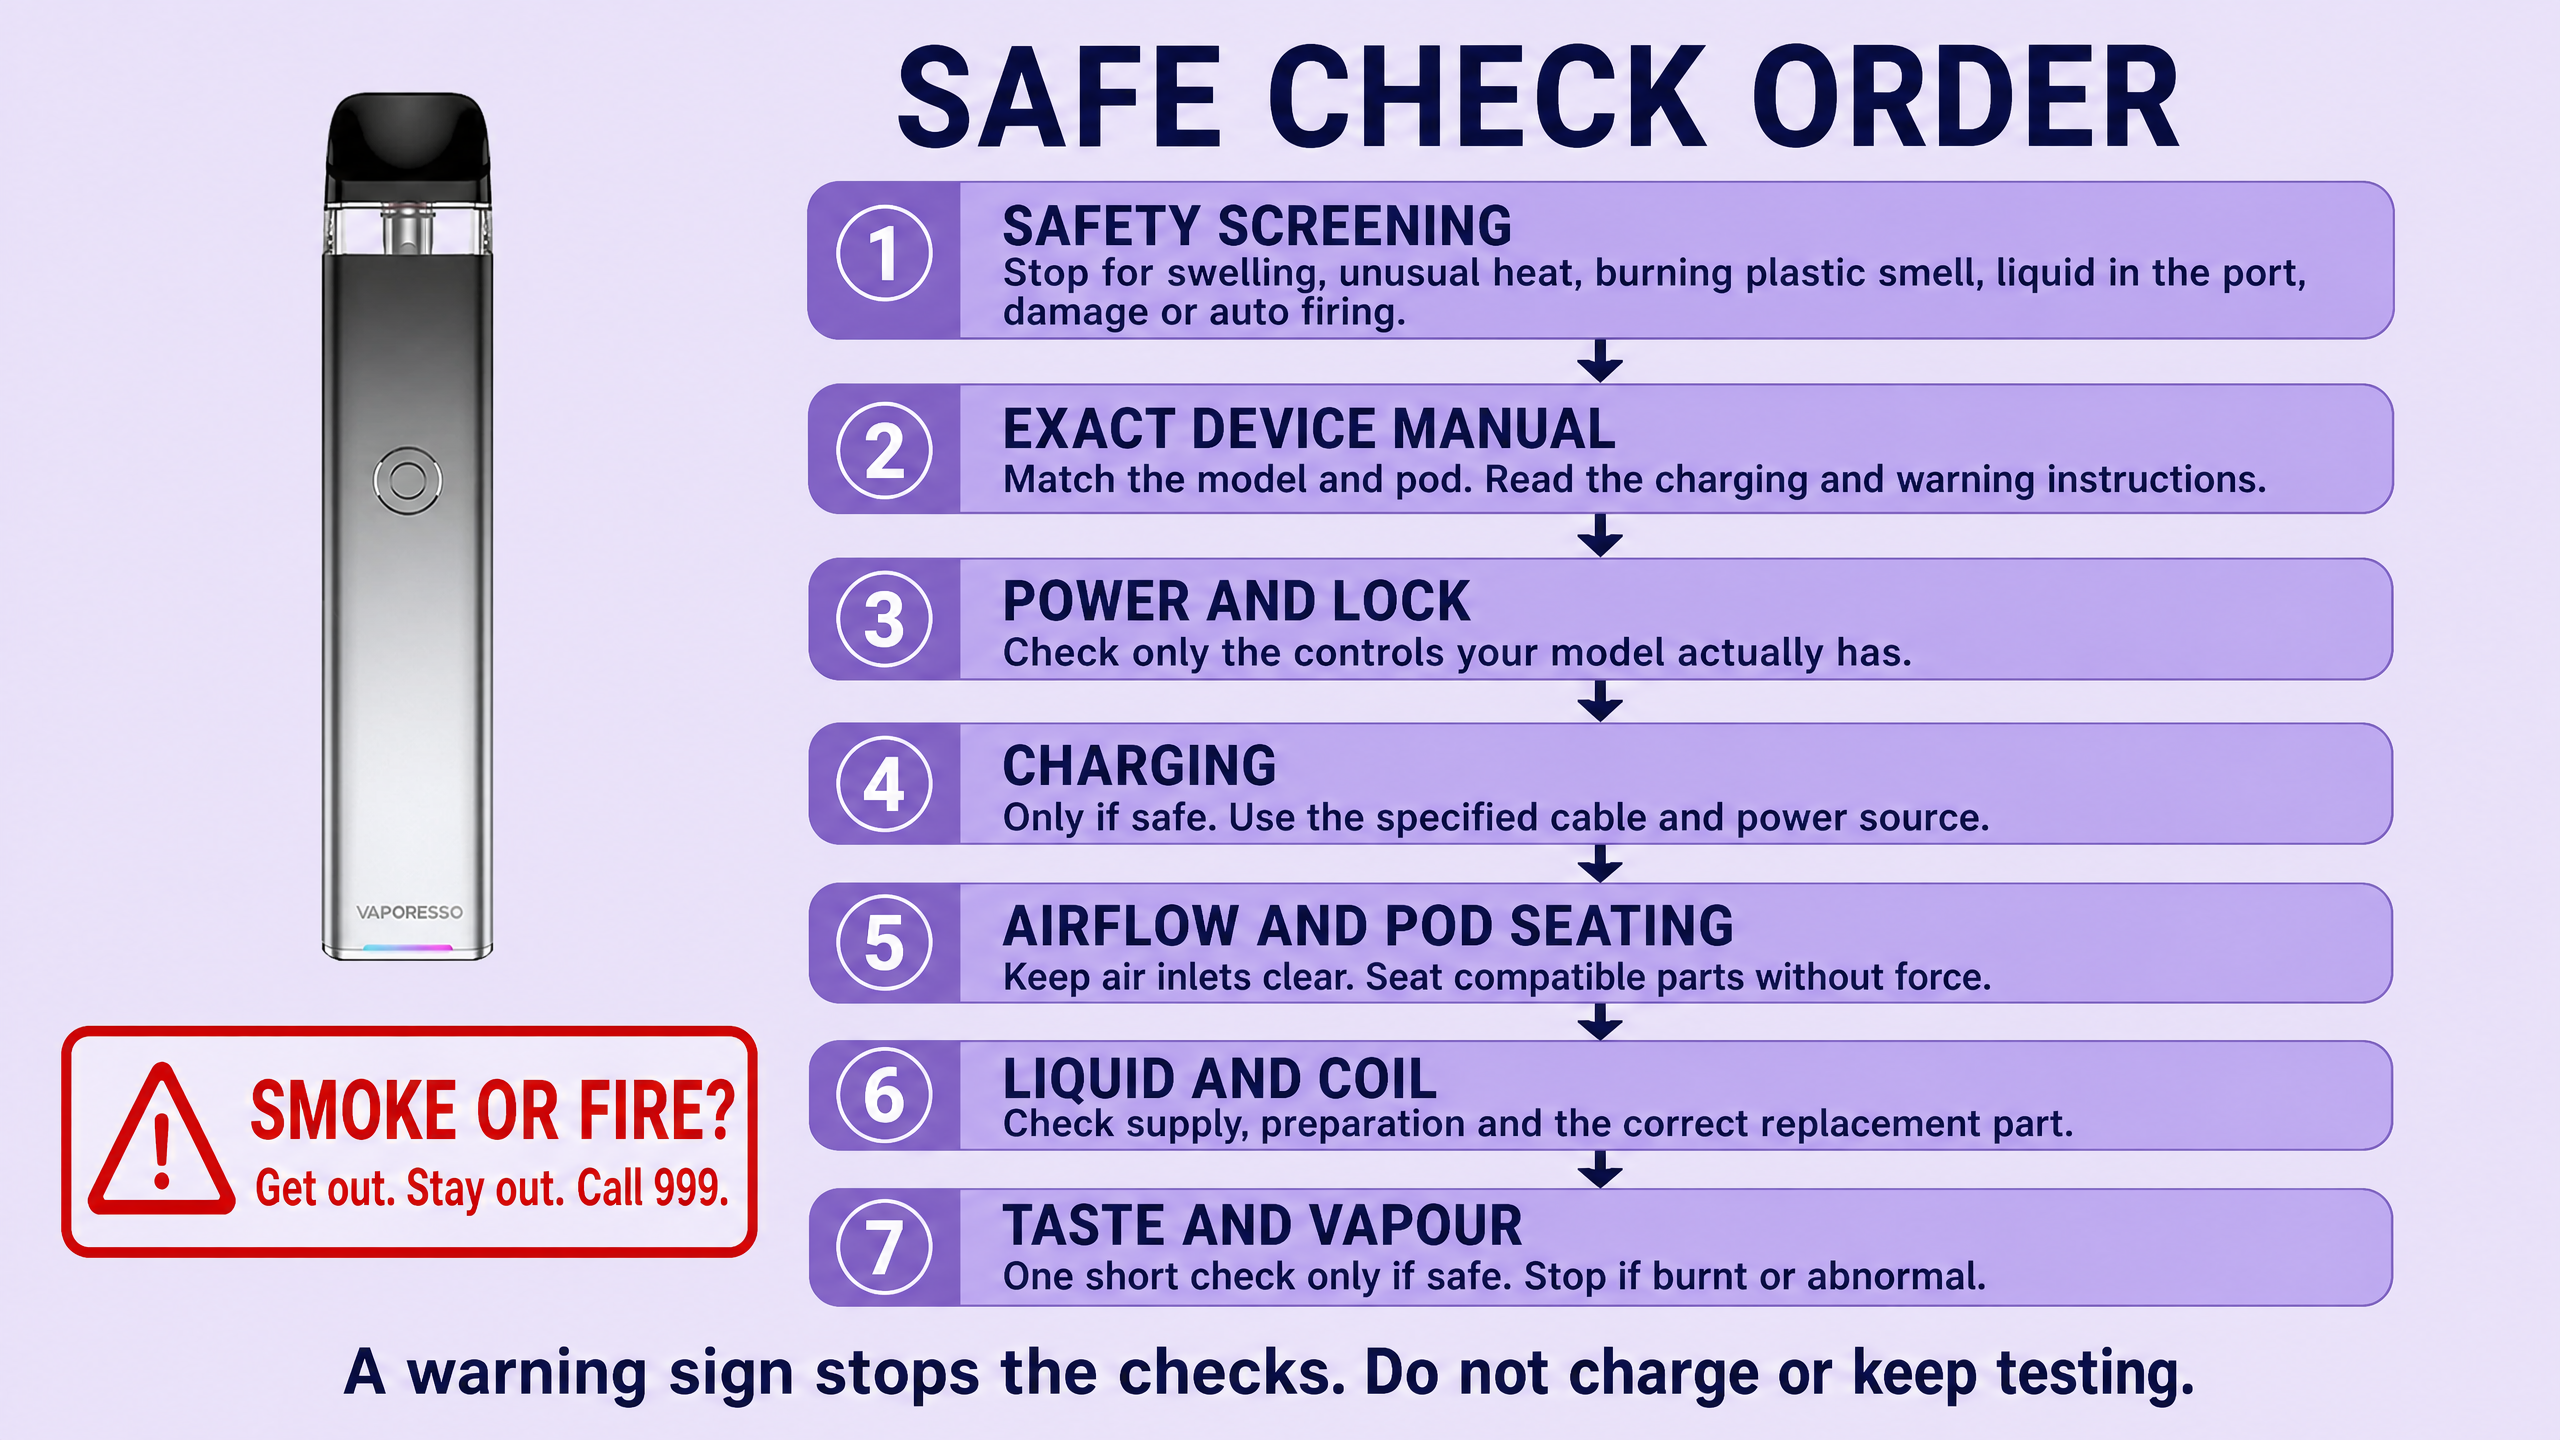
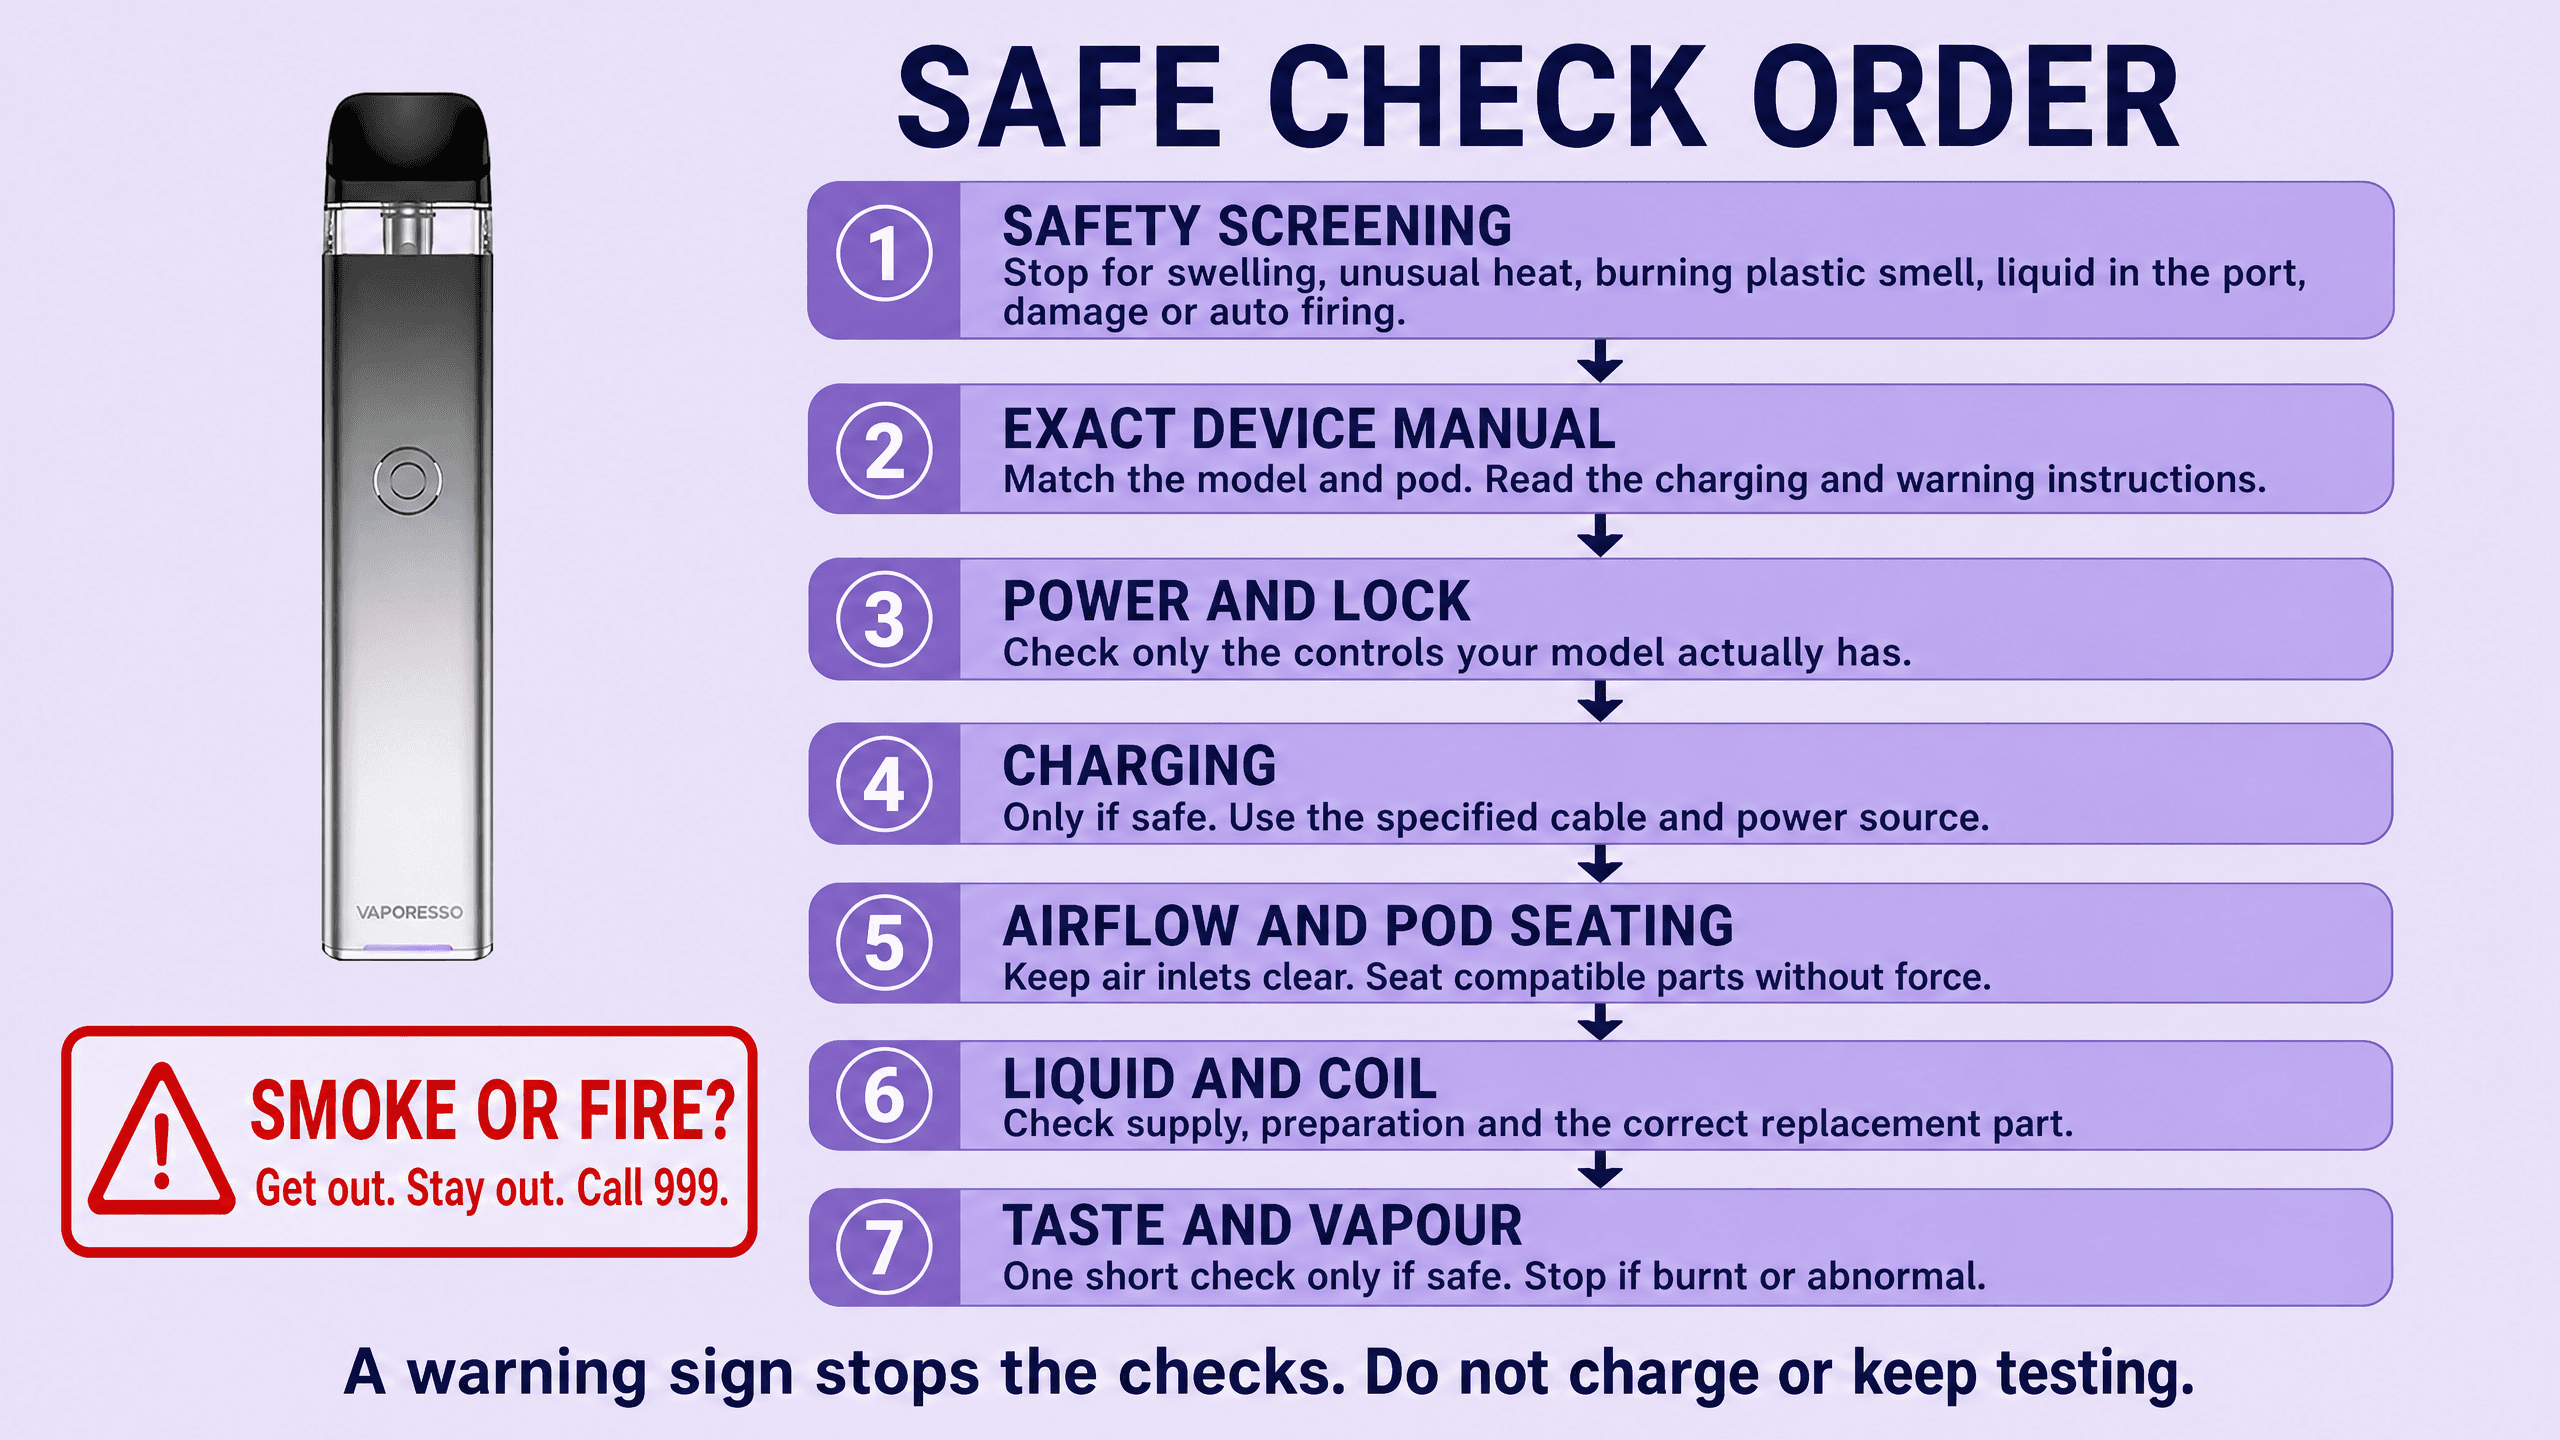
The safe check order, seven steps
Safety screening
Look for swelling, unusual heat, burning plastic smell, liquid in the port, damage and auto firing. Any warning sign stops the checks. Do not charge or keep testing. Smoke or fire means get out, stay out and call 999.
Exact device manual
Match the full model name and pod generation. Find its power controls, charge input, fill method, preparation time and warning table. If the instructions are missing or contradict the supplied hardware, ask the manufacturer before experimenting.
Power and lock
Check whether this model has a button, power switch or lock. Use only its stated sequence. A screen lock, a disabled fire button and a switched-off device are different states. A buttonless kit does not have a five-click reset.
Charging
Only proceed if the device and port passed the safety screen. Check the battery indicator and use the charging equipment and input specified for this model. Charge where you can watch it, on a clean flat surface away from combustible material. Unplug when full.
Airflow and pod seating
With power off where possible, check accessible air inlets, transport seals, dry exterior contacts and correct pod alignment. Seat compatible parts without force. Do not probe the port, bend pins or push tools into the air path.
Liquid and coil
Check the working pod and any supply reservoir separately. Confirm correct filling or sealed-pack assembly, the required first-use wait and a supported pod or coil. Use settings and liquid suited to that part. Replace a damaged or persistently burnt consumable.
Taste and vapour
Only if every earlier check is normal, make one short, gentle check as the manual allows. Stop if it tastes burnt, spits liquid, behaves abnormally or repeats a warning. Follow the matching chapter or contact support instead of repeatedly firing it.
Safe check order at a glance
Follow the numbered order from top to bottom. Safety screening and the exact device manual come before power or charging. At any stage, a new warning sign sends you back to the stop instructions, not to the next experiment.
Choose the next check by symptom
If It is hot, swollen, damaged, wet inside or auto firing
Stop using it and do not charge it. Read Stop before troubleshooting.
An electrical warning overrides every ordinary fault check.
Watch for: Smoke or fire requires evacuation and a call to 999.
If It lights up but produces no vapour
Use No vapour, then Pod not detected and Airflow blocked.
An indicator can work while the pod connection or air path does not.
Watch for: Do not bypass a warning or try repeated hard draws.
If It flashes or shows an error
Use Blinking lights, then the exact device chapter.
Colour, flash count and timing together identify a model-specific signal.
Watch for: A generic internet flash chart cannot diagnose another model.
If It tastes burnt, weak or harsh
Use Burnt taste or Weak flavour and harsh throat hit.
Liquid supply, preparation, coil condition and settings need separate checks.
Watch for: A burnt wick cannot be repaired by charging the battery.
If It leaks, gurgles, spits or puts liquid in your mouth
Use the liquid-related chapters and inspect the pod while switched off.
Condensation, flooding and damaged seals are different faults.
Watch for: Liquid in the port or electronics means stop, not wipe and recharge.
If It will not charge or runs down quickly
Use Charging faults or Battery draining quickly.
Cable, supply, charge indication and usage pattern need separating.
Watch for: Do not leave a failed charge connected indefinitely.
If The pod will not fit or a reading looks wrong
Use Pod not detected or Liquid level and screen readings.
Wrong generations and confusing battery with liquid readings are common diagnostic traps.
Watch for: Never force a part to fit or assume a percentage measures liquid.
If It arrived faulty or may be counterfeit
Use Counterfeit or damaged on arrival and prepare the support record.
Order, batch, packaging and the exact fault help identify the right next step.
Watch for: Do not use a suspected counterfeit to test whether it behaves normally.
No vapour or the vape is not hitting
Possible causes
A flat battery, power or button lock, an unrecognised pod, a shipping seal, blocked airflow, an empty working chamber or an exhausted coil can all prevent vapour. A glowing light only proves that some electronics have power. It does not prove the coil is connected or receiving liquid.
Check
After the safety screen and manual check, note whether there is no response at all, a light without vapour, or a warning. Check the power state and battery indication first. On a cool device, switch off if possible and inspect the pod: is it the right model, is a contact sticker still fitted, and does it sit evenly? Check that your fingers or a protective cover are not covering an air inlet.
Fix
- Use the correct power or unlock sequence, if the model has one. Charge only when the battery indication calls for it and the charging checks pass.
- Remove only the transport parts identified in the leaflet. Wipe accessible exterior pod contacts with a clean, dry, lint-free cloth and reseat the pod without force.
- Check the working chamber and any refill container. Complete the specified preparation and waiting time. If the problem points to the pod, one correctly prepared, known compatible replacement can distinguish a consumable fault from a device fault.
Example: a new pod produces no vapour but the battery light looks normal. If its contact sticker is still present, removing that sticker as instructed may restore the connection. Increasing power would not address the cause.
When it is not fixable at home
If a correctly prepared compatible replacement still gives no response, stop swapping parts. The sensor, contacts or internal electronics may need assessment. Any heat, wet port, damaged contact or repeated protection warning ends the test sooner. Do not bridge contacts or pull up a pin with a knife.
Blinking lights and error messages
Possible causes
A flash can signal low battery, a missing pod, excessive resistance, a short circuit, high temperature or a draw time limit. Some lights also pulse during normal charging. Screen animations and flavour graphics are not necessarily warnings.
Check
Record the exact colour, number of flashes and when they appear: after inserting the pod, during a draw, after a button press or while charging. Copy screen wording exactly. Look up the full model, including any Plus or Pro number. Do not continue firing just to count the flashes if the device is hot or otherwise unsafe.
Fix
Follow the action for that code in the model’s manual. A documented low-battery warning leads to the charging checks. A no-pod warning leads to compatibility, dry exterior contacts and seating. A short-circuit warning means stop firing; do not clear it with repeated button presses. A temperature warning means stop use and charging and let the device cool naturally in a safe place.
Example: the XROS 3 manual assigns three red flashes to low voltage. The XLIM GO 2 manual assigns three red flashes to a short circuit. Charging every vape that blinks three times is therefore a poor diagnostic shortcut. Both model chapters below contain the verified meanings.
When it is not fixable at home
If the code is absent from the manual, ask the manufacturer rather than borrowing a chart for a similar device. If a protection warning repeats after the named user checks, stop. A warning that disappears briefly is not proof that an underlying electrical fault has been repaired.
The vape is auto firing or keeps firing
Possible causes
A stuck fire button, a contaminated draw sensor, liquid entering electronics or an internal fault can cause unwanted activation. A light that stays on is not by itself proof that the coil is heating: distinguish an ordinary display or charging light from continued coil noise, vapour or heat. If uncertain, stop using it.
Check
Stop drawing or pressing the button. Do not put the mouthpiece back to your lips to test it. If it continues heating, treat this as a safety stop. Check from a safe distance for rising heat, smell, hissing or smoke. You do not need to reproduce the fault for a warranty report.
What to do
Do not charge it. If the device is cool and stable and you can use its ordinary power control safely, switch it off. Do not struggle with a stuck button, remove covers or handle a hot device to detach a pod. If it is connected to power, switch off at the socket only where you can do so safely. Keep people and pets away and contact the retailer or manufacturer for the next step.
Example: a draw-activated kit starts hissing in a pocket after a leak. Cleaning the visible mouthpiece is not an adequate repair because liquid may have reached the sensor inside. The whole device needs assessment.
When it is not fixable at home
Auto firing is not a routine adjustment or a reason to try a stronger draw, blow through the mouthpiece or flatten the battery. Do not resume use just because it stops. Internal sensor, button and battery repairs belong with the manufacturer. Smoke or fire means get out, stay out and call 999.
Burnt taste, including a new pod that tastes burnt
Possible causes
The coil heats liquid held in its wick. A low working-liquid level, incomplete preparation, a supply reservoir that has not connected, unsuitable liquid, too much power or repeated long draws can leave that wick under-supplied. Once the wick is scorched, refilling does not restore it.
Check
Stop using the affected pod. Look at the working chamber as well as the larger reservoir. Confirm that the sealed assembly was activated exactly as instructed, or that an open pod was filled through its filling hole. Check the first-fill waiting time and the pod’s supported settings. On a dual-flavour kit, establish which side is affected.
Fix
If you caught an unprepared new pod before firing it, finish the preparation and wait the specified time. Once there is a persistent burnt taste, replace the compatible pod or coil. Fill and prepare the replacement correctly before use. Choose the liquid type and settings stated for that particular part, not a wattage copied from a different resistance.
For a sealed prefilled pack, replace the appropriate pack when its supply is exhausted or its integrated coil is damaged. Do not pry it open, inject liquid into it or try to wash a burnt wick. For an open pod with an integrated coil, replace the whole pod. A separate coil is replaced only in a tank designed for that operation.
Example: liquid remains in a large refill container but the small working pod is dry. Another charge will not restore liquid flow. Check the approved assembly and feed procedure, then replace or report the pack if that procedure does not resolve it.
When it is not fixable at home
A scorched wick is a consumable failure. Repeated immediate burning of properly prepared compatible replacements needs manufacturer advice about the device or the supplied parts. A burning-plastic smell from the body or charging port is a safety stop, not a coil-flavour problem.
Weak flavour, thin vapour or a harsh throat hit
Possible causes
Weak output can follow a low battery, an exhausted pod, an airflow or power setting change, poor liquid supply or a worn coil. A harsh draw may also follow a different liquid strength or recipe. Burnt taste should go straight to the burnt-taste checks rather than being treated as weak flavour.
Check
Compare the setup with the last time it worked normally. Did you change the pod resistance, liquid, prefilled edition, airflow position or power mode? Check the pack label instead of relying on the case colour. On a dual-flavour device, confirm the selected side. Do not assume a flavour change means the battery is defective.
Fix
Restore the documented setting for the installed pod and reopen an accidentally closed airflow control. If the battery is low, follow the charging checks. Check liquid supply and preparation before deciding that the coil has worn out. Replace an exhausted or persistently unpleasant pod with the exact compatible part.
For refillable hardware, use a liquid ratio and strength intended for the device and chosen by the adult user. Do not raise the nicotine strength or power to overcome weak flavour, and do not dilute a sealed prefilled pack. If a liquid or pod feels uncomfortable to use, stop using it. This guide does not diagnose a health complaint.
Example: an adjustable kit changes from Normal to a higher-output mode and suddenly feels harsher. Check and restore the previous supported mode before buying a battery or opening a pod. If the taste is already burnt, replace the damaged consumable instead.
When it is not fixable at home
If output remains abnormal with a correctly prepared supported pod and normal settings, contact support. Do not keep testing through discomfort. For a personal health concern, seek NHS advice rather than treating the symptom as proof of a device fault.
Leaking or gurgling
Possible causes
A few droplets around a cool mouthpiece or pod can be condensation. Repeated pooling, a wet seam or liquid escaping from an air inlet may indicate flooding, overfilling, a loose closure, a damaged seal or a cracked pod. Strong draws and an unsuitable liquid or setting can contribute on some refillable systems.
Check
Switch off where possible and remove the pod only as the manual permits. Identify where the liquid first appears. Check the fill cap, pod seam and visible seals without dismantling a sealed pack. Inspect the battery compartment and charging port separately. If liquid has entered either the port or internal electronics, stop and use the support route.
Fix
- Blot accessible exterior liquid with a dry, lint-free cloth. Do not rinse the battery, blow liquid into the body or poke a cloth deep inside it.
- On an open refillable pod, use the designated fill hole, respect its fill limit and close the plug or cap promptly. Fit a user-replaceable coil only as the manual describes.
- Reseat a correctly assembled prefilled pack without force. Keep the device away from direct sun and hot cars. Use gentle draws and the recommended setting rather than trying to clear flooding with repeated firing.
Example: the base is dry after cleaning but a fresh pool appears at a cracked pod seam before another draw. That points to a failed container, not harmless condensation. Replace the pod and check that liquid has not reached the electronics.
When it is not fixable at home
Replace a cracked pod, damaged fill plug or persistently leaking sealed pack. Tape, glue and added seals are not appropriate repairs. If a fresh compatible pod leaks into the device again, stop and ask support to assess the fit and body. A gurgle alone cannot identify every cause, so do not label all wetness as condensation.
Spitting or hot droplets during a draw
Possible causes
Spitting is liquid being projected through the air path during heating. It often accompanies a flooded coil or condensation near the mouthpiece. Overfilling, a poorly closed cap, a loose or worn consumable, very forceful draws and a setting outside the coil’s intended range can contribute.
Check
Stop taking draws and let the device settle. Inspect the cool, removable pod according to its manual. Check for liquid in the mouthpiece, a loose cap, an incorrect fill level and a damaged seal. A light crackle during normal heating is different from liquid repeatedly reaching your lips.
Fix
Switch off and blot accessible mouthpiece condensation. Refit the closure and pod correctly. On adjustable equipment, return to the supported setting for the fitted coil. Do not turn power above the recommended range to burn off a flood. On a sealed prefilled kit, keep the pack sealed and follow only its supplied preparation instructions.
Use a short, gentle draw only after the cause has been corrected and all safety checks pass. If it spits again, stop using that pod. Repeated dry firing, shaking a complete device, blowing through it towards the battery or covering the air holes are not general clearing methods.
Example: spitting begins immediately after filling an open pod through its central air tube. The liquid went into the wrong path. Follow the manual’s cleaning or replacement guidance; adding more liquid through the proper hole does not remove the flood already present.
When it is not fixable at home
A damaged or repeatedly spitting pod should be replaced. If correctly prepared replacements behave the same way, ask the manufacturer to check compatibility and the device. If liquid reaches the port or the device starts firing on its own, stop use entirely.
Not charging, charging slowly or stopping part way through
Possible causes
The cable, adaptor, connection, battery state or charging circuit may be responsible. A screen that turns off can also be a normal display behaviour. A connector fitting physically does not establish the correct charging input. Some older pens use micro USB, while many current pods use USB-C.
Check
Start with a cool, dry, undamaged device. With everything unplugged, inspect the visible port and cable ends for liquid, lint, bent metal, looseness or discoloration. Do not insert a pin, blade or brush into the port. Read the exact input on the device and manual, then identify the charging indication and the full-charge signal for that model.
Fix
- Use the supplied or manufacturer-specified charging equipment and an appropriate power source. Keep the device visible on a clean, flat surface away from combustible material.
- If there is no charging response, try one known working, undamaged cable of the specified type. If needed, test one suitable power source separately. Changing one item at a time reveals which change mattered.
- Check whether the documented charge indicator progresses. Avoid using the device while charging during diagnosis. Unplug when full and never leave it charging unattended or overnight.
A higher advertised wattage on a charger does not promise a faster vape charge. The device controls its supported input. Do not invent a universal full-charge time or leave a device connected indefinitely to revive an old battery. Follow the manufacturer’s limit when a deeply discharged device does not recover.
Example: the same approved supply charges the device with one cable but not another. Retire the faulty cable. If neither suitable cable works, the fault may be in the port or device rather than a need for a more powerful charger.
When it is not fixable at home
A connection that works only when held at an angle, a loose port, repeated failed charging or abnormal heat needs assessment. Do not wedge the plug, repair the connector, open the battery or wire it directly to a power source.
Battery draining unusually quickly
Possible causes
Longer or more frequent draws, a higher-output mode, a different pod resistance or an ageing battery can change runtime. The screen is an indication of charge, not a laboratory measurement of remaining capacity. A headline puff count describes a liquid-pack claim and does not promise that many puffs from one battery charge.
Check
First distinguish draining during use from losing charge while idle. Heat, unexpected activation or a rapid unexplained loss while sitting unused is a reason to stop and ask support. For an otherwise normal device, note the installed pod, mode, recent draw pattern and whether charging actually reached the documented completion signal.
Fix
Return to the usual manufacturer-supported mode and compare under similar use. Turn a button device off when carrying or storing it, following its instructions. A button lock may not stop draw activation. Keep the device away from extreme temperatures and allow a cold device to return naturally to the manufacturer’s charging range before connecting it. Never use a heater or hairdryer.
If a worn pod is producing little vapour, investigate the pod rather than compensating with longer repeated draws. A known suitable cable and power source may resolve an incomplete charge, but a full-looking display is not a reason to ignore very short runtime.
Example: a kit lasts less time after switching to Boost while everything else remains normal. That is a setting to compare first, not proof that the battery has failed. If it becomes hot in a pocket without being used, stop instead of comparing modes.
When it is not fixable at home
An integrated battery that no longer holds a useful charge is not a user-replaceable consumable. Ask about assessment or replacement of the device. Do not intentionally drain it to zero as a reset, open the casing or fit an improvised cell.
Pod not detected, not clicking in or sitting loose
Possible causes
The pod may be the wrong generation, still have a transport sticker, be incompletely assembled or have liquid or debris on its accessible contacts. A distorted pack, damaged magnet, bent contact or broken latch can also prevent a reliable fit. Not every magnetic pod makes an audible click.
Check
Compare the full device name with the sealed replacement packet, including the number and suffix. Check the pod resistance where relevant. Remove the old assembly completely only as instructed. Look for a removable transport seal and check whether a reservoir must first connect to the pod. Inspect the socket from outside with the device off.
Fix
Dry accessible exterior contacts and remove only loose debris that can be wiped away without reaching into the device. Align the pod to its guides or magnetic connection, then seat it with ordinary finger pressure. It should sit as shown in the manual. Do not keep pushing because another brand’s pod has a more pronounced click.
For a threaded tank, begin gently and stop if the threads catch or the tank sits crooked. For a pod, never add foil, magnets or packing material to improve contact. A compatible known working replacement can test the consumable once the device is cool, dry and undamaged.
Example: a fresh pack carries the same brand but a different model number. Its near-fit does not make it compatible. Keep it unused and resolve the part identity rather than trimming plastic or bending contacts.
When it is not fixable at home
Damaged pins, threads, magnets or latches need support. A repeated no-pod or short-circuit warning with a correctly prepared compatible replacement is a stop point. Do not pry spring contacts upwards or glue a pod into position.
Liquid level, battery percentage and screen readings seem wrong
Possible causes
Battery percentage, a puff counter, a mode indicator and a liquid symbol answer different questions. A clear supply reservoir can still contain liquid while the working pod is not feeding properly. On a dual-flavour kit, one side may be exhausted before the other. Some screens also sleep between draws or use decorative animations.
Check
Use the manual to identify each symbol and the method for waking the display. Check the working pod and the visible reservoir separately, in good light and in the normal viewing position. Do not infer the remaining liquid from a battery icon or from the kit’s advertised puff total.
Fix
For a suspected supply issue, follow that model’s approved container assembly and preparation sequence. An inversion step on one device is not permission to invert or shake every device. Do not squeeze a reservoir, puncture a seal or add bottled liquid to a closed pack to force a reading to change.
If a puff counter was reset, that does not make the coil or liquid new. If a liquid estimate stays high while taste becomes burnt, stop using the affected pack. Where the manufacturer has not explained how a liquid symbol is calculated, treat its meaning as unverified and use the supplied instructions and visible condition.
Example: a charged BM6000 shows a high battery reading but produces a dry taste. Its battery display cannot prove that liquid has reached the working pod. Check the correct model’s feed instructions and stop using a burnt consumable.
When it is not fixable at home
A screen that remains blank when the manual says it should be active, an unresponsive control or a blocked liquid supply that survives correct assembly needs support. Do not open the body to reconnect a display or treat an implausible reading as permission to ignore heat or taste warnings.
Airflow blocked or the draw suddenly feels tight
Possible causes
A shipping plug, a finger covering an inlet, a closed airflow slider, pocket debris, condensation or a misaligned pod can restrict the draw. Flooding may feel tight and gurgly. An internal sensor fault may feel like a blockage because the device does not activate even when air passes through.
Check
Inspect the mouthpiece and visible inlets with the device off where possible. Check the leaflet for the location of transport seals and adjustable airflow. A decorative seam, microphone-like hole or charge port is not an opening to clean by guesswork. Notice whether the restriction started after a pod change or after carrying the kit in a pocket.
Fix
Remove the specified transport plug, uncover the air inlet and restore the slider to a supported position. Wipe only accessible exterior surfaces. Remove and reseat the correct pod if the manual allows it. If a removable mouthpiece has a manufacturer-approved cleaning method, follow that method and keep every wet part away from the battery.
Do not inhale harder to overcome a blockage. Do not blow into the device, push wire through the air path or use compressed air. Those actions can drive liquid or debris towards a sensor. A fixed-airflow prefilled kit has no hidden adjustment screw to find.
Example: a kit draws normally until it is held with a finger across the base inlet. Moving the finger addresses the restriction. A kit that remains blocked with clear external inlets needs a different diagnosis, not a deeper cleaning tool.
When it is not fixable at home
A blocked internal air path, damaged mouthpiece, recurring liquid obstruction or a sensor that will not activate with a correctly fitted pod needs a replacement consumable or manufacturer assessment. Stop immediately if the device starts activating without a draw.
The device is hot
Possible causes
Heating at the coil during use is different from the battery body becoming unusually hot while idle or charging. Repeated draws, a blocked air path, excessive power, direct sun or a charging fault can contribute. You cannot identify a safe internal battery temperature by touch or a screen animation.
Check
Stop using the device and stop charging. Note when the heat appeared and whether it is concentrated near the tank, body or port, without handling anything dangerously hot. Check for swelling, unusual smell, hissing, smoke, damage or liquid entry. Any of those warning signs ends ordinary troubleshooting.
What to do
Let a stable device cool naturally away from direct sun and combustible material, keeping people and pets away. Do not put it in a fridge, freezer or water, and do not use a fan or cooling trick as a way to keep firing. If it was charging, isolate the power at the socket only if it is safe to do so.
Once completely cool, you can review the manual, supported pod settings and the visible air inlets without taking another draw. If the heat was unusual, happened while idle or returns during normal use, ask the manufacturer before using it again. A temperature protection message is useful evidence for support, not an obstacle to defeat.
Example: a screen reports OVER HEAT. Repeatedly pressing the button until the warning clears does not explain the cause. Record the message, stop, and follow the manufacturer’s temperature and support instructions.
When it is not fixable at home
Heat from the battery or charge port, heat after a serious drop, rising idle temperature and recurring thermal cut-outs need assessment. Do not open the case. Smoke or fire means get out, stay out and call 999.
E-liquid in the mouthpiece or mouth
Possible causes
Condensation can collect near a mouthpiece. Flooding, a loose closure, overfilling, a damaged pod or liquid entering the central air tube can put more liquid into the air path. Liquid noticed before heating is different from hot droplets projected during a draw, although the two problems can occur together.
Check
Stop using the device. Inspect the mouthpiece and the cool pod without drawing on it. Check the fill level and closure on an open pod, or the assembly and visible seams on a sealed prefilled pack. Look for liquid around the battery connection and port. Keep the device and any liquid away from children and pets.
Fix
Blot accessible mouthpiece liquid with a dry, lint-free cloth. Follow only the approved cleaning procedure for removable parts, and never wash the battery section. Correct an incorrectly closed fill cap or wrongly seated pod. Use the leak and spitting chapters if the liquid quickly returns. Do not keep drawing to clear it or deliberately taste the liquid.
Example: a mouthpiece is wet again immediately after wiping and the tank level keeps dropping while unused. Treat that as a leak needing correction or pod replacement, rather than repeatedly wiping and continuing.
If liquid has been swallowed or there is a health concern, stop hardware troubleshooting and seek advice through the NHS poisoning guidance. That page explains when emergency help or NHS 111 is appropriate. This article does not provide treatment instructions.
When it is not fixable at home
Replace a cracked, damaged or persistently flooding consumable. A device with liquid inside its electronics or charging port needs support even if its mouthpiece has been dried. Do not charge it to test whether it still works.
Counterfeit concerns or a device damaged on arrival
Possible causes
A new product can be incorrectly assembled, supplied with the wrong part, damaged in transit or defective. Unfamiliar packaging alone does not prove it is counterfeit: manufacturers revise designs. Equally, a plausible box or a code that opens a website is not conclusive proof of authenticity.
Check
Before use, compare the full model and contents with your order. Photograph damaged packaging, leaks, broken seals or distorted parts. Keep the batch number, authenticity label and leaflet. Where the brand provides verification, reach it through the manufacturer’s official website instead of trusting an unfamiliar address printed on a suspicious label.
What to do
Do not use or charge a damaged or suspected counterfeit device. Contact the retailer with the order reference, exact model and photographs. If the issue is only a routine setup question and there are no safety or authenticity concerns, use the supplied instructions to check the indicated transport seals and assembly. Do not dismantle it to create proof of a fault.
Ask the retailer or manufacturer to check an invalid, already-used or unexpected verification result. Keep the packaging until they respond. The MHRA consumer guidance explains the Yellow Card reporting route for suspected product safety concerns. Our fake vape checking guide gives further identification checks.
Example: an order contains a leaking pod and a wet charge port before first use. This is a support case immediately. Drying the outside and connecting a charger would create an unnecessary additional test.
When it is not fixable at home
Physical damage, liquid inside a new device, uncertain authenticity and a new kit that remains faulty after its permitted setup checks need retailer resolution. Do not post a damaged lithium device back without receiving handling and carrier instructions. Do not promise a particular refund or replacement before the retailer has assessed the case.
Where the safety boundaries come from
The charging and stop rules follow OPSS battery guidance and London Fire Brigade advice. Device manuals supply the model-specific controls. General fault categories do not override a protection warning or a manufacturer limit.
Office for Product Safety and Standards battery guidanceEvidence checked 2026-11-11
Limitation: A checklist cannot establish that an internally damaged battery is safe. No electrical repair or physical performance test is claimed.
Ten device examples
Use the full name on your device and leaflet. Read the safety screen first. A similarly named model can have different controls and parts. The images show inspection points and reminders; the written instructions carry the detail.
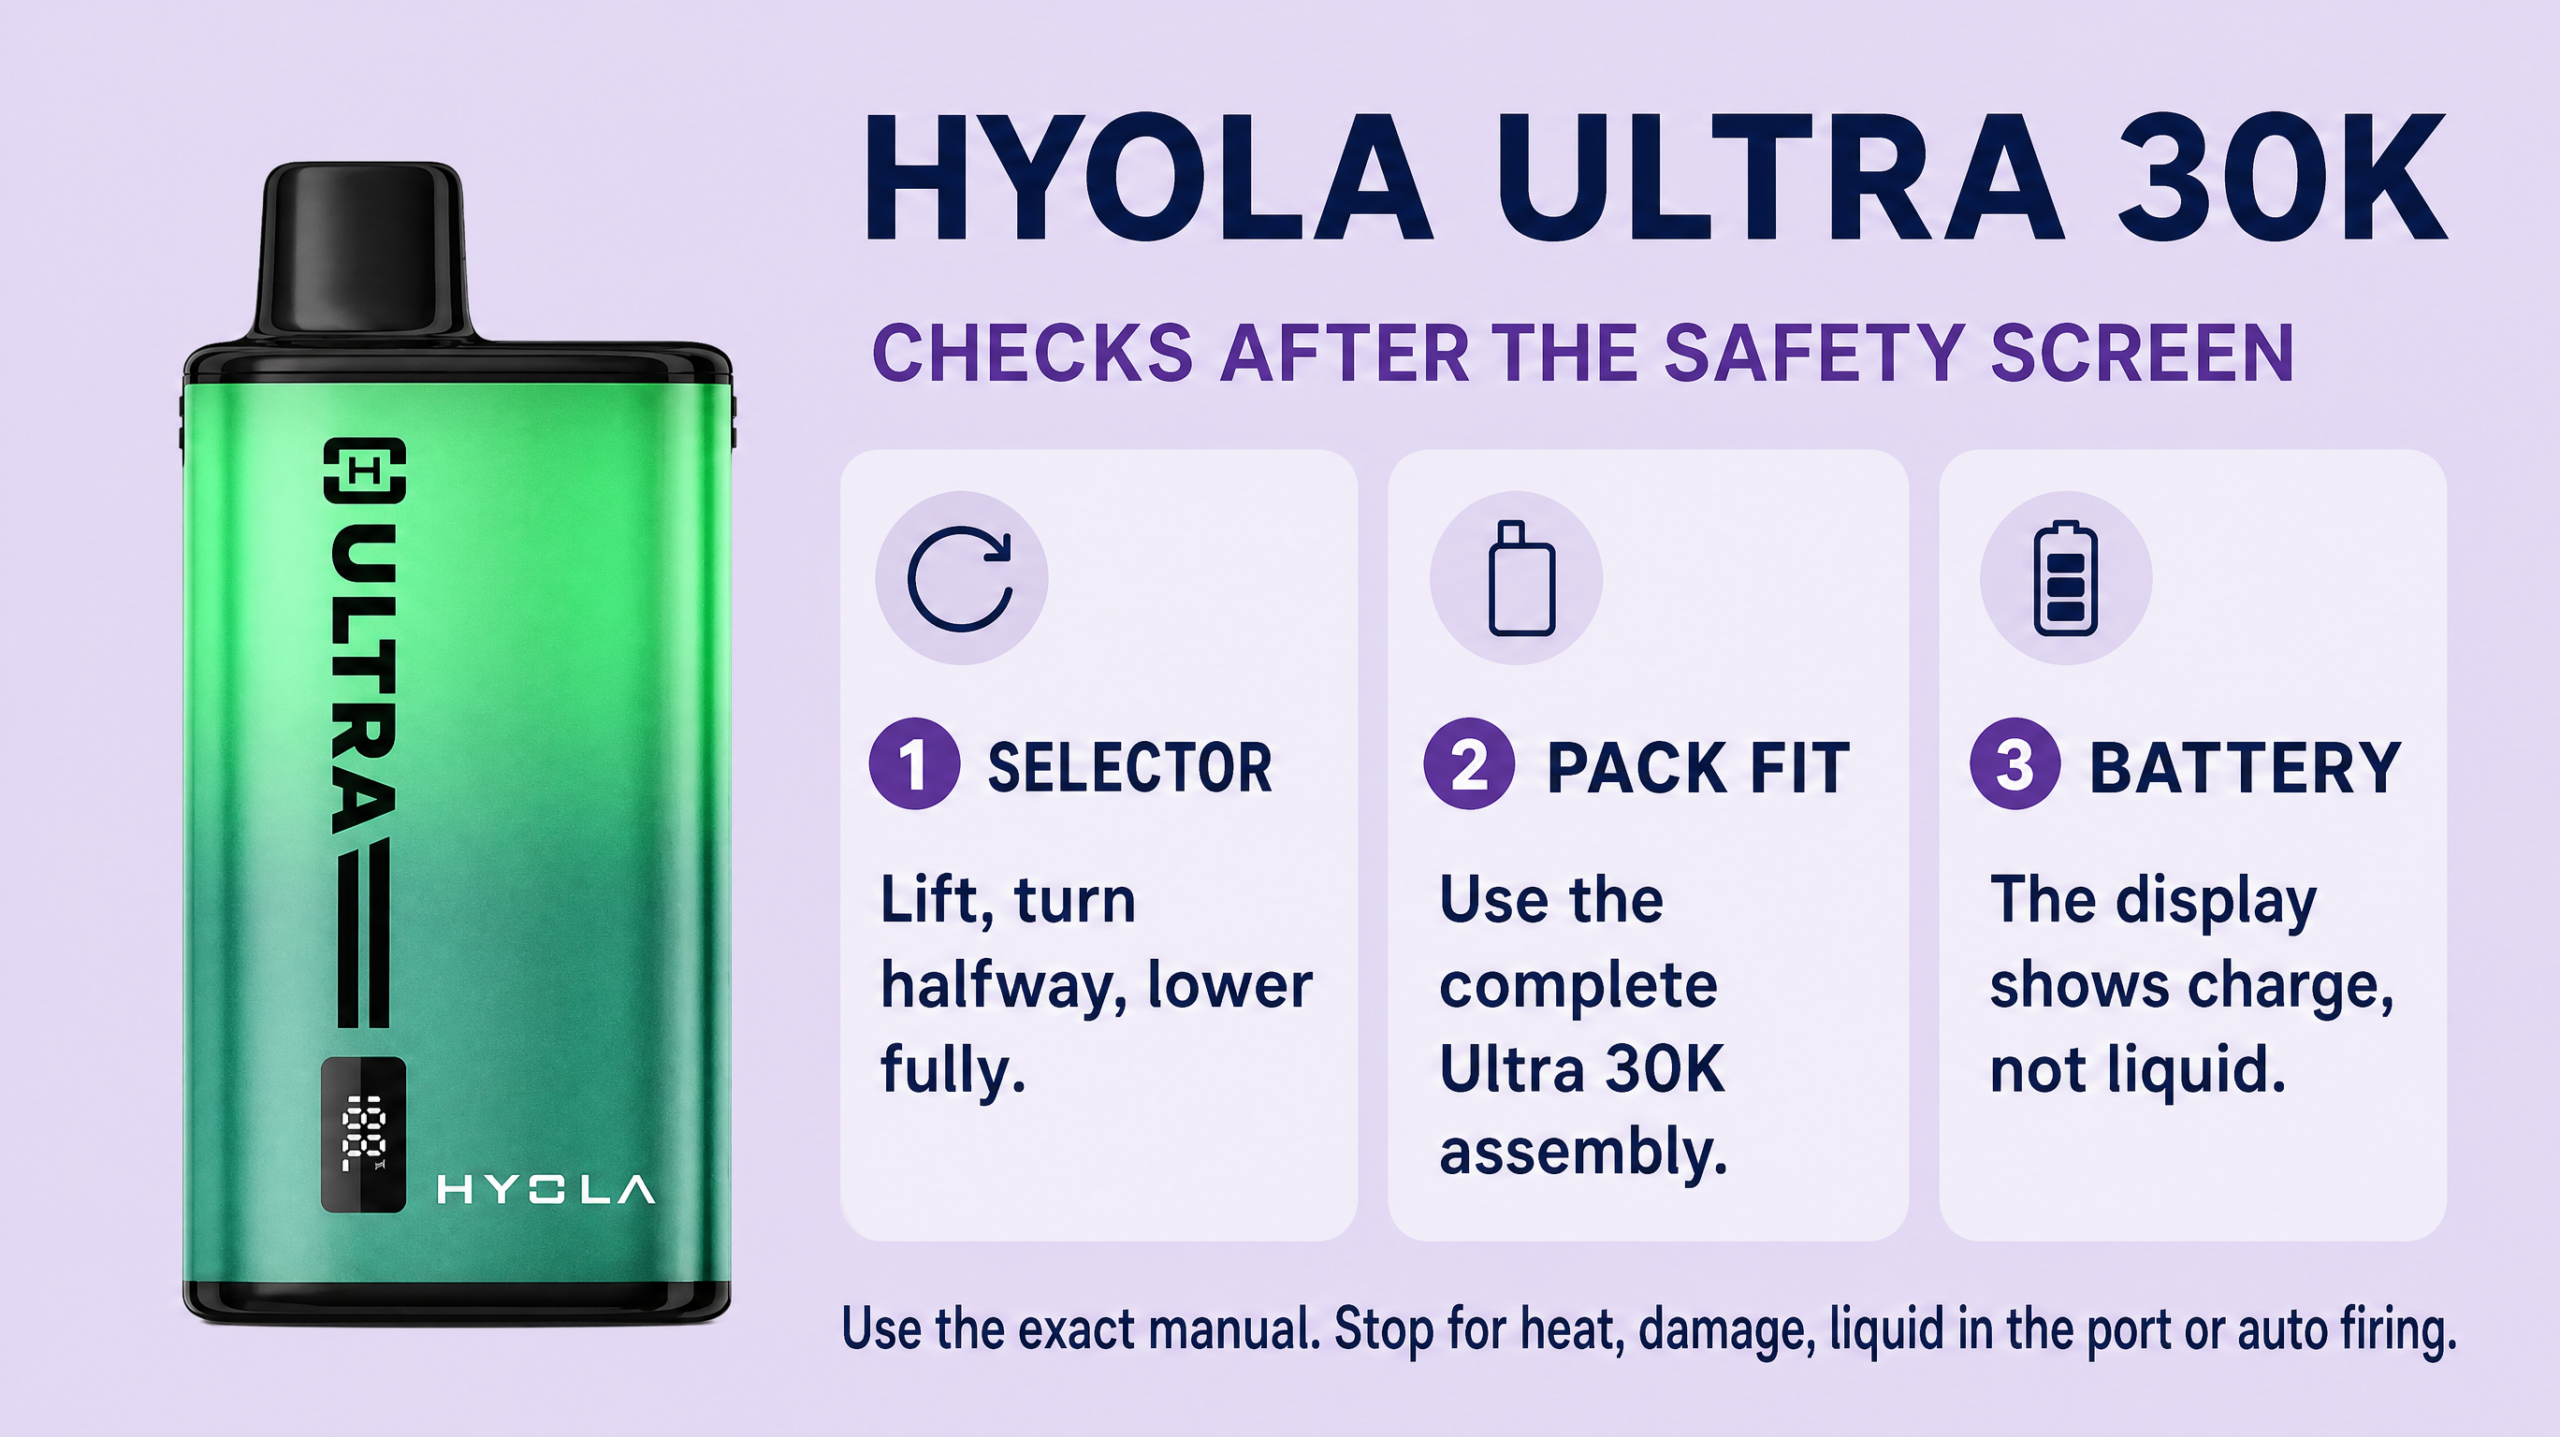
- Hyola Ultra 30K
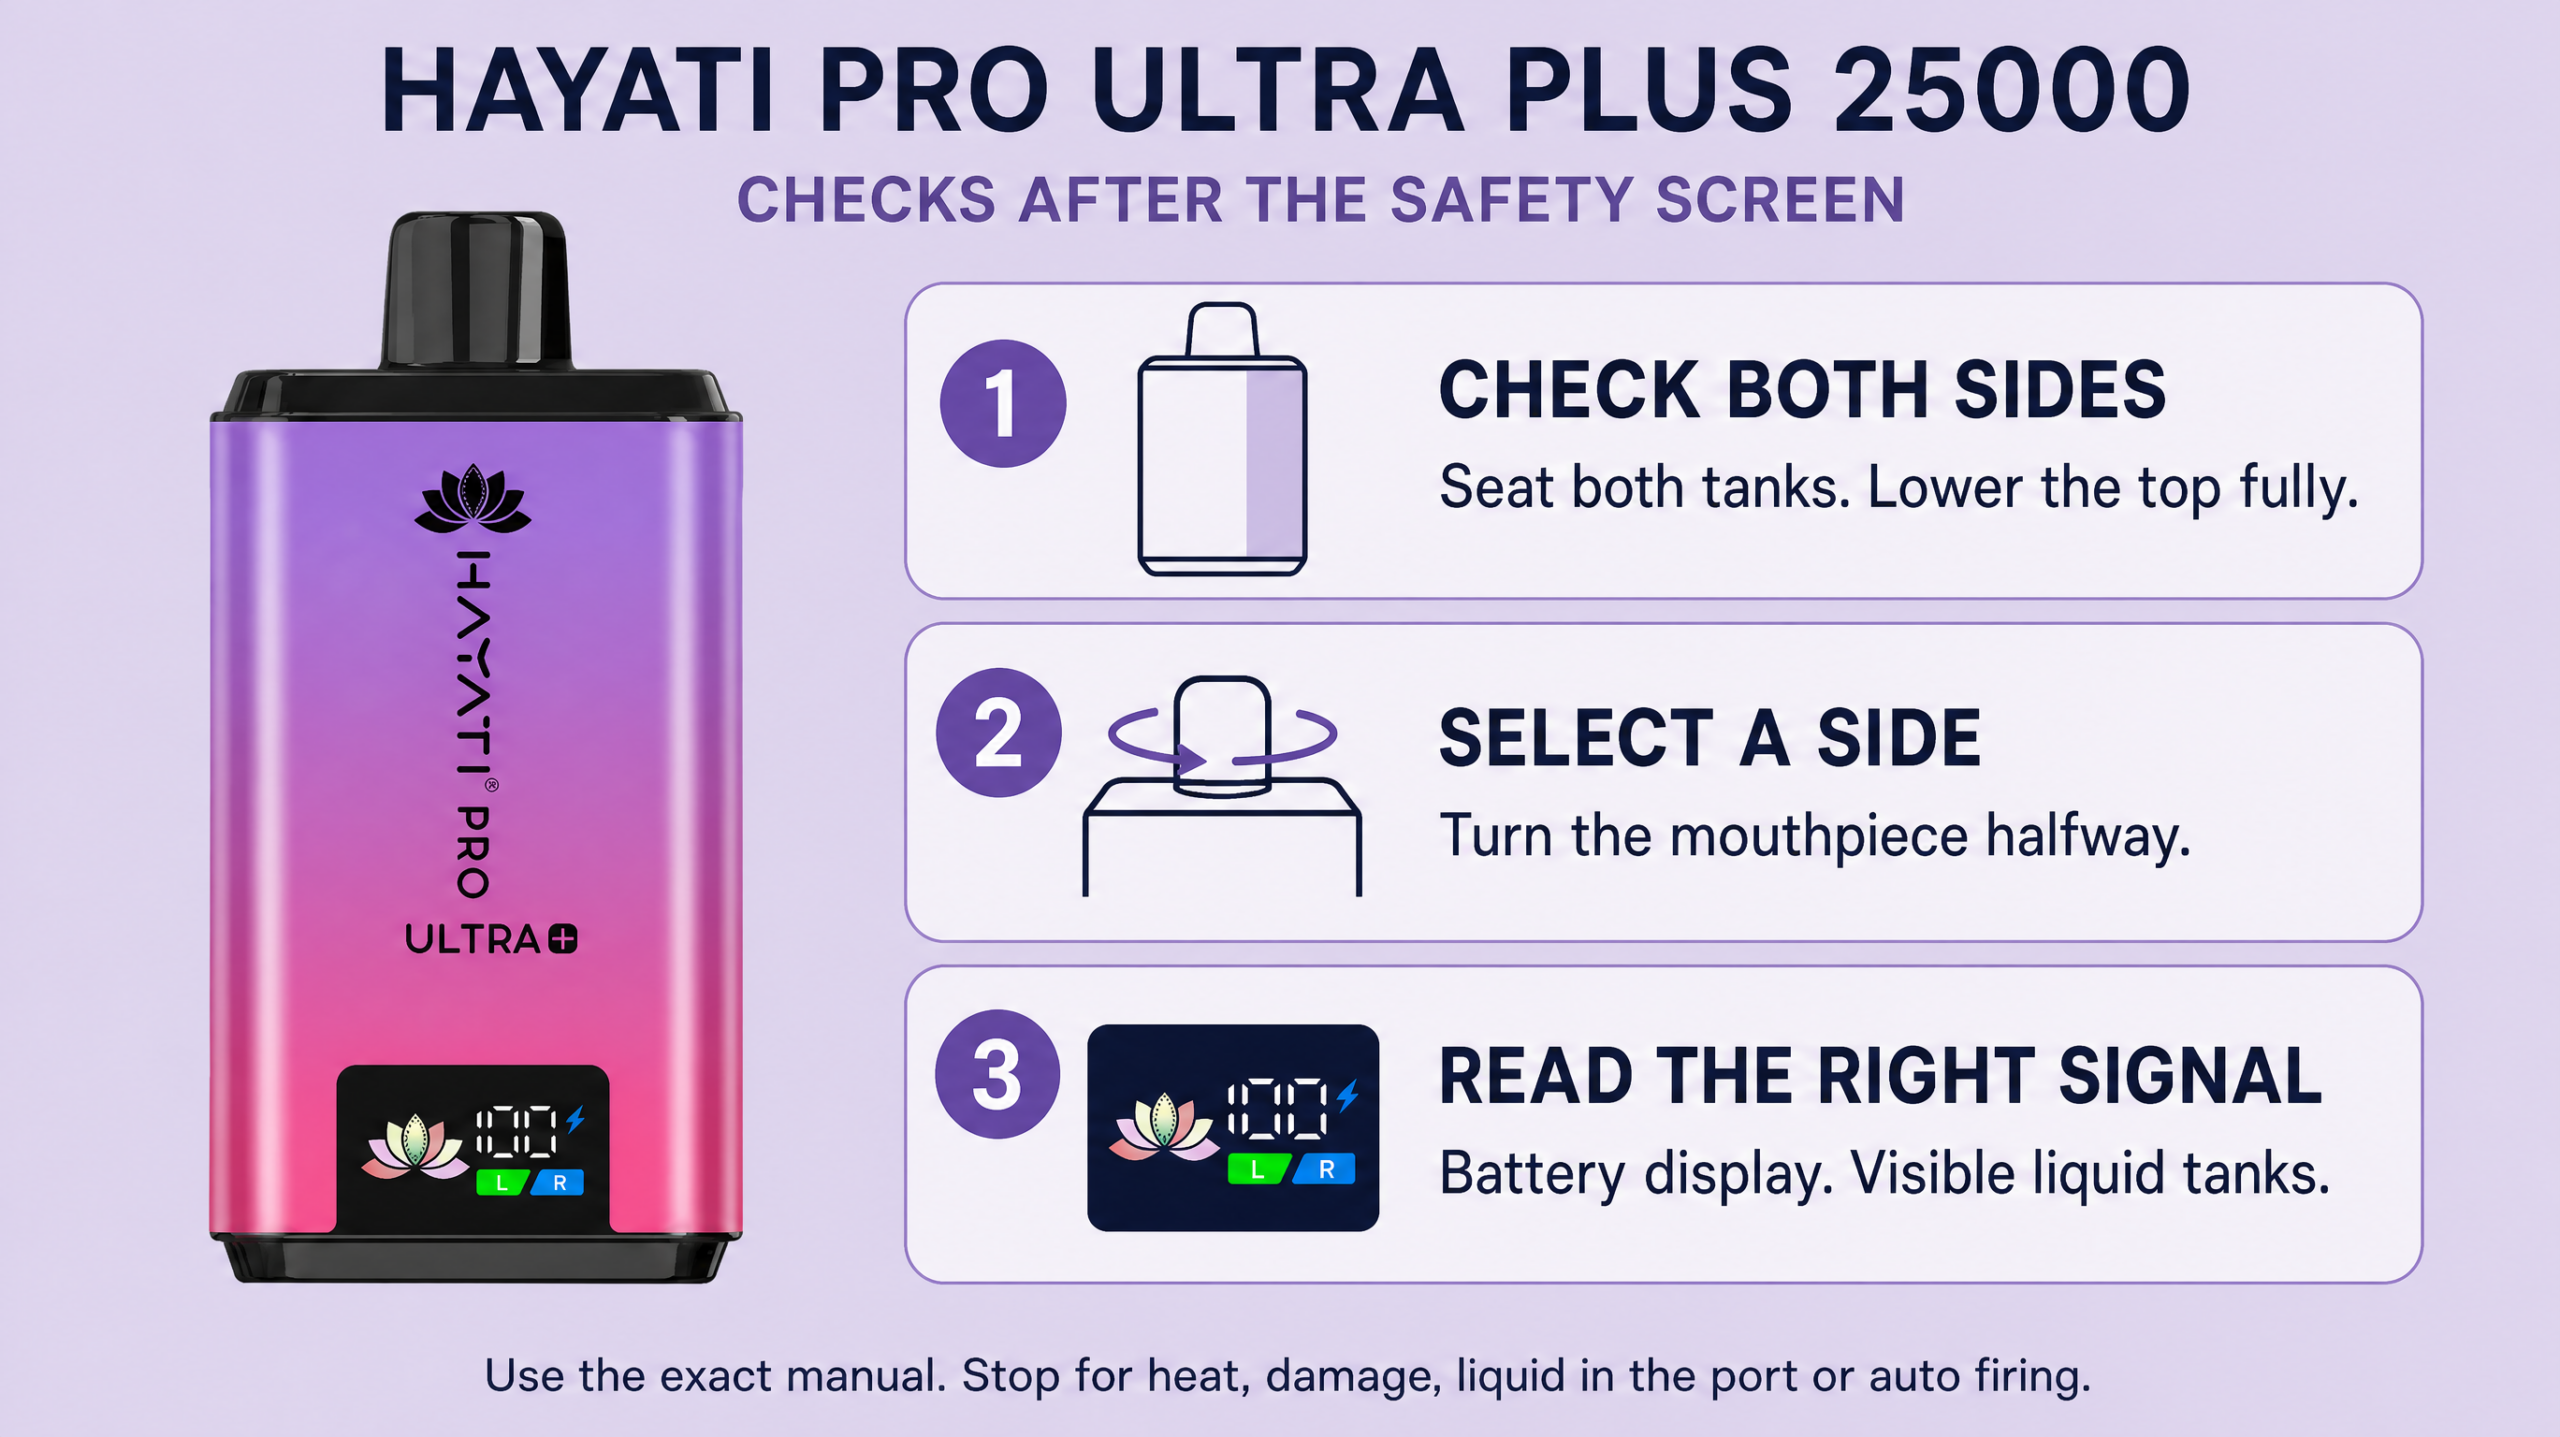
- Hayati Pro Ultra Plus 25000
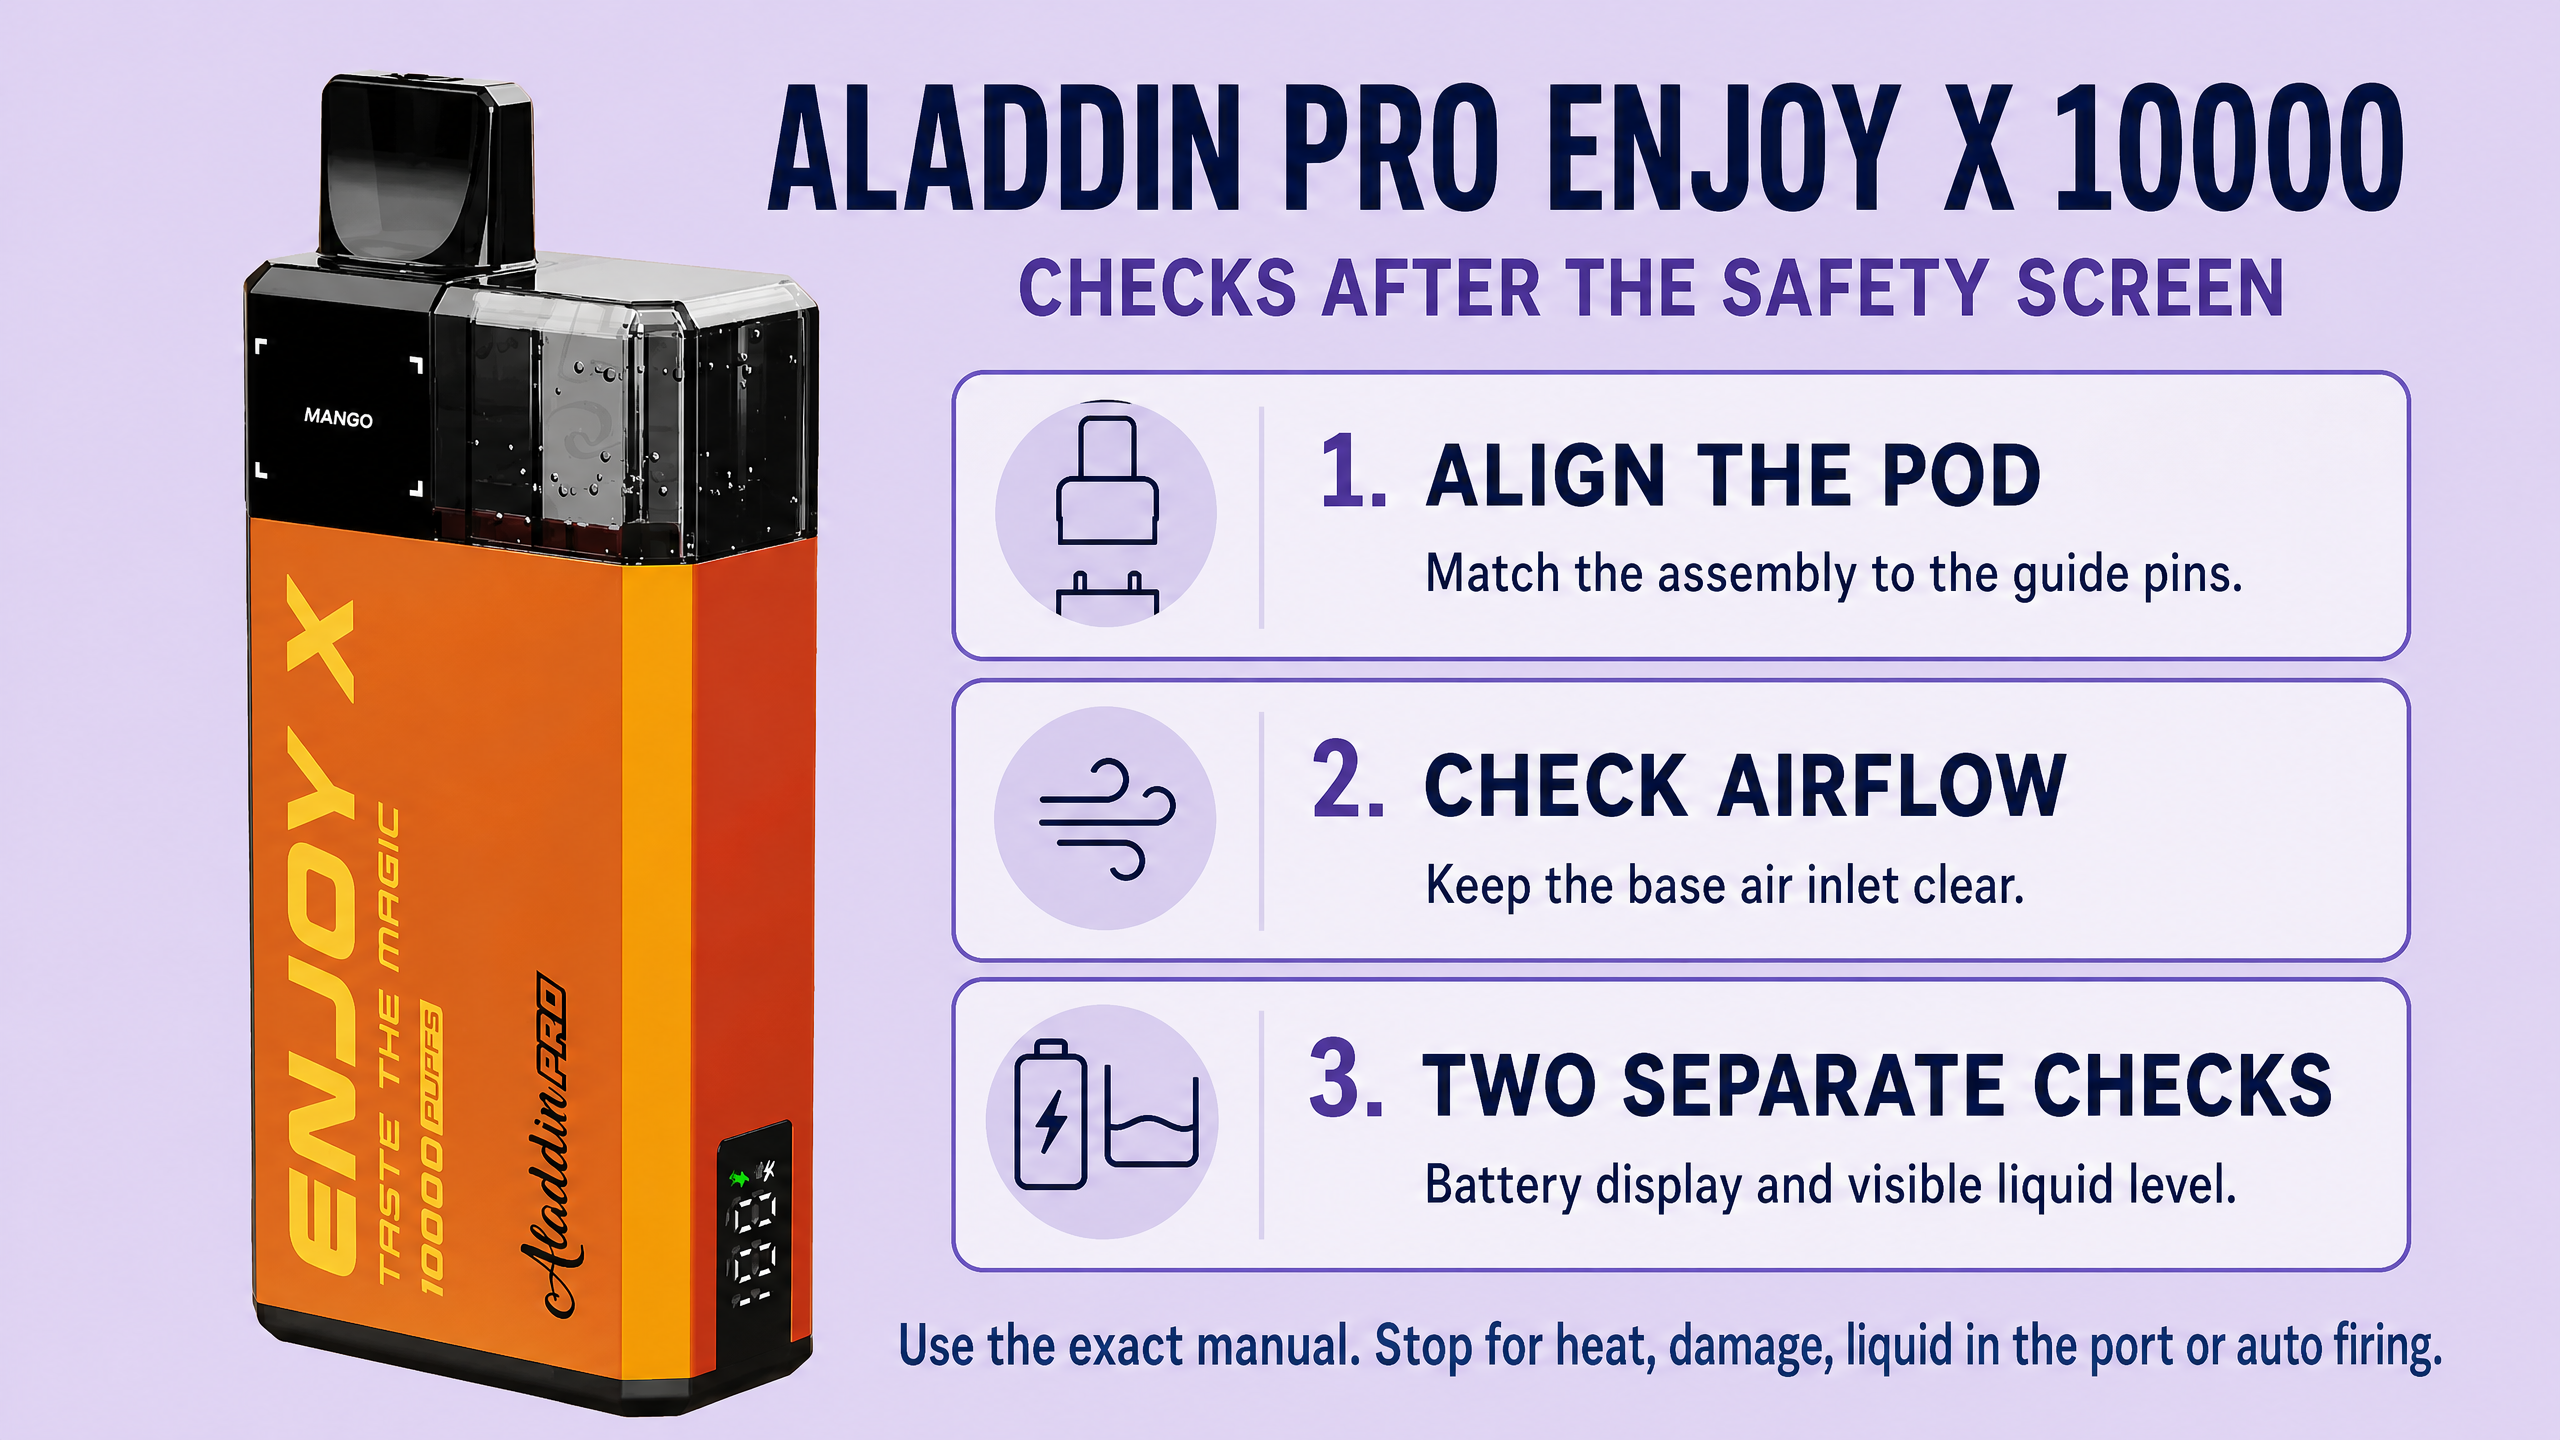
- Aladdin Pro Enjoy X 10000
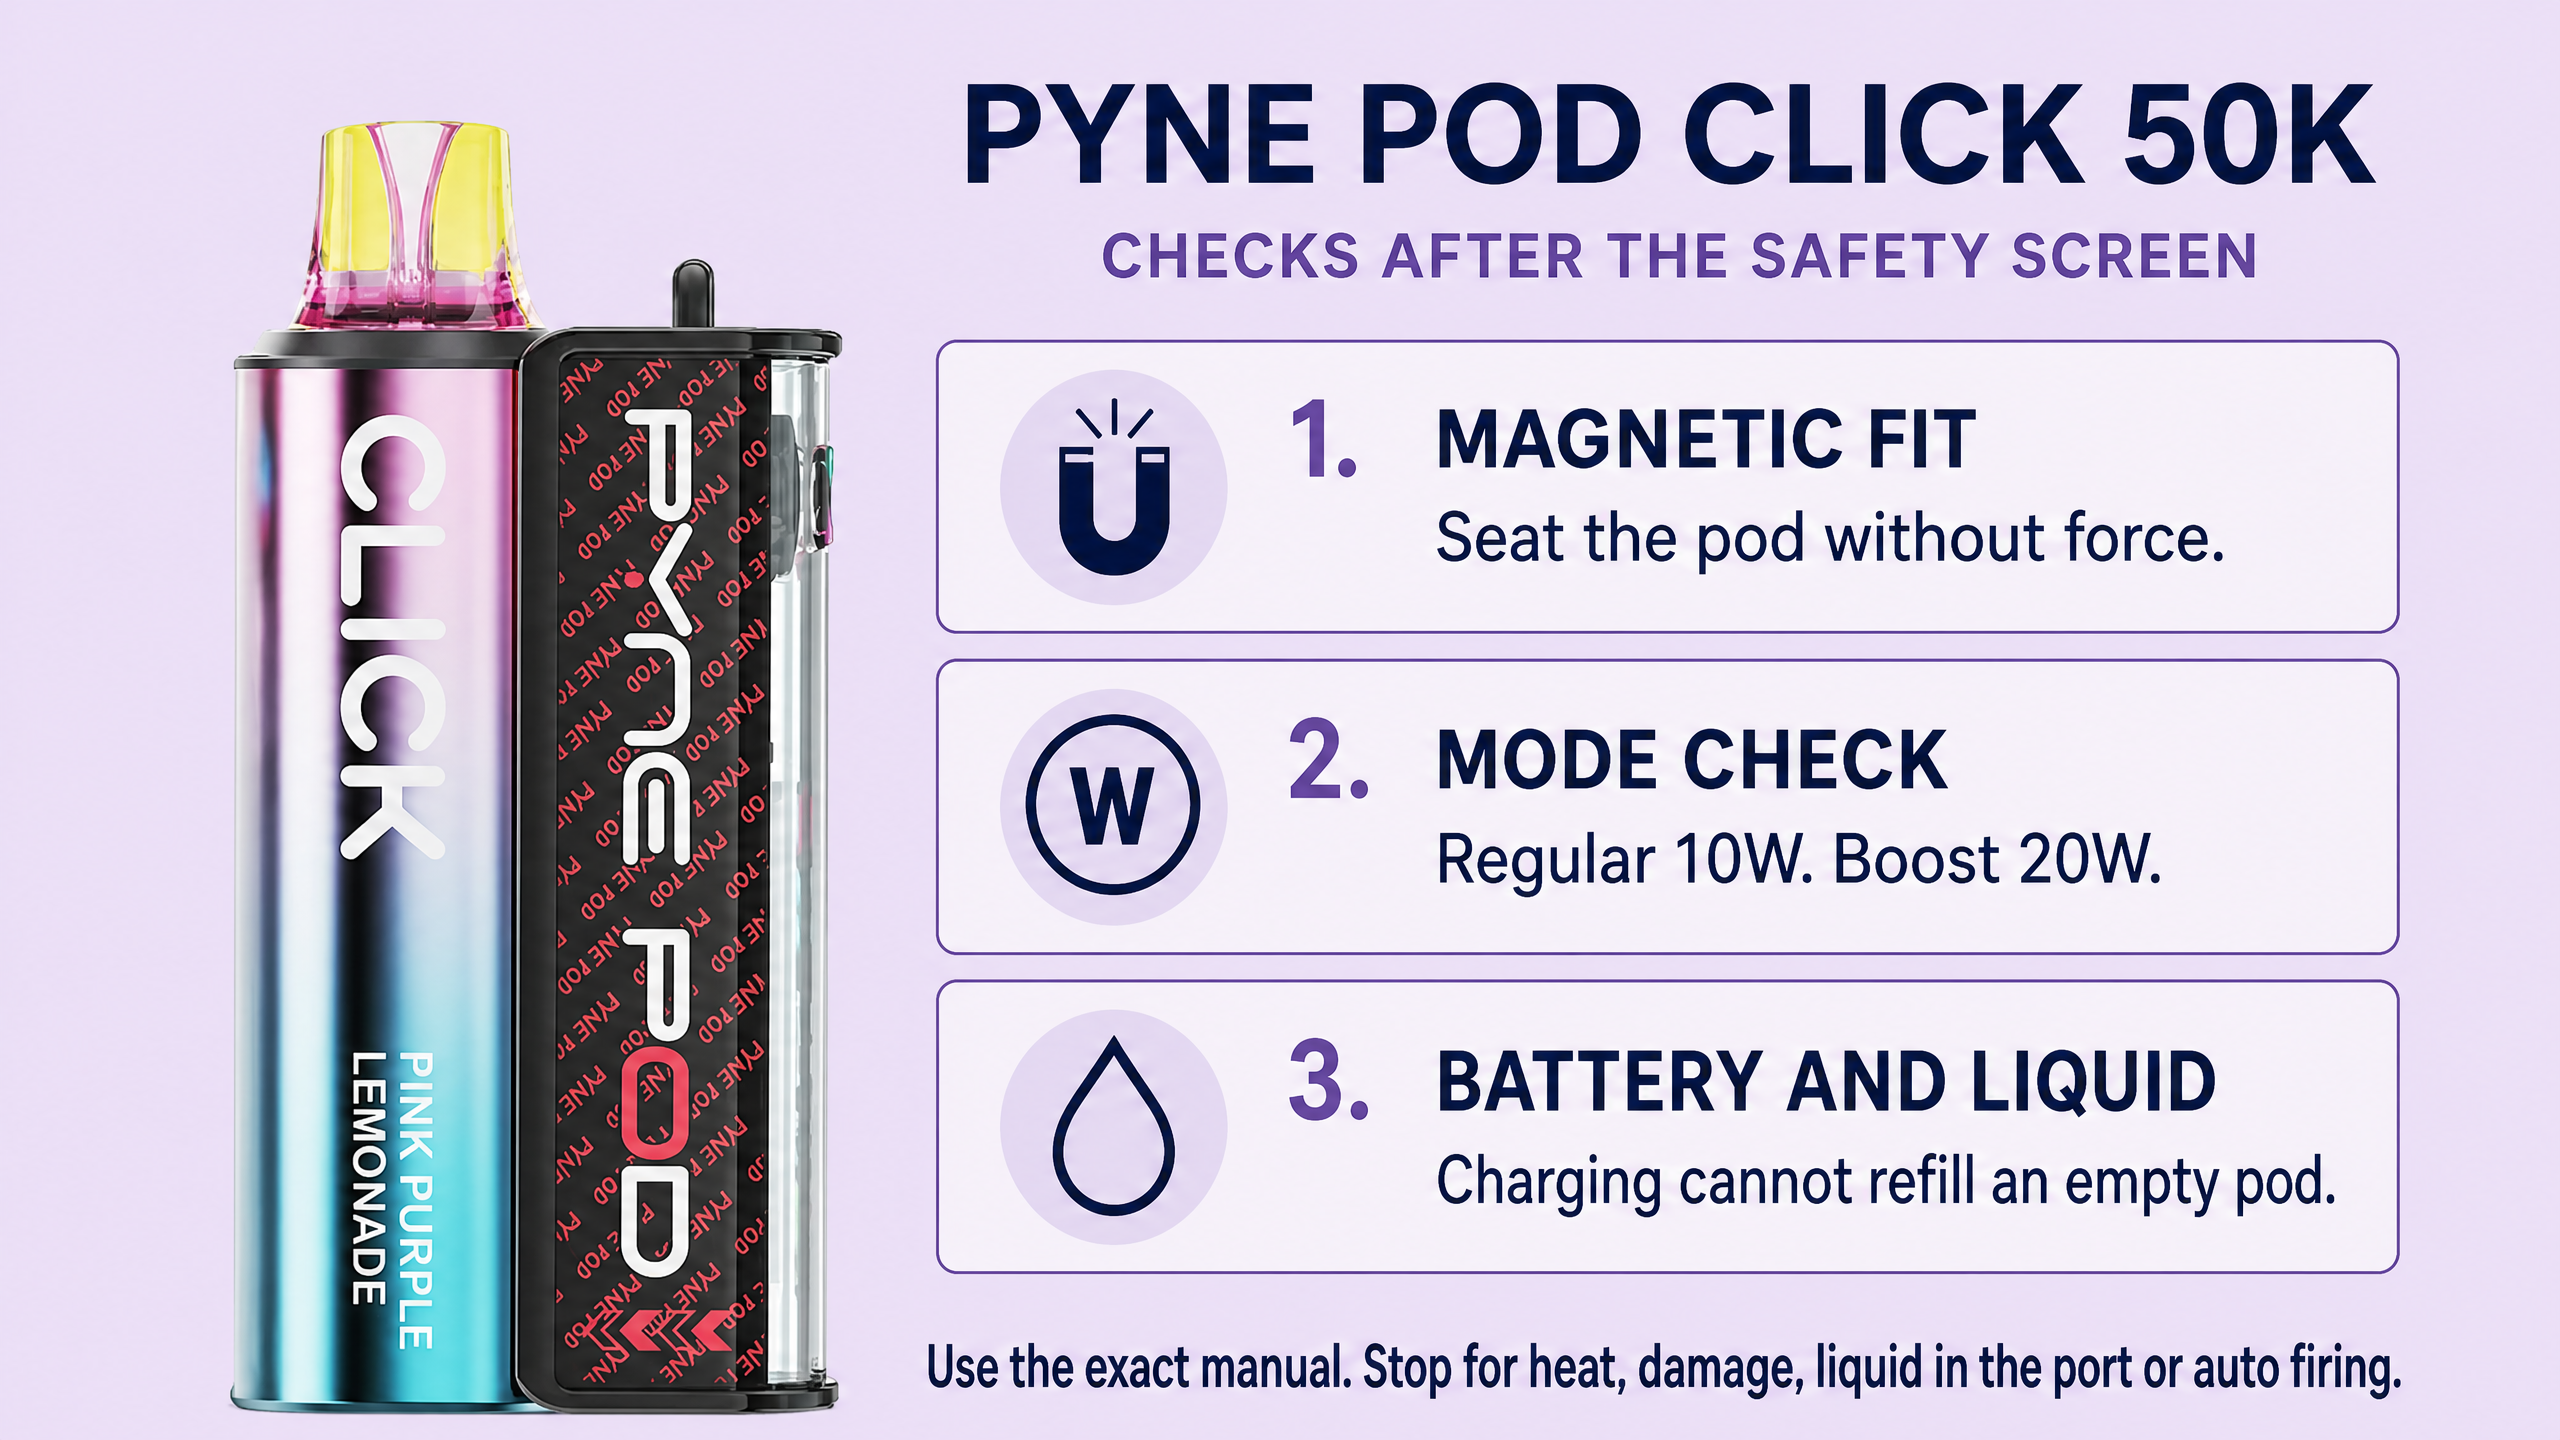
- Pyne Pod Click 50K
- Lost Mary BM6000
- Elf Bar Dual 10K
- Vaporesso XROS 3
- Vaporesso XROS Pro 2
- OXVA XLIM GO 2
- Innokin Go S pen
Where a complete code table could not be verified, the evidence note says so. Do not translate an unexplained flash using another device chapter.
Hyola Ultra 30K troubleshooting
These checks apply to the Hyola Ultra 30K. It is a draw-activated kit with two loaded sides and a mouthpiece selector. The manufacturer specification lists an 800mAh rechargeable battery and USB-C charging.
Display, fit and charging
The front display indicates battery level. It does not establish how much usable liquid remains in each side. Prepare the pod and refill-container parts according to the supplied leaflet, then fit the complete assembly into the magnetic connection. Do not try to force loose components into a space intended for an assembled pack.
The mouthpiece selects the side you draw from. Move it through its intended half-turn and lower it fully into position; follow the supplied leaflet for the lifting action. Charge through USB-C using the specified supply only after the device has passed the safety screen. A USB-C socket alone does not establish a charging-current limit.
Three useful fixes
- No draw after a new pack: check the removable transport seals, complete pack assembly and full seating. There is no fire button to unlock.
- One side seems empty or tastes different: check the selector has settled into the intended side. Judge each side’s liquid and coil separately. Do not keep using a side that tastes burnt.
- Weak output despite liquid remaining: read the battery indication, then inspect the pack’s preparation and connection. Charging and liquid supply are separate checks.
Stop point: a stuck selector, damaged pack, persistent leak or failure with a correctly prepared Ultra 30K replacement needs support. Never force the mouthpiece or pry open a sealed pack. Use only Ultra 30K replacement packs when the fault is an exhausted or damaged compatible consumable.
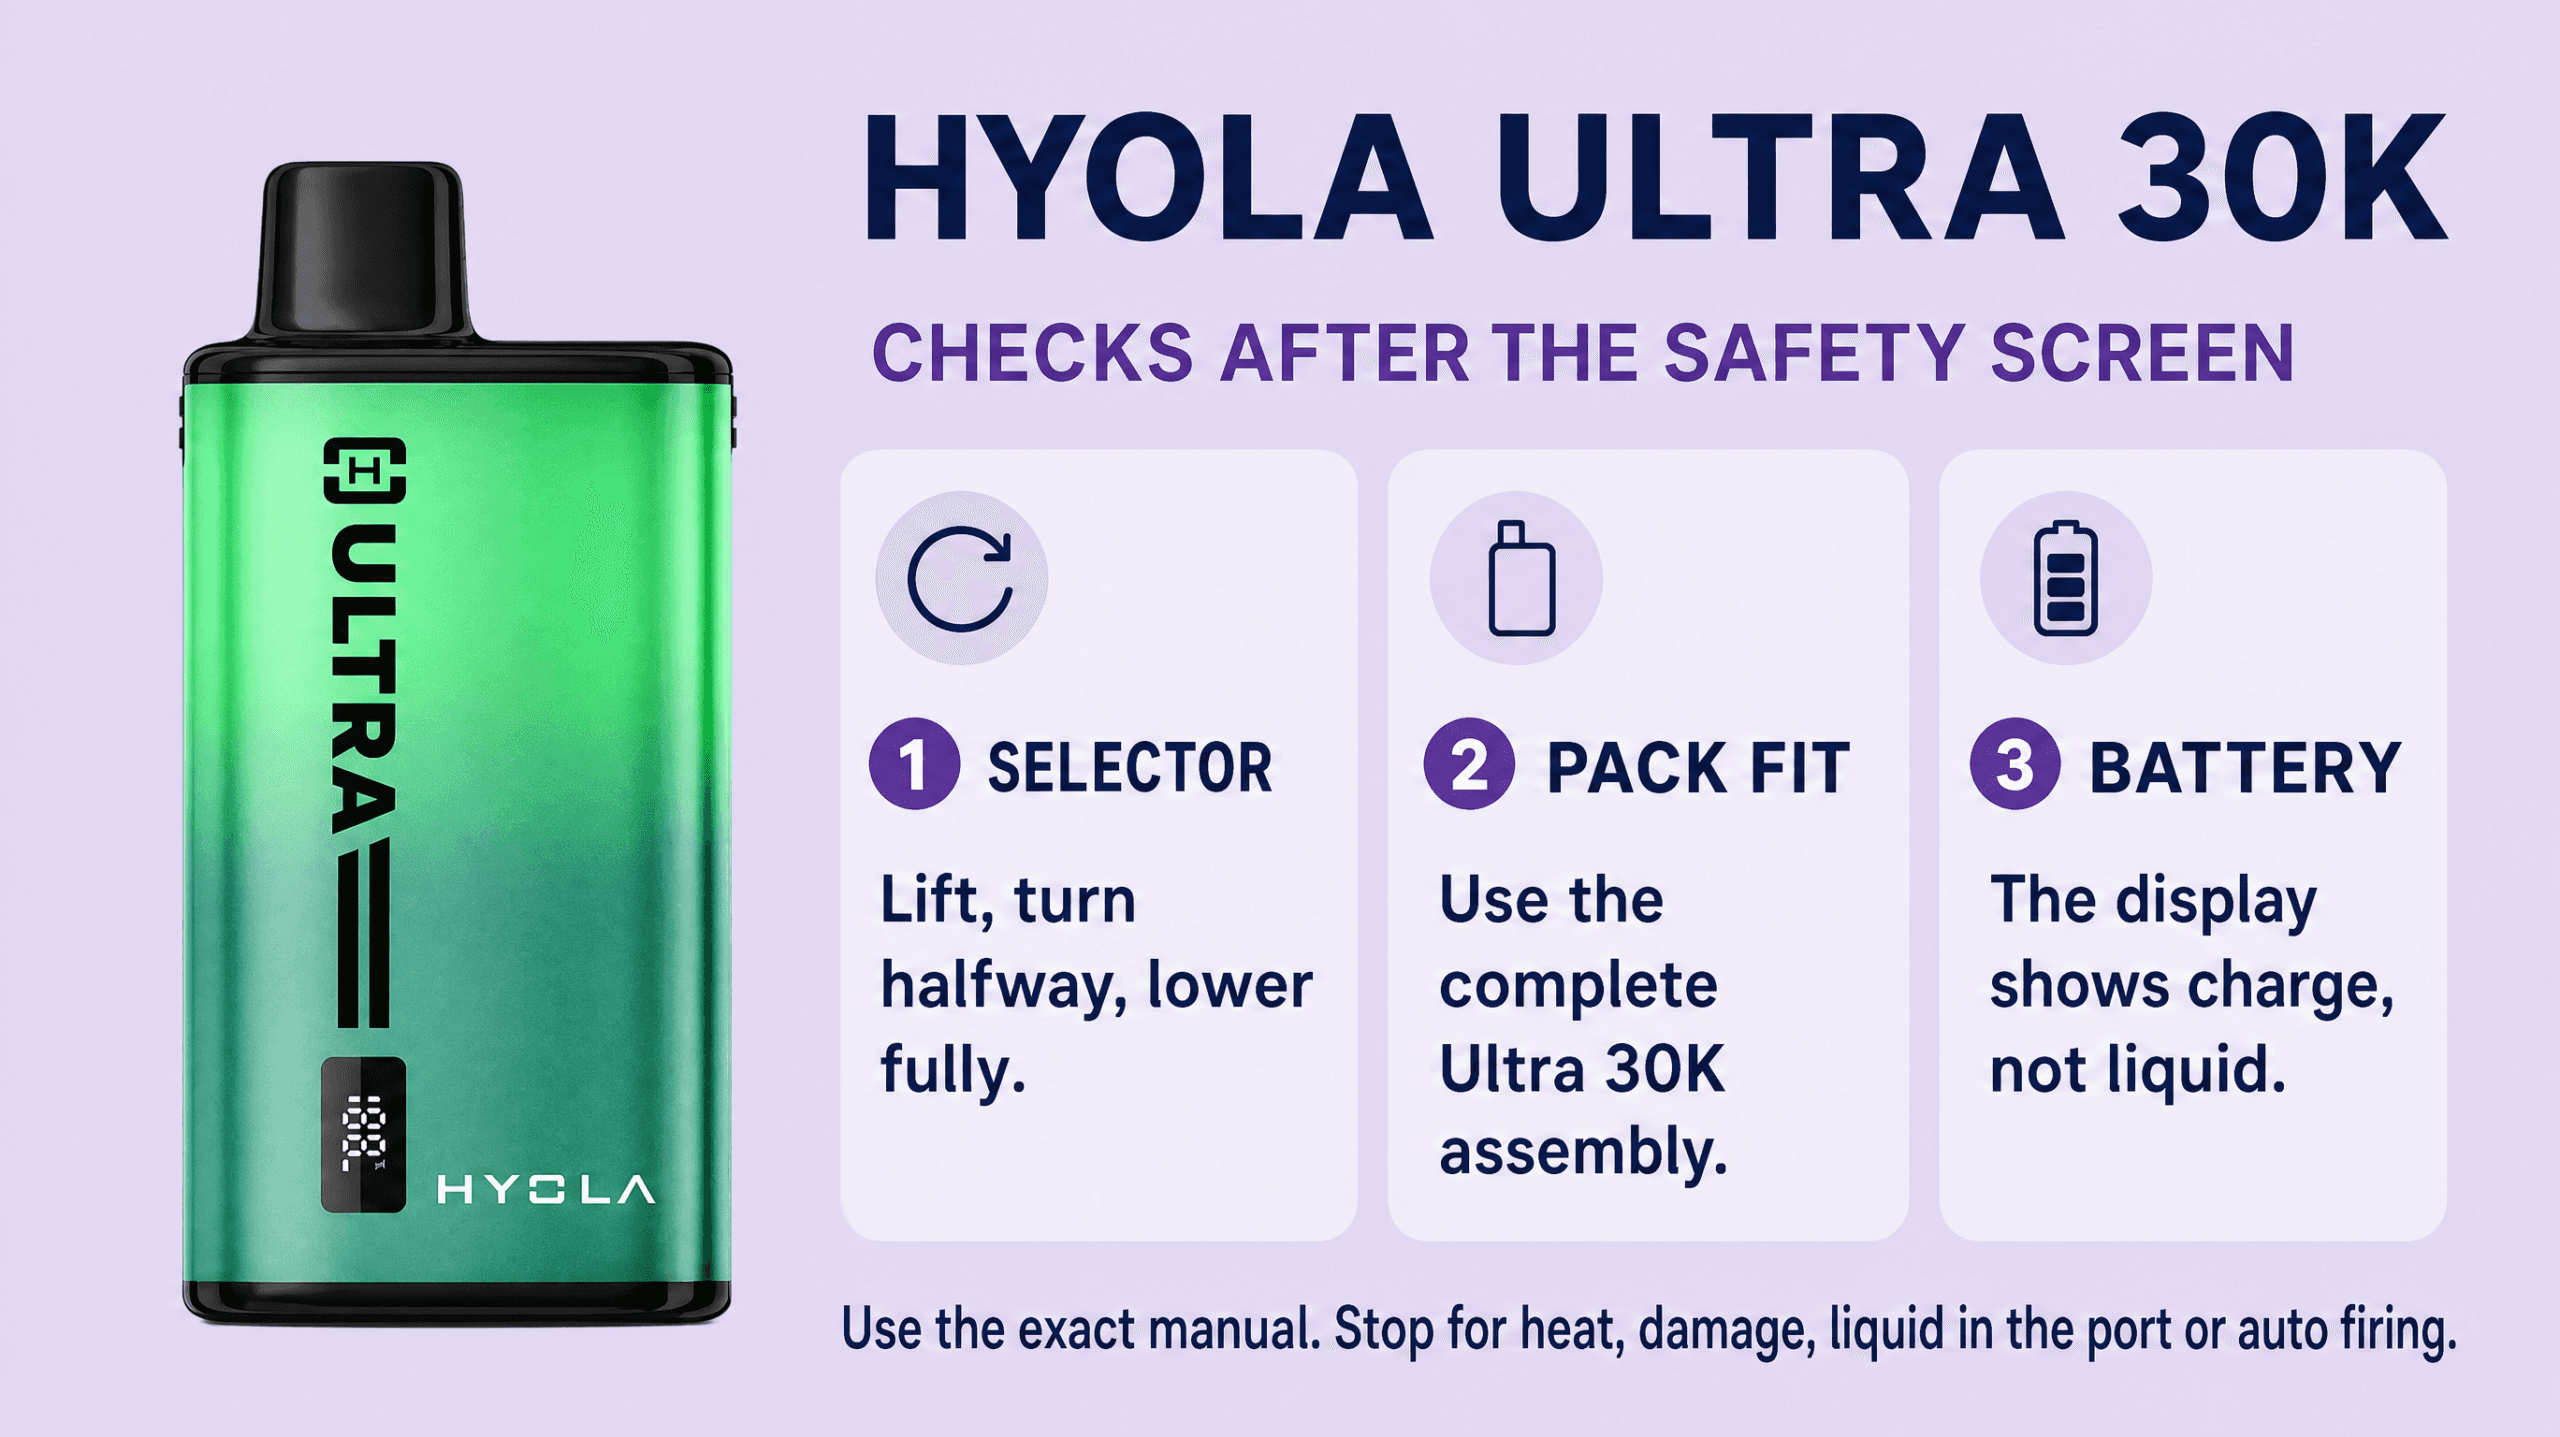
Hyola Ultra 30K source and limits
Hyola confirms the replaceable pod format, magnetic seating, draw activation and USB-C charging. Its individual Ultra 30K product specification lists an 800mAh battery. The linked Vape Forest product page and its setup steps supply the battery-display and lift-and-turn selector details used here.
Hyola Ultra 30K specifications and setup informationEvidence checked 2026-11-11
Limitation: A complete model-specific protection-code table and charging-current limit were not verified. No flash-count translation, full-charge time or cable-in-box promise is given.
Hayati Pro Ultra Plus 25000 troubleshooting
Match the name Hayati Pro Ultra Plus 25000, also written Pro Ultra Plus 25K. This chapter covers that replaceable-pack model. Its two tanks and independent coils mean a fault on one selected side does not automatically diagnose the battery.
Display, fit and charging
The manufacturer identifies a battery display and transparent liquid tanks. Read those separately. A changing animation does not replace a documented warning code. The kit uses an 850mAh rechargeable battery, and our product instructions specify USB-C charging.
For a fresh pack, remove the transport seals identified in the leaflet, fit a tank into each side and lower the mouthpiece section until it sits flat. The mouthpiece turns halfway around to change the selected side. If the top will not sit flat, stop and recheck orientation and compatibility rather than pressing harder.
Three useful fixes
- No vapour after replacement: confirm both tanks are correctly seated and the top section is fully down. Check dry accessible contacts and remaining battery charge.
- Only one side produces vapour: finish the selector movement, then inspect that side’s liquid supply and preparation. A working opposite side narrows the check but does not make a leaking or damaged pack acceptable.
- Burnt taste with a charged display: stop using the affected side. Check its supply and replace the compatible pack if the coil remains burnt. Recharging cannot restore a scorched wick.
Stop point: do not force the top, refill the sealed tanks with bottled liquid or translate flashes from another Hayati model. If the correct replacement does not resolve the fault, contact support. Our Pro Ultra Plus refill guide explains the pack replacement procedure, and the matching replacement pack identifies the correct consumable.
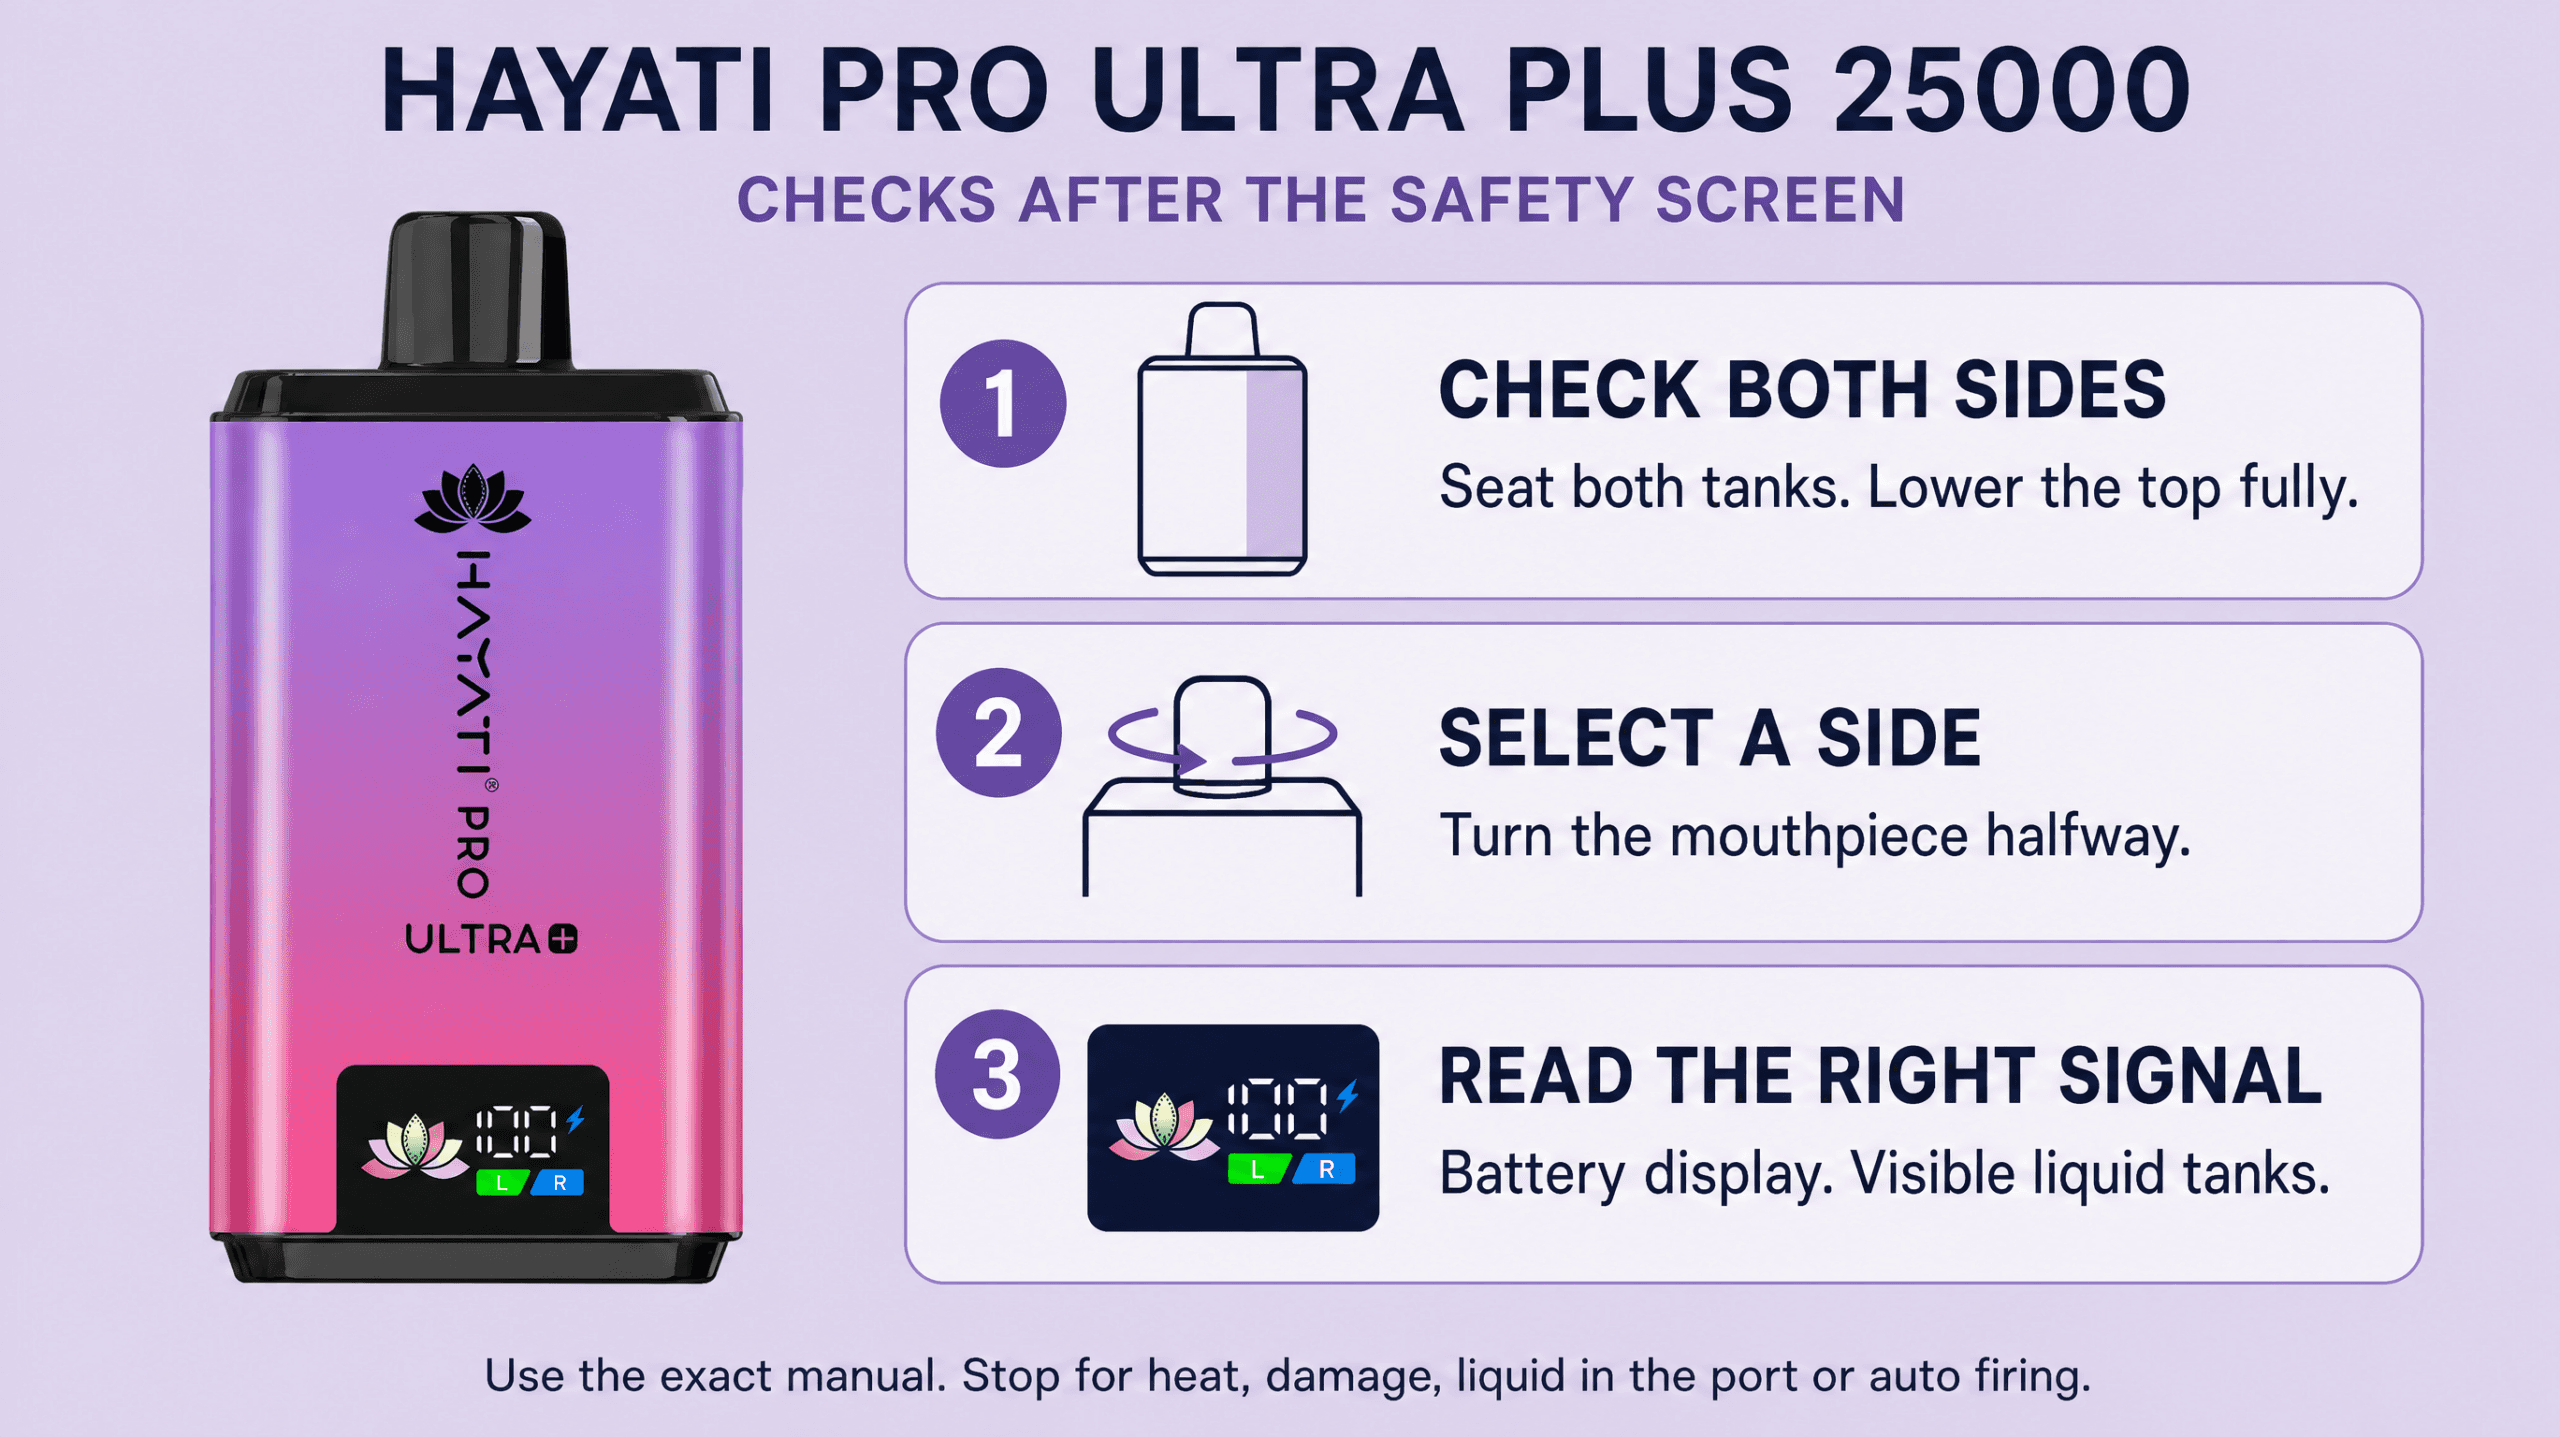
Hayati Pro Ultra Plus 25000 source and limits
Hayati identifies the dual independent coil and tank arrangement, twist mouthpiece, visible liquid tanks, battery display and 850mAh battery. The Vape Forest product instructions confirm USB-C charging, pushing both tanks into place and lowering the mouthpiece section flat.
Hayati Pro Ultra Plus manufacturer product informationEvidence checked 2026-11-11
Limitation: No complete protection-code table, numeric charging input or manufacturer full-charge time was verified. Liquid-capacity arithmetic that differs between pages is not used.
Aladdin Pro Enjoy X 10000 troubleshooting
The Aladdin Pro Enjoy X 10000 uses a rechargeable body and a replacement prefilled pod assembly. Our current product instructions list an 800mAh battery, USB-C charging, a side battery display and adjustable airflow at the base.
Display, fit and charging
Read the side display for charge and the clear pod for liquid. Prepare a new pack by removing only the indicated protective sticker and removable silicone cap. Join its refill container to the pod in the orientation shown on the pack, then align the complete assembly with the device’s guide pins and seat it fully.
Allow the first-use waiting time stated in the supplied instructions. A full reservoir does not prove the coil has finished saturating. Charge through the Type-C port using the specified setup. We could not verify a manufacturer charging-current rating or timed charging claim, so neither is used here.
Three useful fixes
- New pod will not sit correctly: check that the pod and container are joined and that the assembly follows the guide pins. Do not push it in at an angle or trim a part.
- Draw is unusually tight: check the airflow adjustment at the base and make sure a finger, label or case is not covering the inlet. Do not probe inside it.
- Battery display looks healthy but vapour is absent: check the liquid supply, initial preparation and correct pack fit. Replace an exhausted or persistently burnt pack instead of charging again.
Stop point: damaged guides, liquid entering the body, a repeated connection fault or unexplained flashing needs retailer or manufacturer help. Use the full Enjoy X name when identifying replacement pods. Shared branding alone is not proof that another range fits.
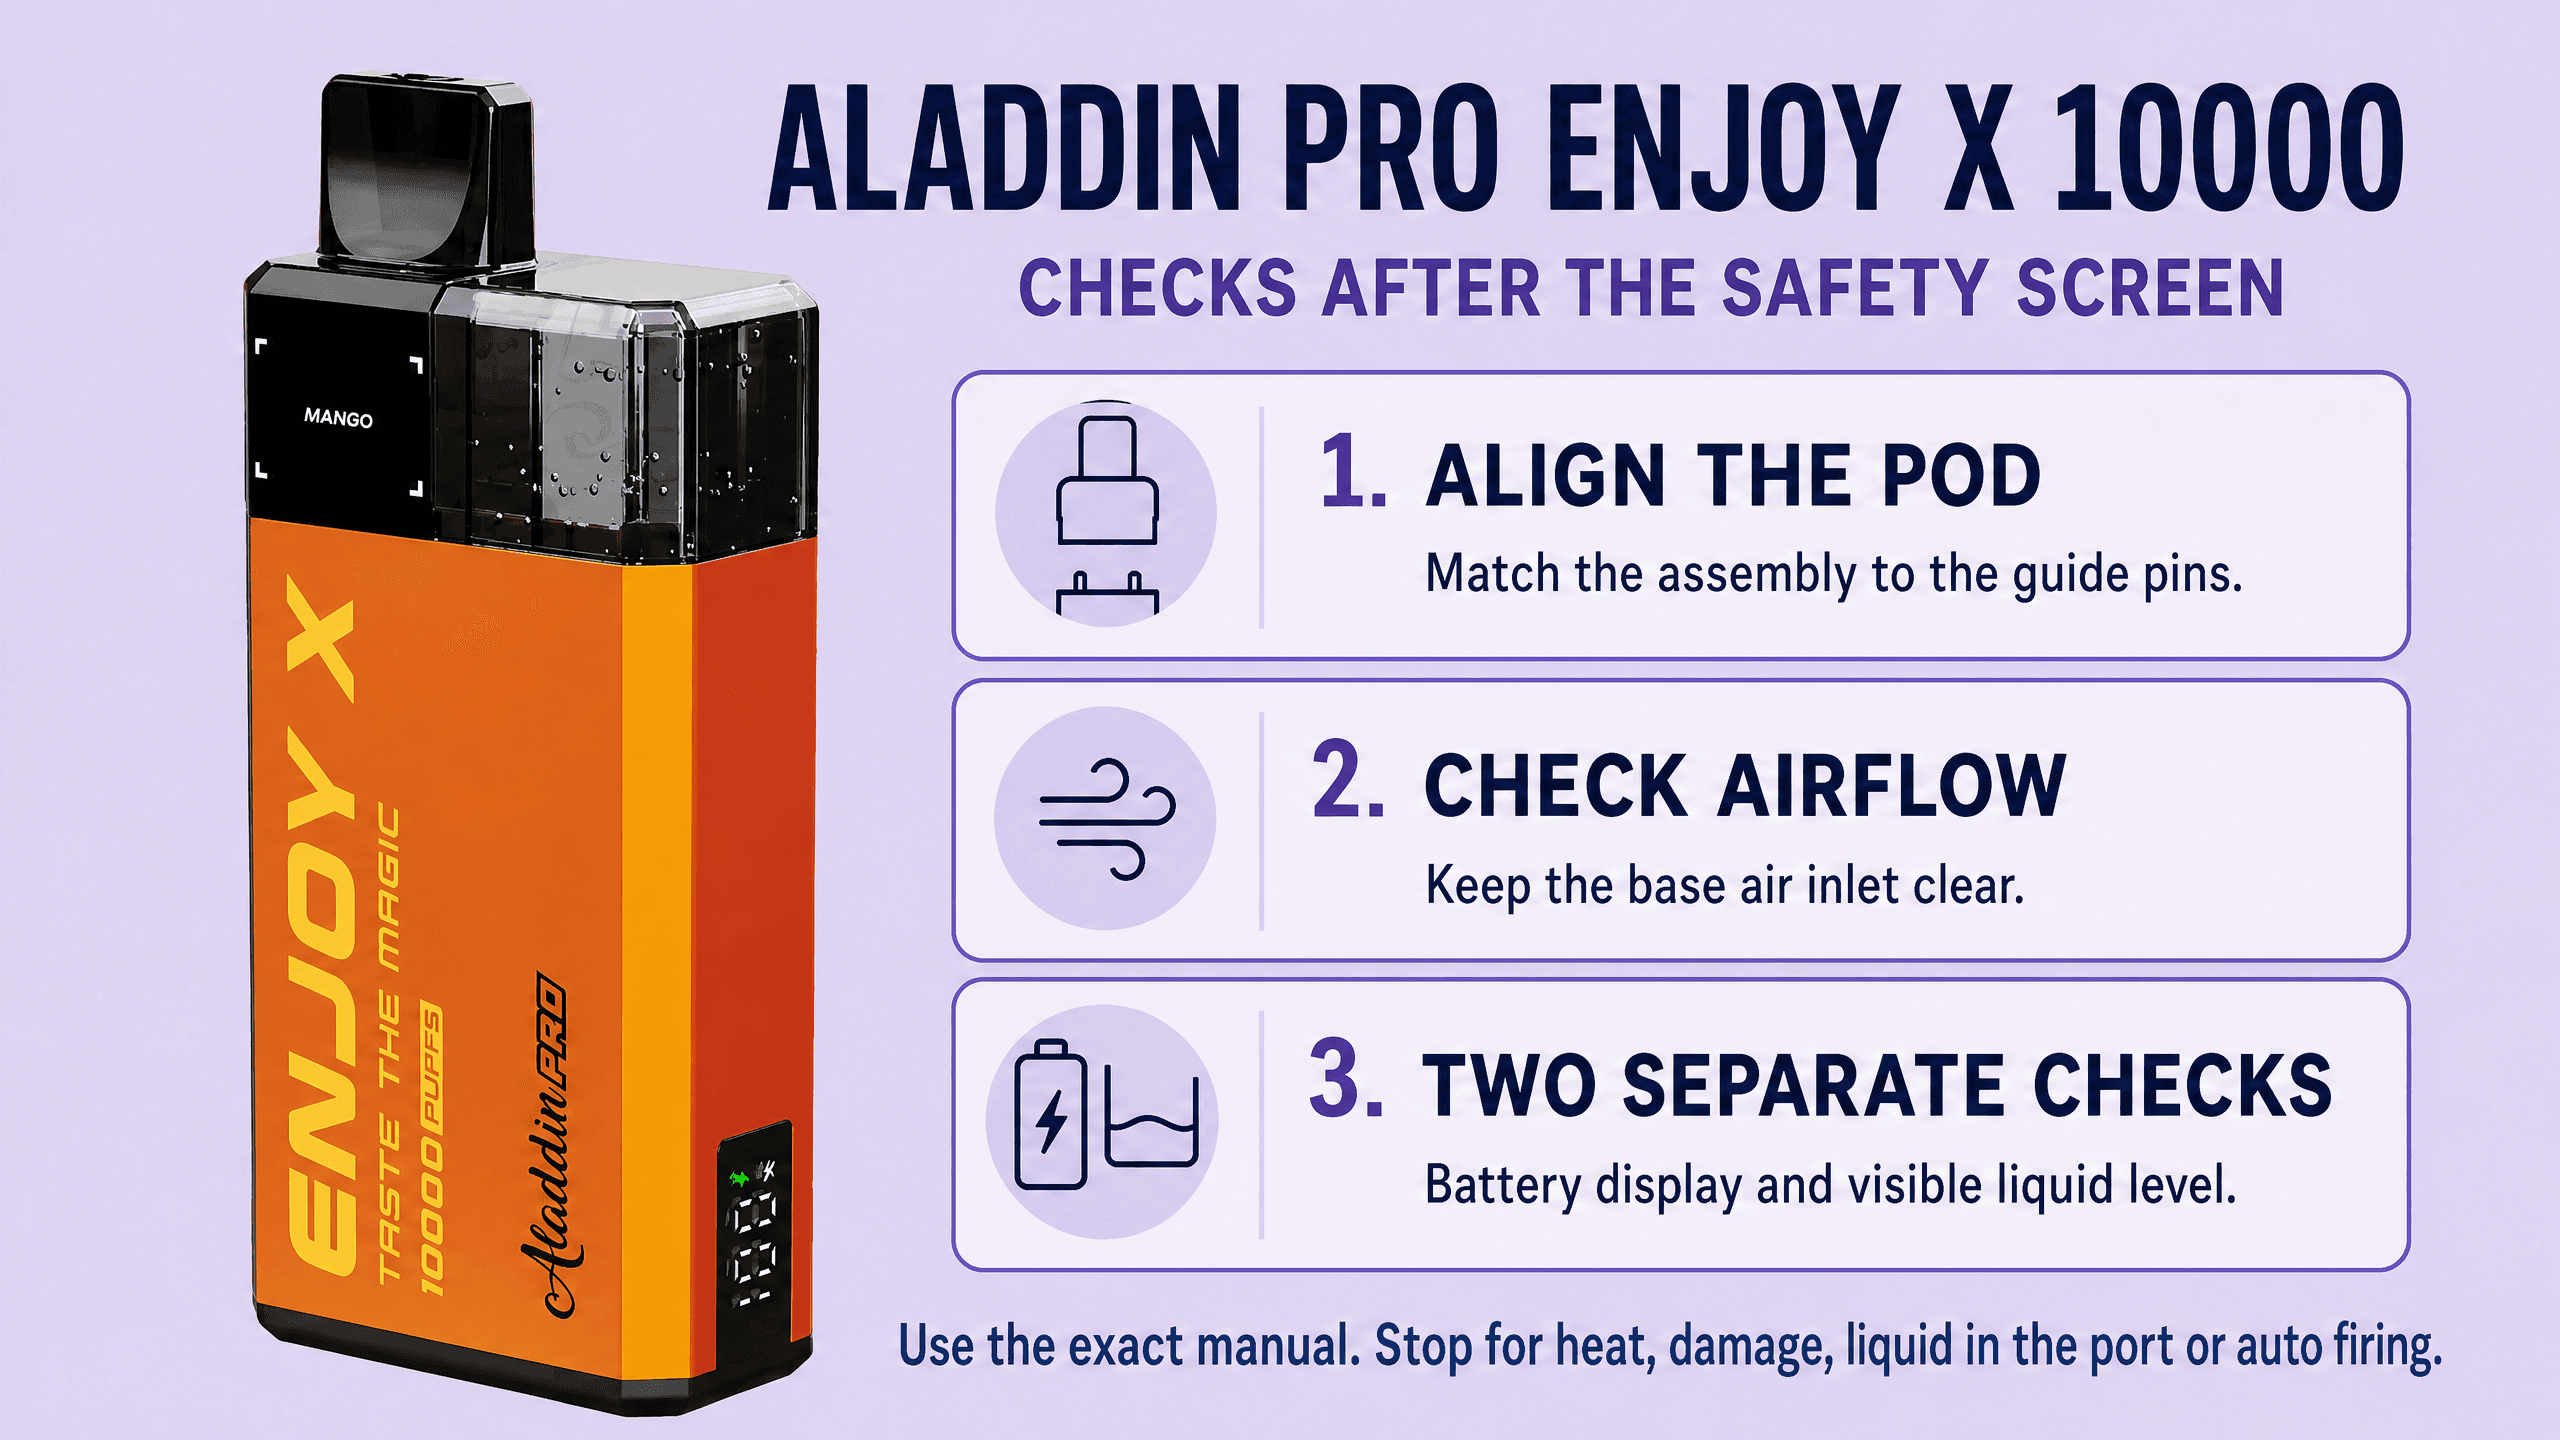
Aladdin Pro Enjoy X 10000 source and limits
The current catalogue instructions specify an 800mAh battery, USB-C, a side battery display, adjustable base airflow, a pod joined to its refill container and alignment with device guide pins. These are catalogue facts, not an independently checked manufacturer fault-code table.
Vape Forest Enjoy X 10000 product specifications and setupEvidence checked 2026-11-11
Limitation: A primary manufacturer manual, flash-code table, exact first-use waiting time and charging-current rating could not be verified. The supplied leaflet remains necessary for those details.
Pyne Pod Click 50K troubleshooting
The Pyne Pod Click 50K has a magnetic pod connection and an inhale-activated system. Our listing specifies a 750mAh rechargeable battery, USB-C charging and two settings: Regular at 10W and Boost at 20W. Its airflow is listed as fixed.
Display, fit and charging
Our product page describes battery and liquid indications. It does not explain the calculation behind the liquid reading, so do not treat a displayed level as proof that the working coil is supplied. The advertised 50K name is not a battery charge counter or a reason to continue using an empty pod.
Prepare the correct pod pack as its leaflet shows, then align and seat the magnetic connection without twisting it like a threaded tank. Charge through USB-C using the specified supply. Do not assume that its modest battery size means it needs a stronger charger or that one charge should last through every supplied pod.
Three useful fixes
- No response after swapping pods: inspect the accessible connection, check the transport parts have been removed as instructed and reseat the compatible assembly squarely.
- Output or runtime changed: check whether Regular or Boost is selected. Use the supplied leaflet for the control sequence. We have not verified a universal click sequence for this model.
- Full-looking reading but burnt taste: stop using that pod. Check preparation and visible condition; an indicator is not permission to keep firing a dry or burnt coil.
Stop point: an assembly that will not stay seated, an unexplained error or failure with the correct replacement needs support. Do not add magnets or foil to the connection. Confirm the exact compatible replacement with the packet or retailer before ordering because the word Click appears on more than one model.
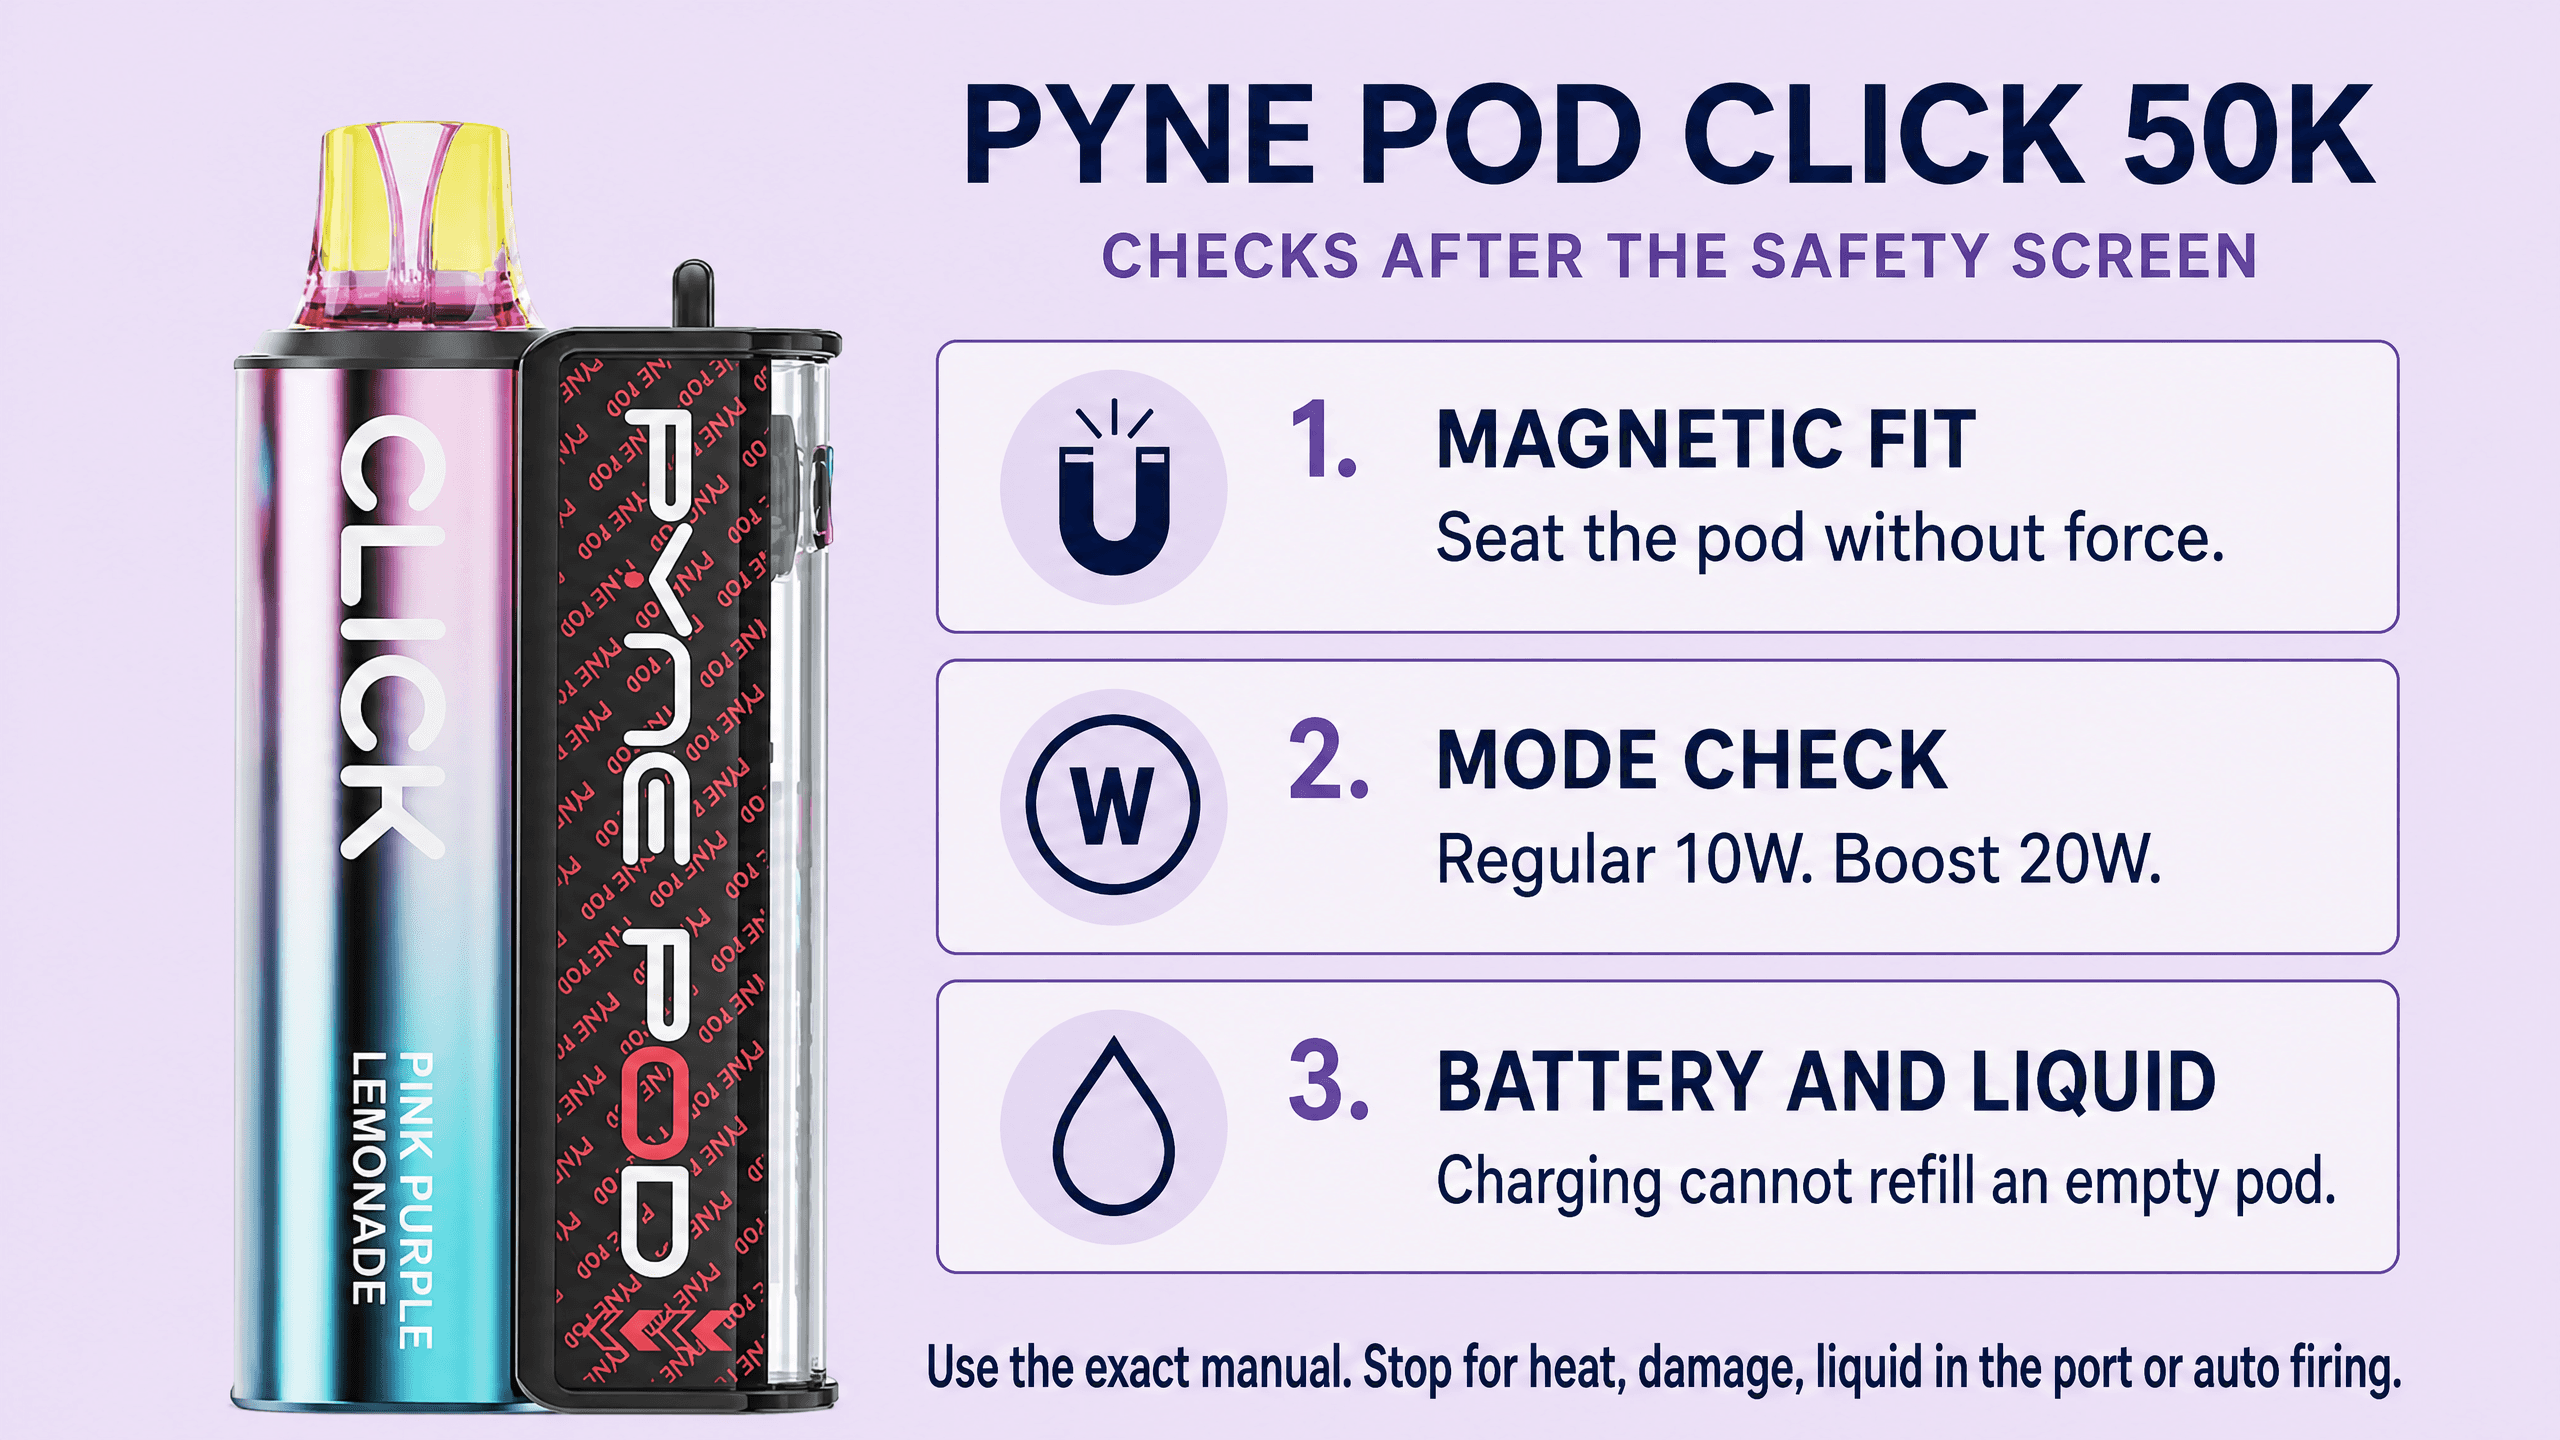
Pyne Pod Click 50K source and limits
The product page identifies the magnetic pod connection, inhale activation, fixed airflow, USB-C, a 750mAh battery and Regular 10W and Boost 20W settings. It describes battery and liquid indicators without providing a diagnostic code table.
Vape Forest Pyne Pod Click 50K specification and setupEvidence checked 2026-11-11
Limitation: A primary manufacturer manual, the mode-change button sequence, screen estimation method and exact charging input were not verified. No reset, flash-count translation or liquid-percentage guarantee is given.
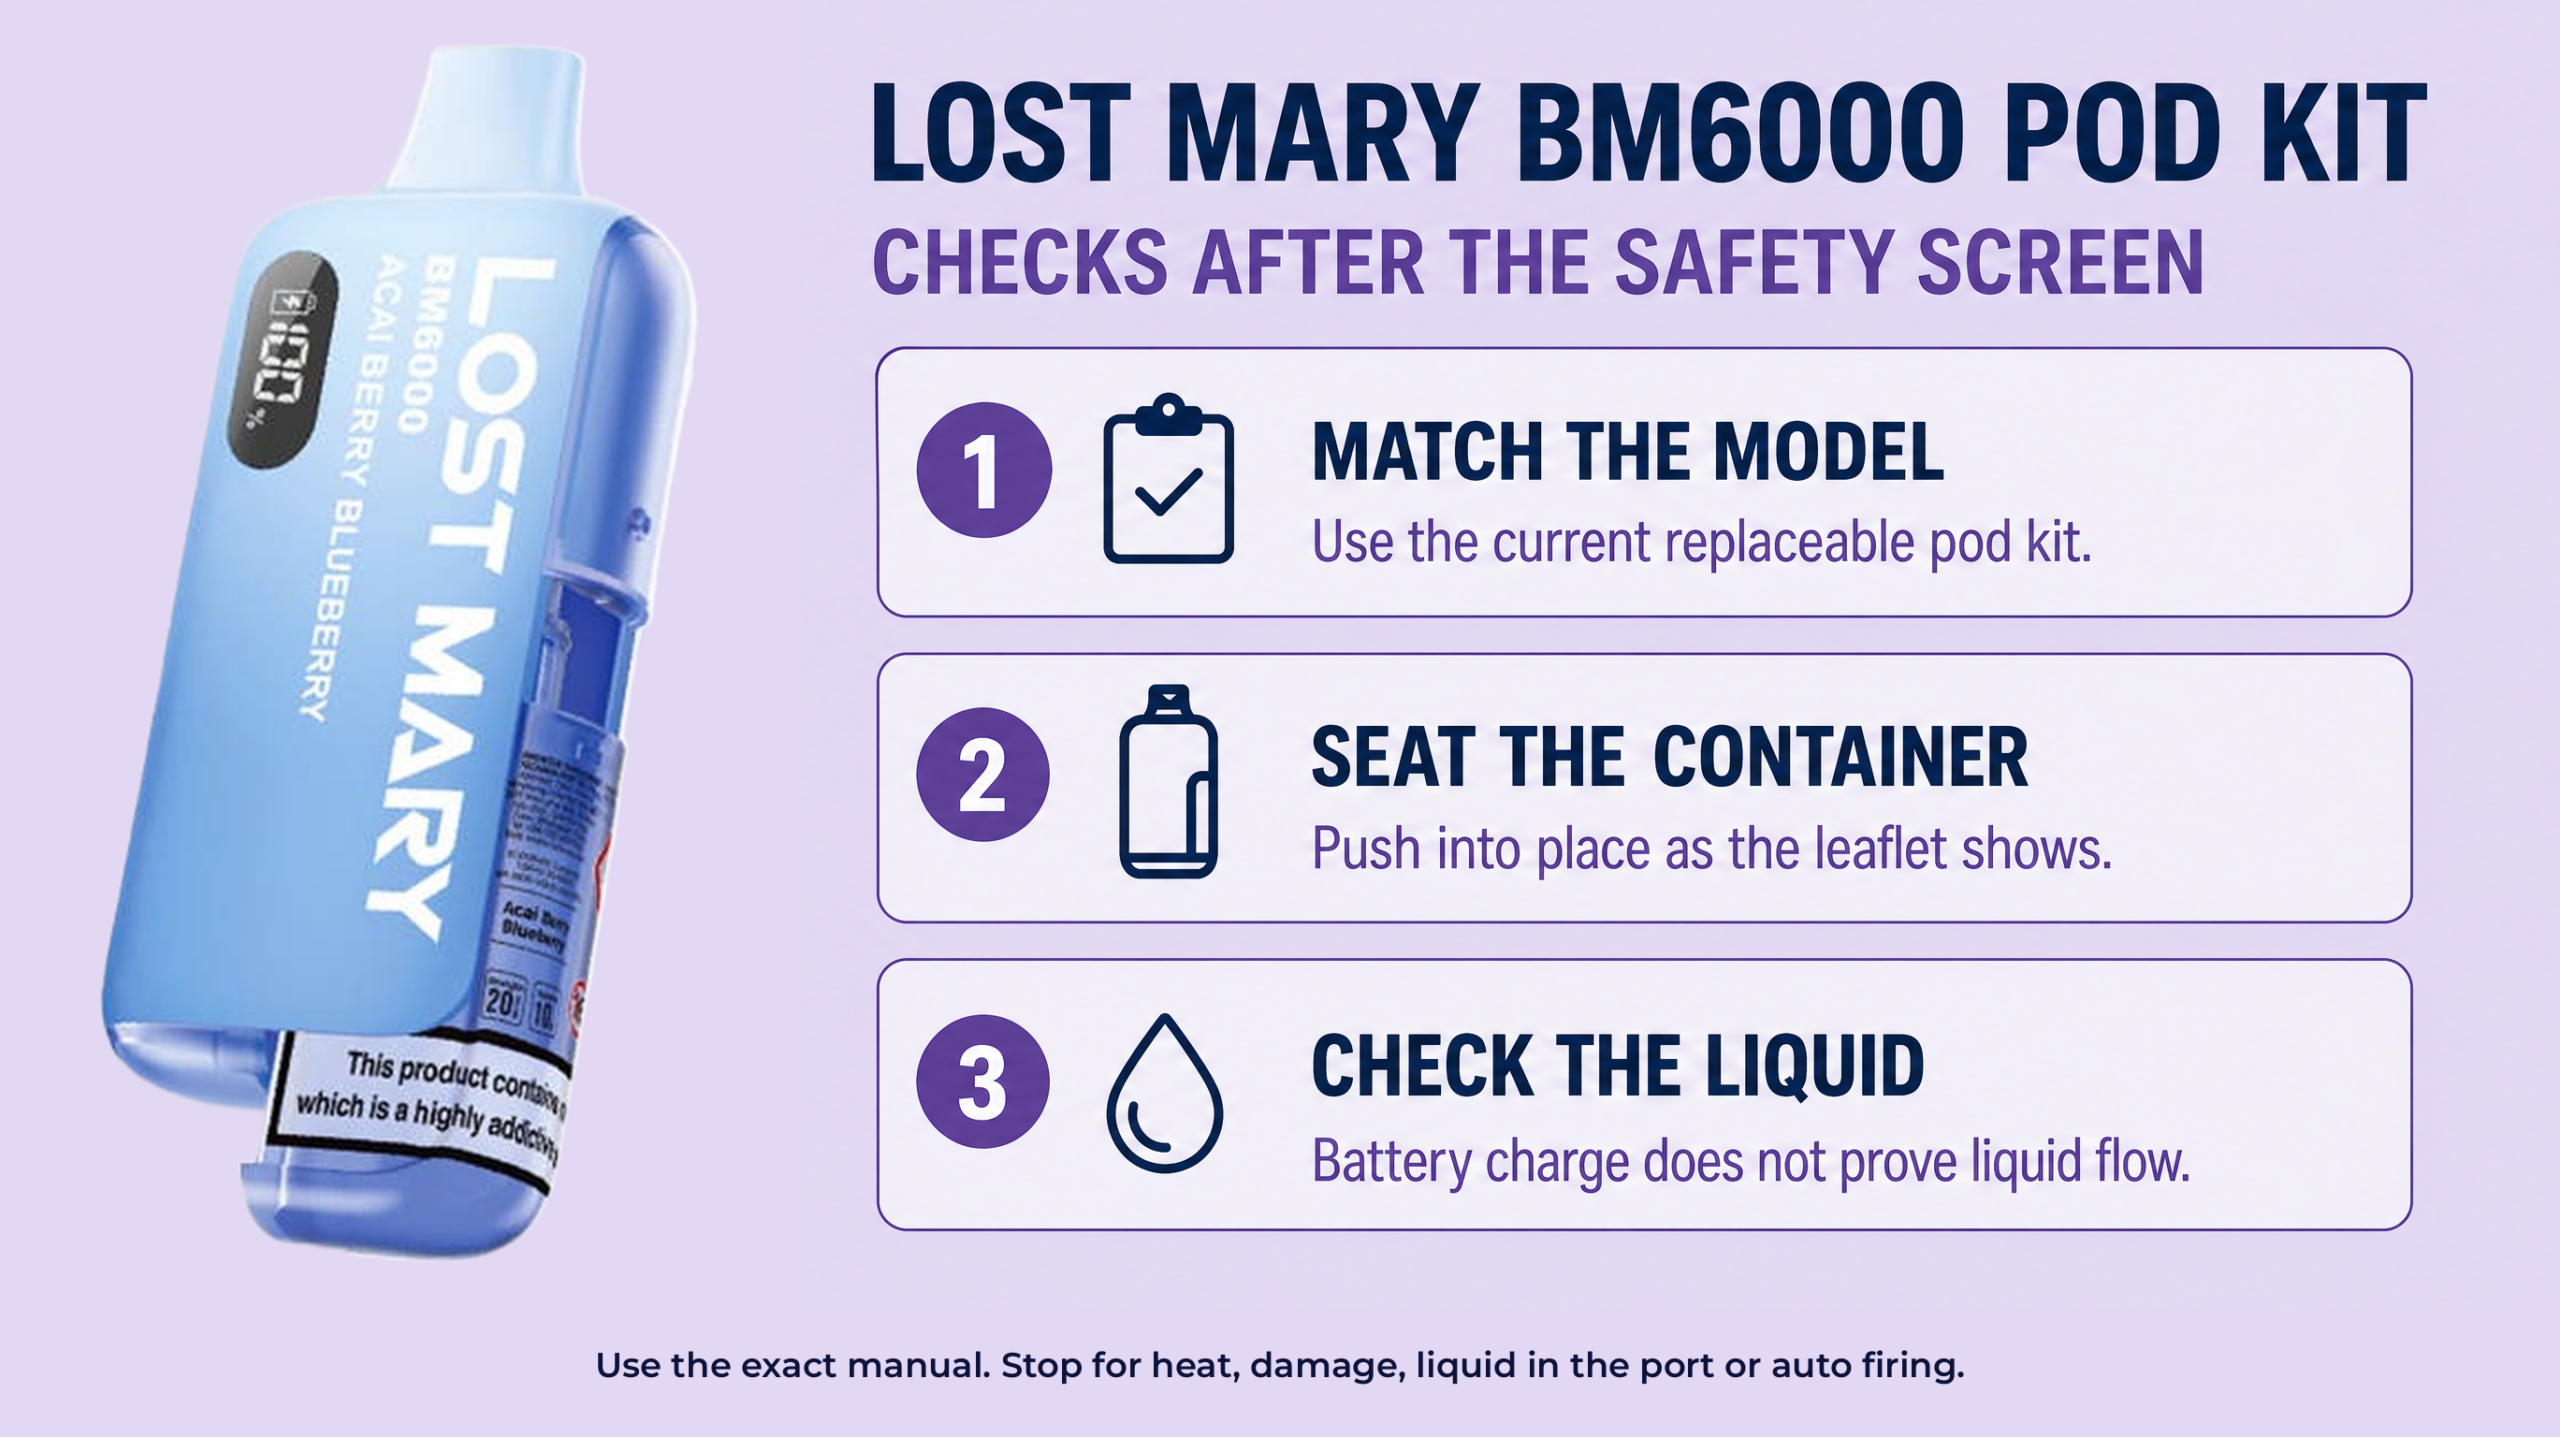
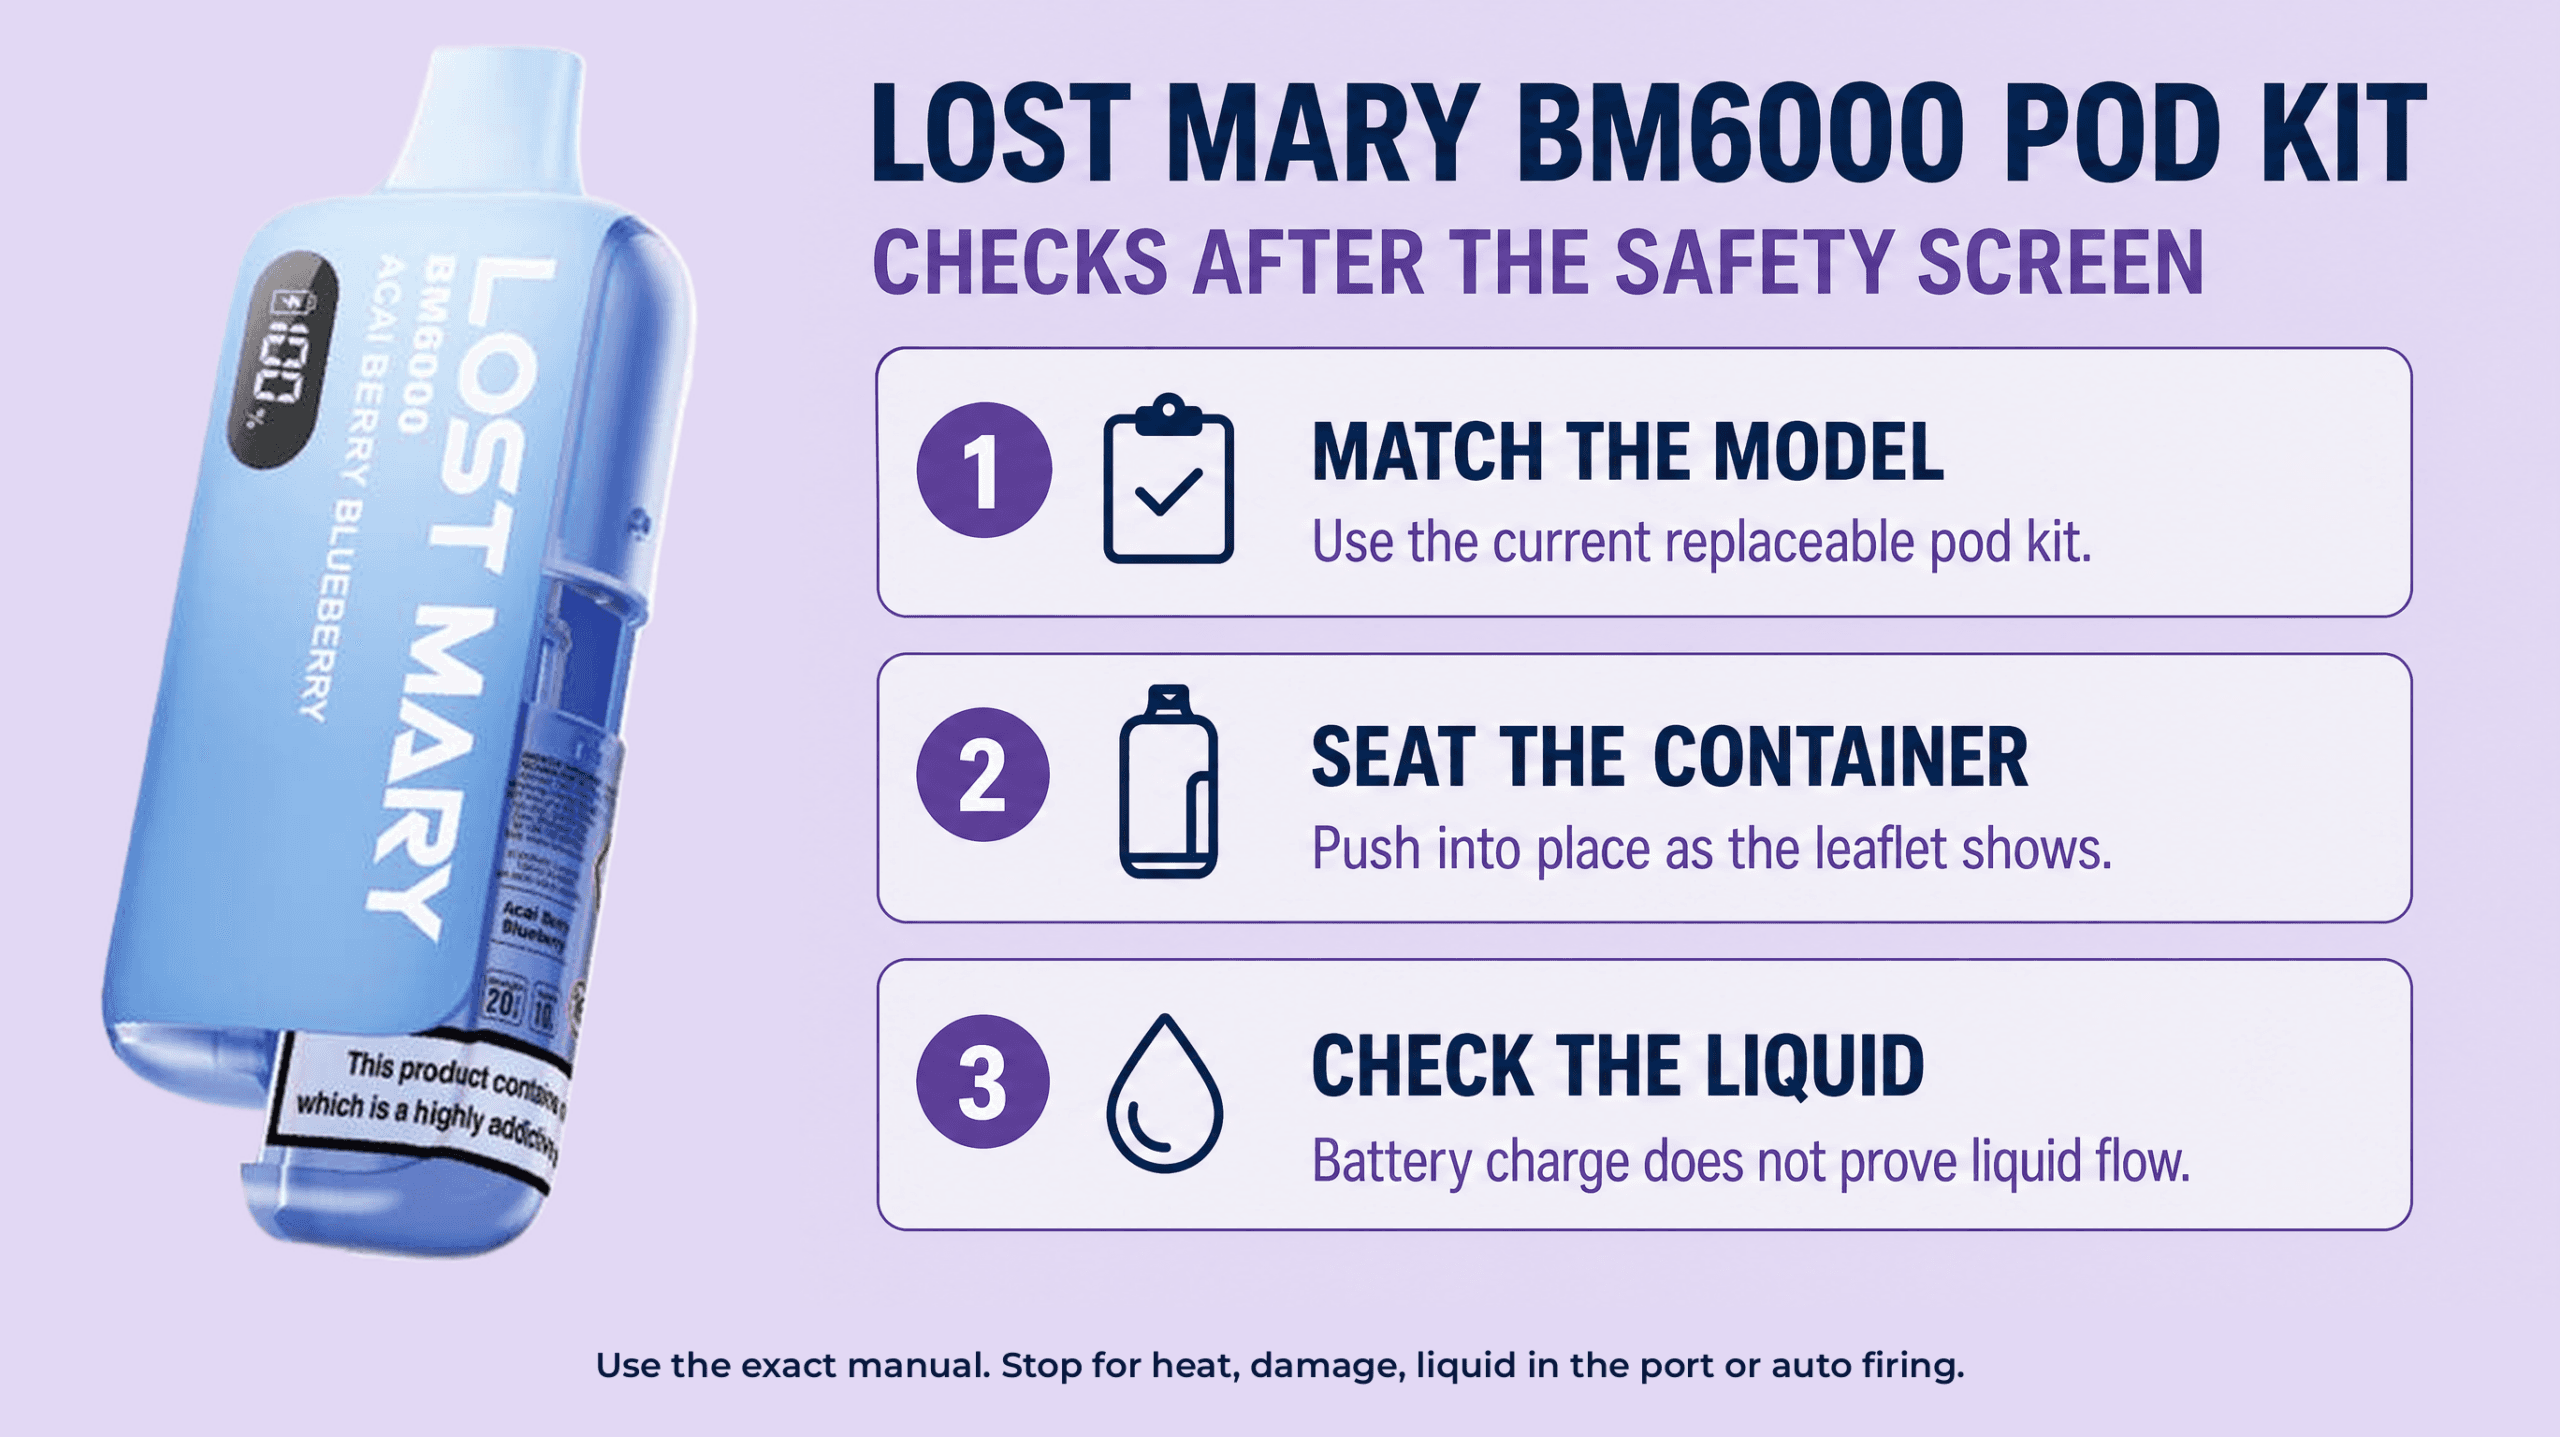
Lost Mary BM6000 troubleshooting
This example is for the current Lost Mary BM6000 prefilled pod kit with a replaceable pod and refill container. Do not apply its replacement procedure to older sealed hardware simply because both carry the BM6000 name.
Display, fit and charging
The current model has a 1000mAh rechargeable battery, a battery power display and USB-C charging. Read the visible liquid supply separately. Lost Mary’s setup sequence removes the indicated sticker and silicone transport part, then pushes the supply container fully into place.
The manufacturer’s illustrated instructions include turning this model upside down and shaking it several times until bubbles in the container clear, to establish liquid flow. Use that step only when your exact replaceable version and supplied leaflet match. It is not a general fix for other vapes, a leaking device or liquid in the charge port. Do not invent an extra shaking time or a routine for old sealed hardware.
Three useful fixes
- No vapour on first assembly: check the removable transport parts and complete container insertion. Follow the exact liquid-feed procedure before using the pod.
- Liquid remains but the working pod seems dry: inspect the supply connection and follow the matched leaflet. Stop if taste is burnt or the feed still does not work.
- New pack does not fit: confirm it is the current replaceable model. The manufacturer’s replacement sequence lifts the old pod upwards and slides the old container downwards before installing the new set.
Stop point: do not force the old version open or charge through a wet port. An exhausted or failed compatible consumable is replaced with the matching BM6000 pod and container. A repeated fault needs support. The BM6000 guide provides the longer model-specific setup reference.
Lost Mary BM6000 source and limits
The current manufacturer page describes the replaceable pod and container version with a 1000mAh battery, container insertion, a model-specific inverted liquid-feed step and separate pod and container removal. Our live product page confirms USB-C and a battery power display.
Lost Mary BM6000 manufacturer setup and replacement instructionsEvidence checked 2026-11-11
Limitation: Older BM6000 hardware differs. The current illustrated manufacturer feed procedure is specific to this replaceable version and must match the supplied leaflet. No undocumented error chart or fixed shaking duration is added.
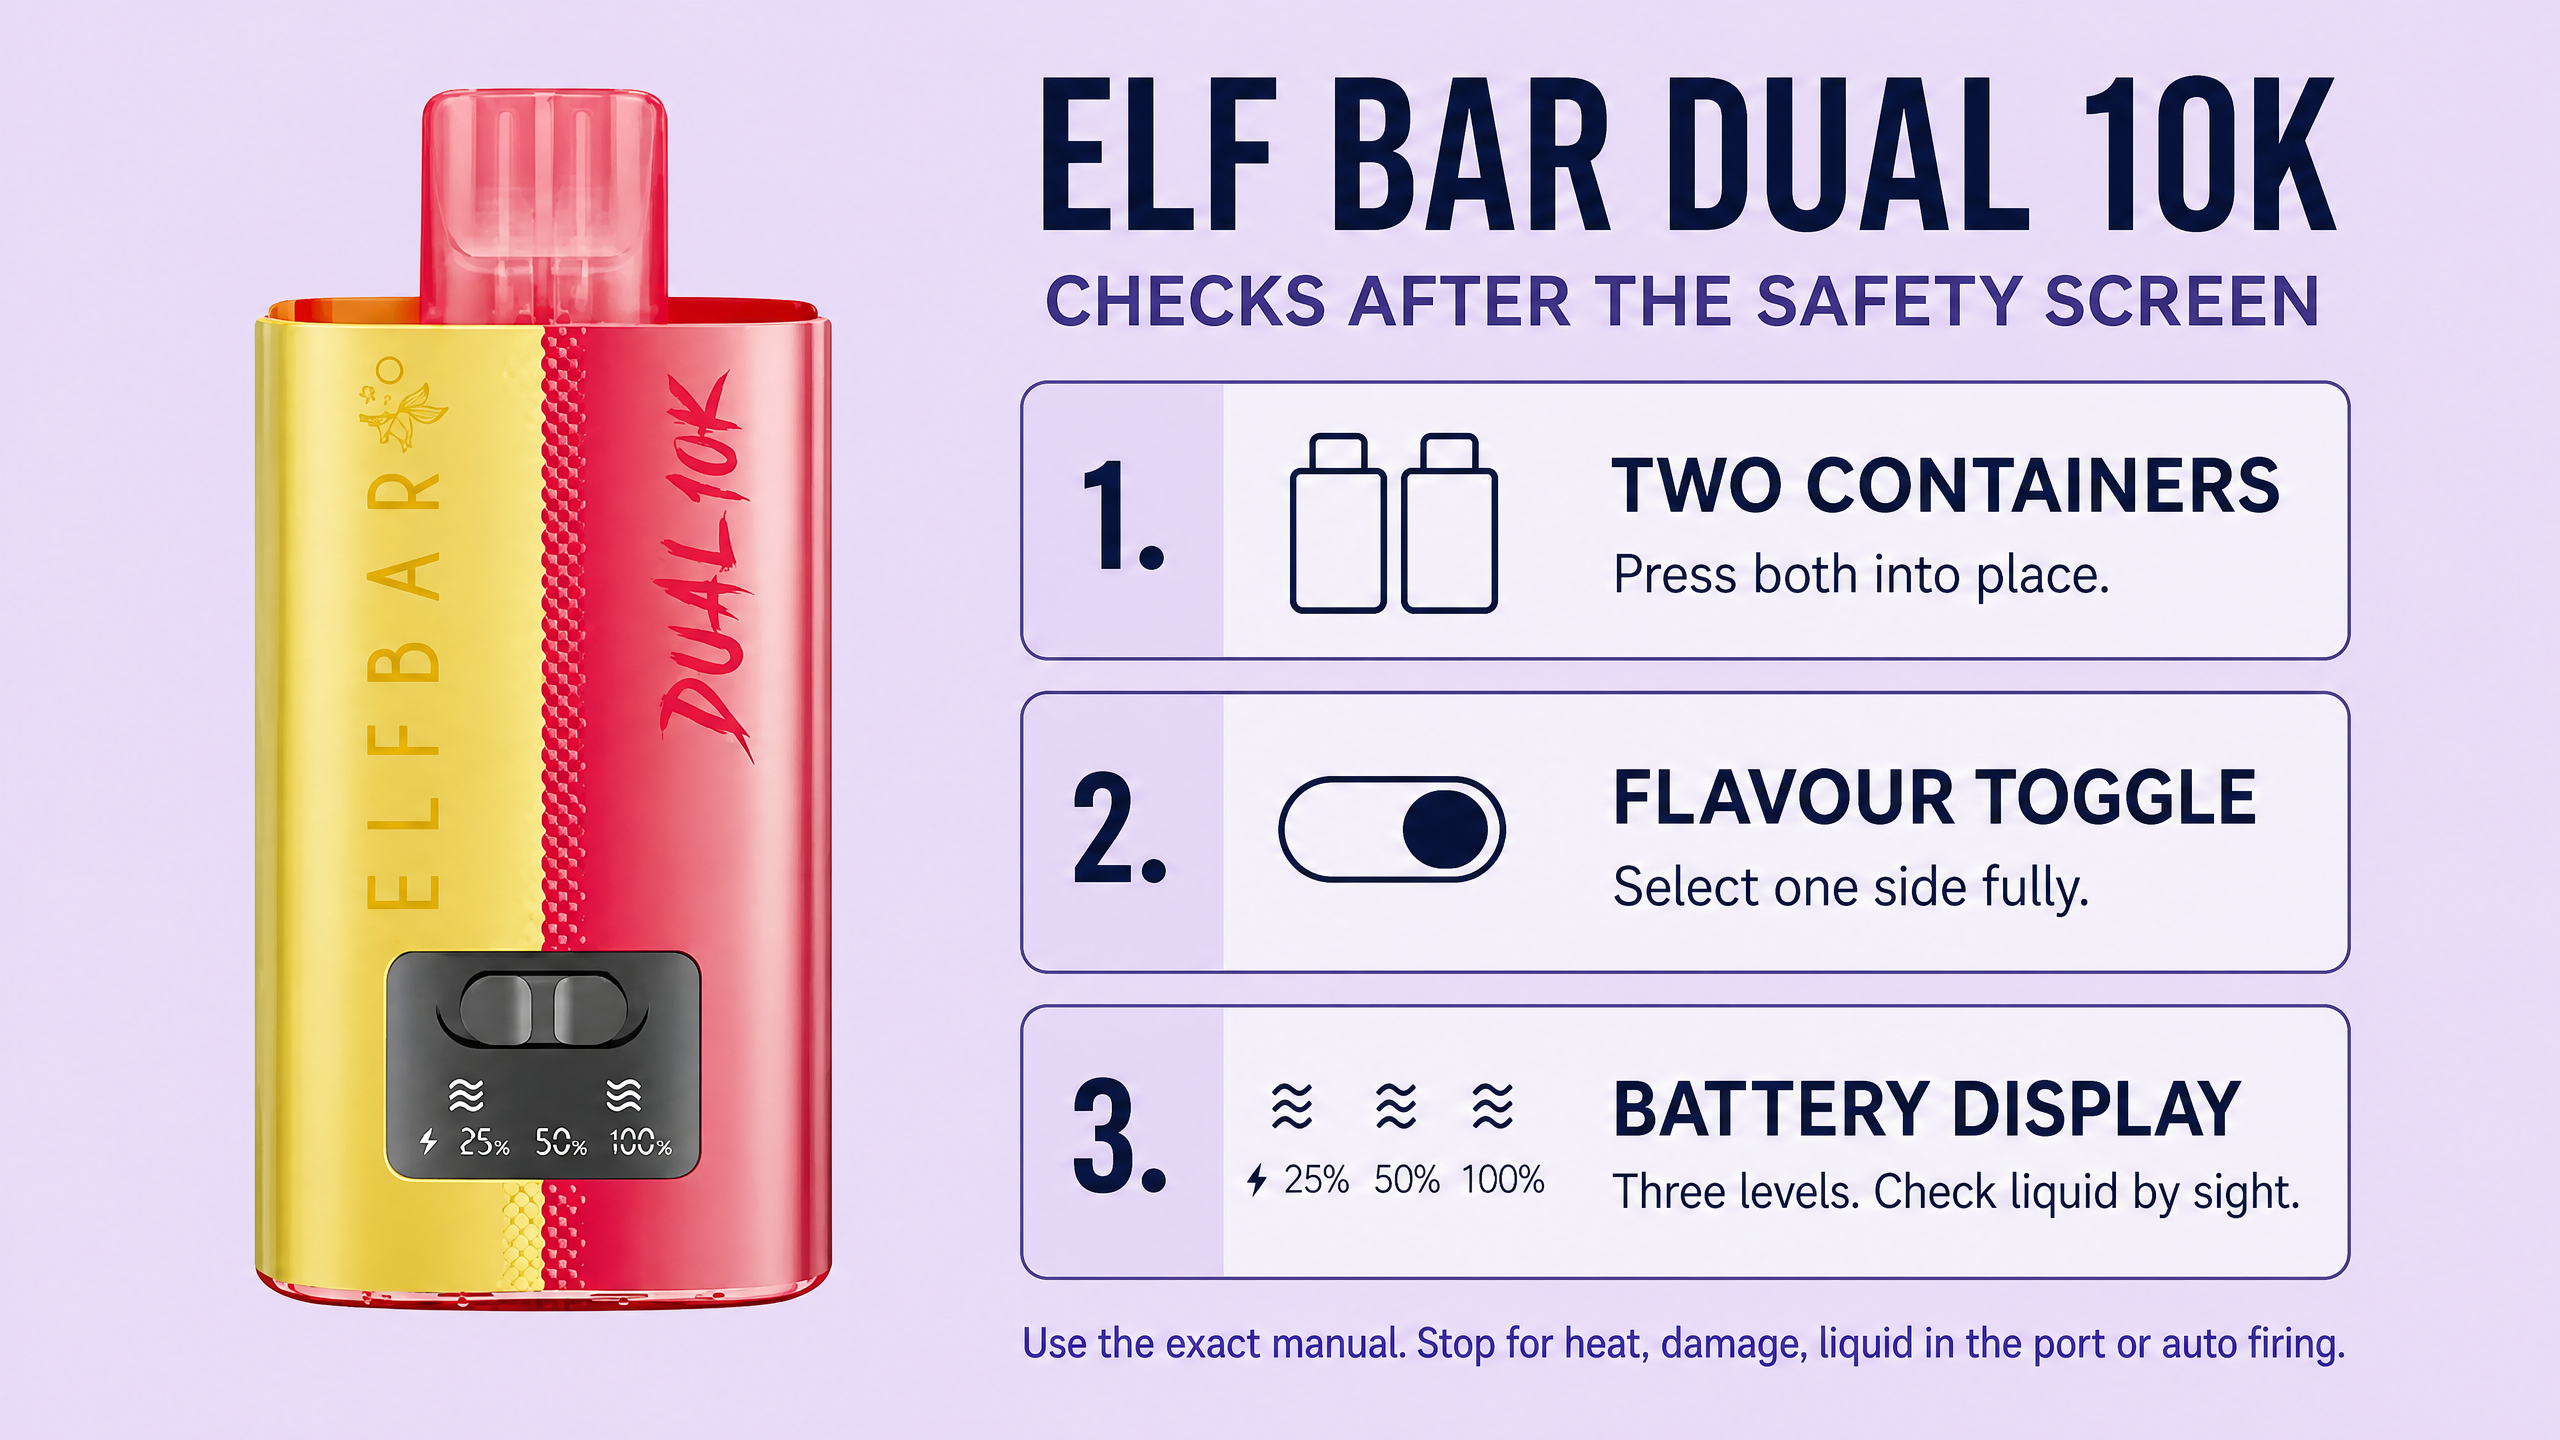
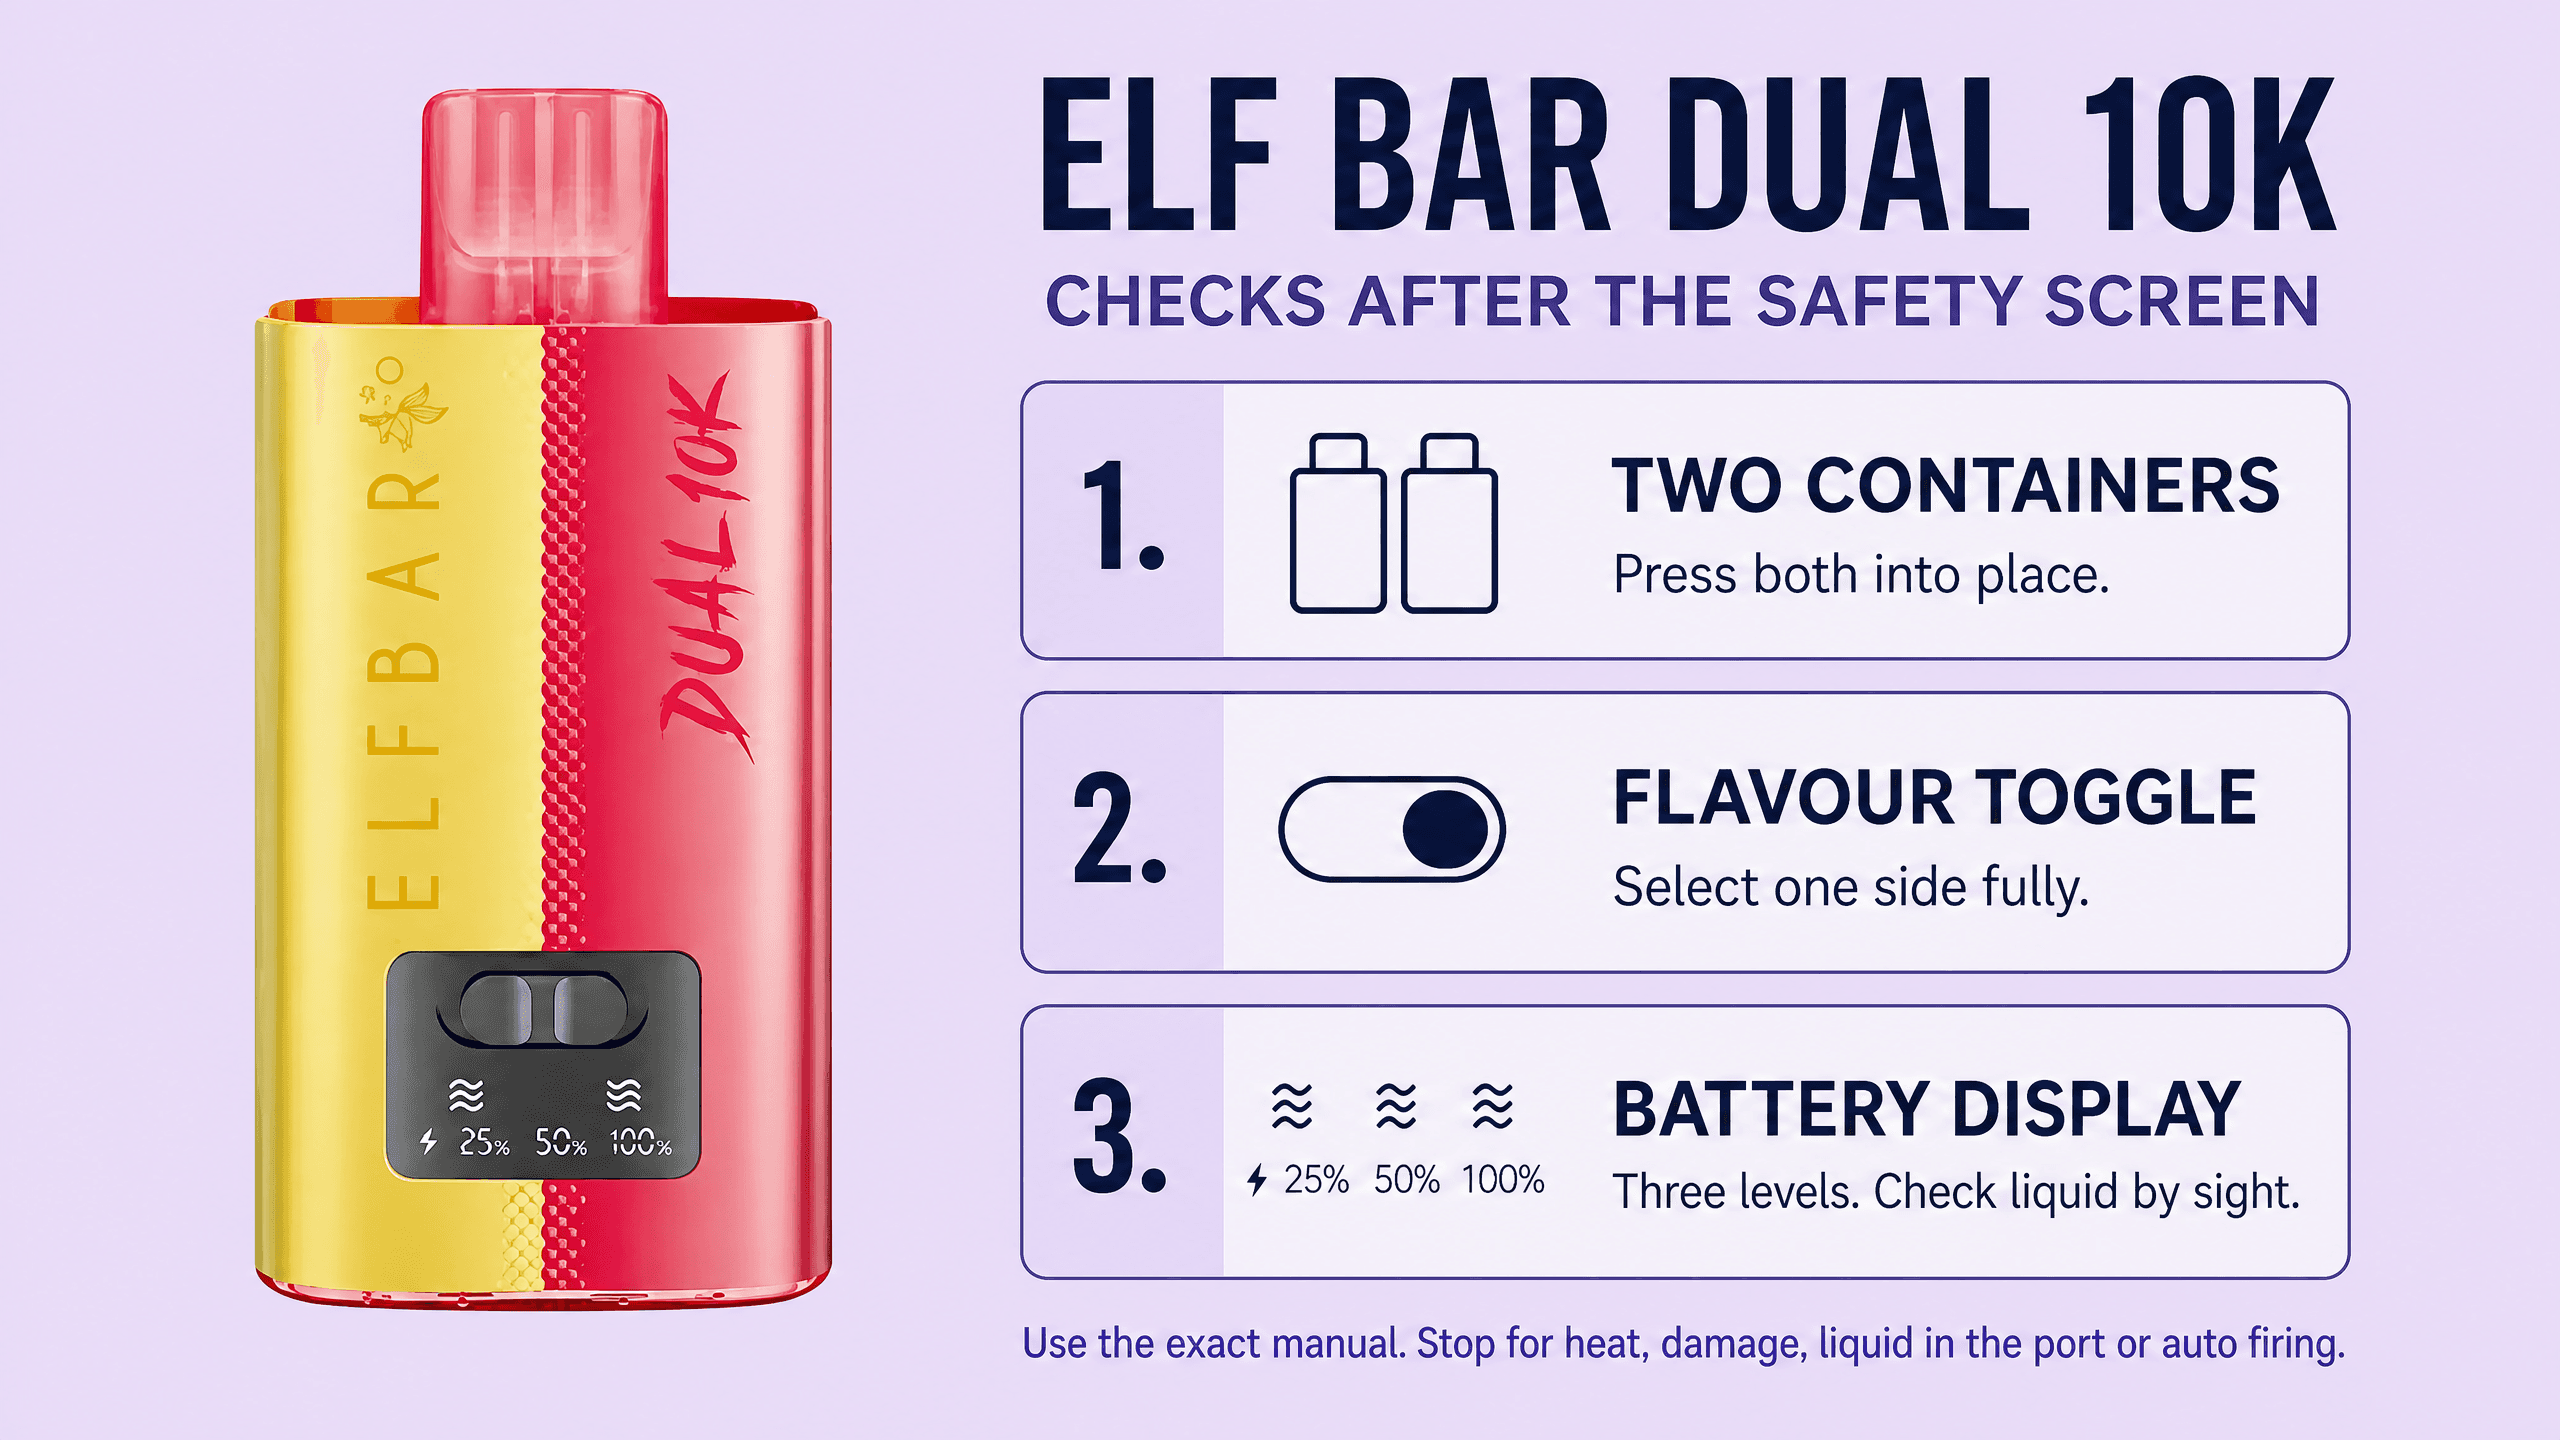
Elf Bar Dual 10K troubleshooting
The Elf Bar Dual 10K selects between two loaded flavours with a toggle. The manufacturer’s page describes two working pods and two supply containers. That layout matters when one side behaves normally and the other does not.
Display, fit and charging
Elf Bar calls the battery indication a three-level display. It is separate from the transparent containers used to view liquid. Do not treat a lit battery segment as a liquid reading, and do not turn a segment into a precision measurement that the manual does not provide.
For setup, the manufacturer instructs you to remove and read the sticker, press both containers into place and switch to one side. Position the toggle fully. The device has an 850mAh battery and a Type-C charging port. Use the supplied input instructions and monitor charging rather than borrowing a timed charge claim from another Elf Bar.
Three useful fixes
- One side produces no vapour: check the toggle is fully selecting that side, then check its container seating and liquid supply.
- New pack or first use gives a dry draw: stop and check both containers have reached their intended positions. Follow any waiting or preparation instruction on your supplied pack.
- Output weakens on both sides: check the battery indication after the safety screen. Charging will not restore an empty container or a burnt coil.
Stop point: a stuck toggle, cracked container, persistent leak or repeated failure with the correct pack needs support. Do not force the switch or open a sealed container. If you are replacing an exhausted consumable, match the full model to the Dual 10K replacement listing and its pack instructions before fitting it.
Elf Bar Dual 10K source and limits
Elf Bar specifies pressing both containers into position, selecting a side with the toggle, transparent liquid containers, a three-level battery display, USB-C and an 850mAh battery. The manufacturer describes two 1ml pods and two 5ml containers.
Elf Bar DUAL10K manufacturer instructions and specificationsEvidence checked 2026-11-11
Limitation: No protection-code table or charging-current rating was verified. The manufacturer's three-level battery description is used instead of treating the display as a precise liquid or battery-percentage meter.
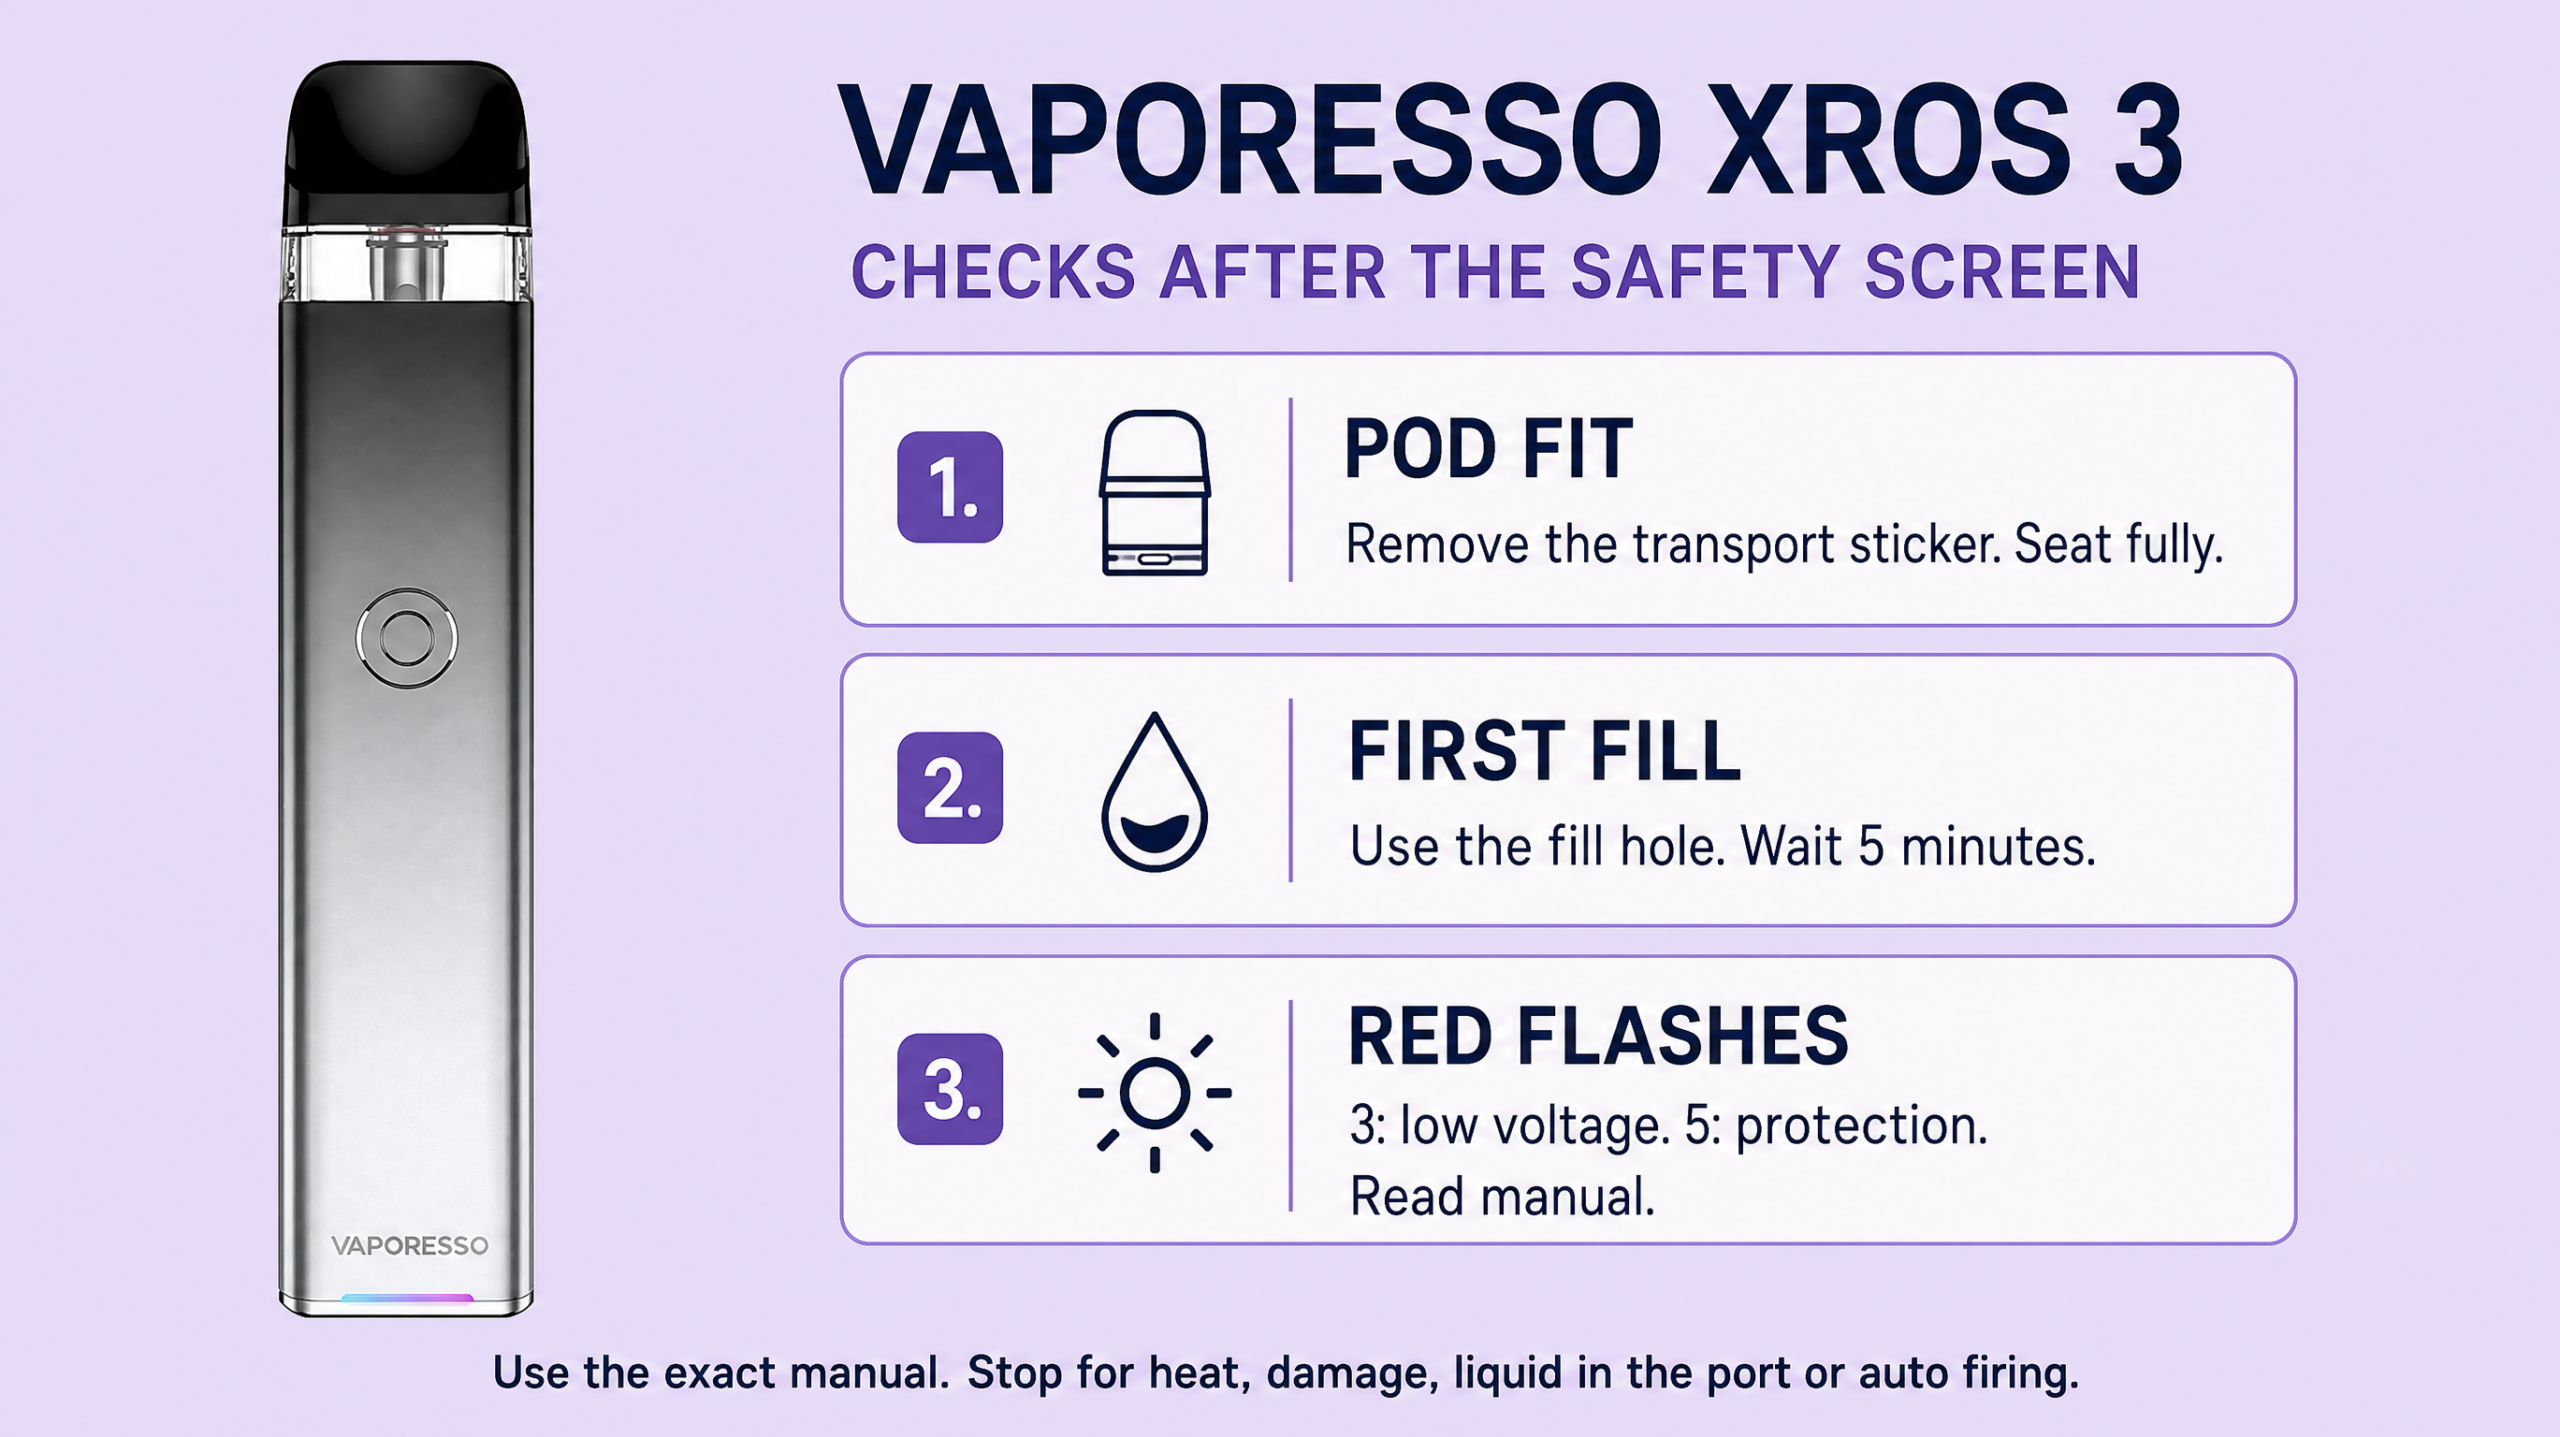
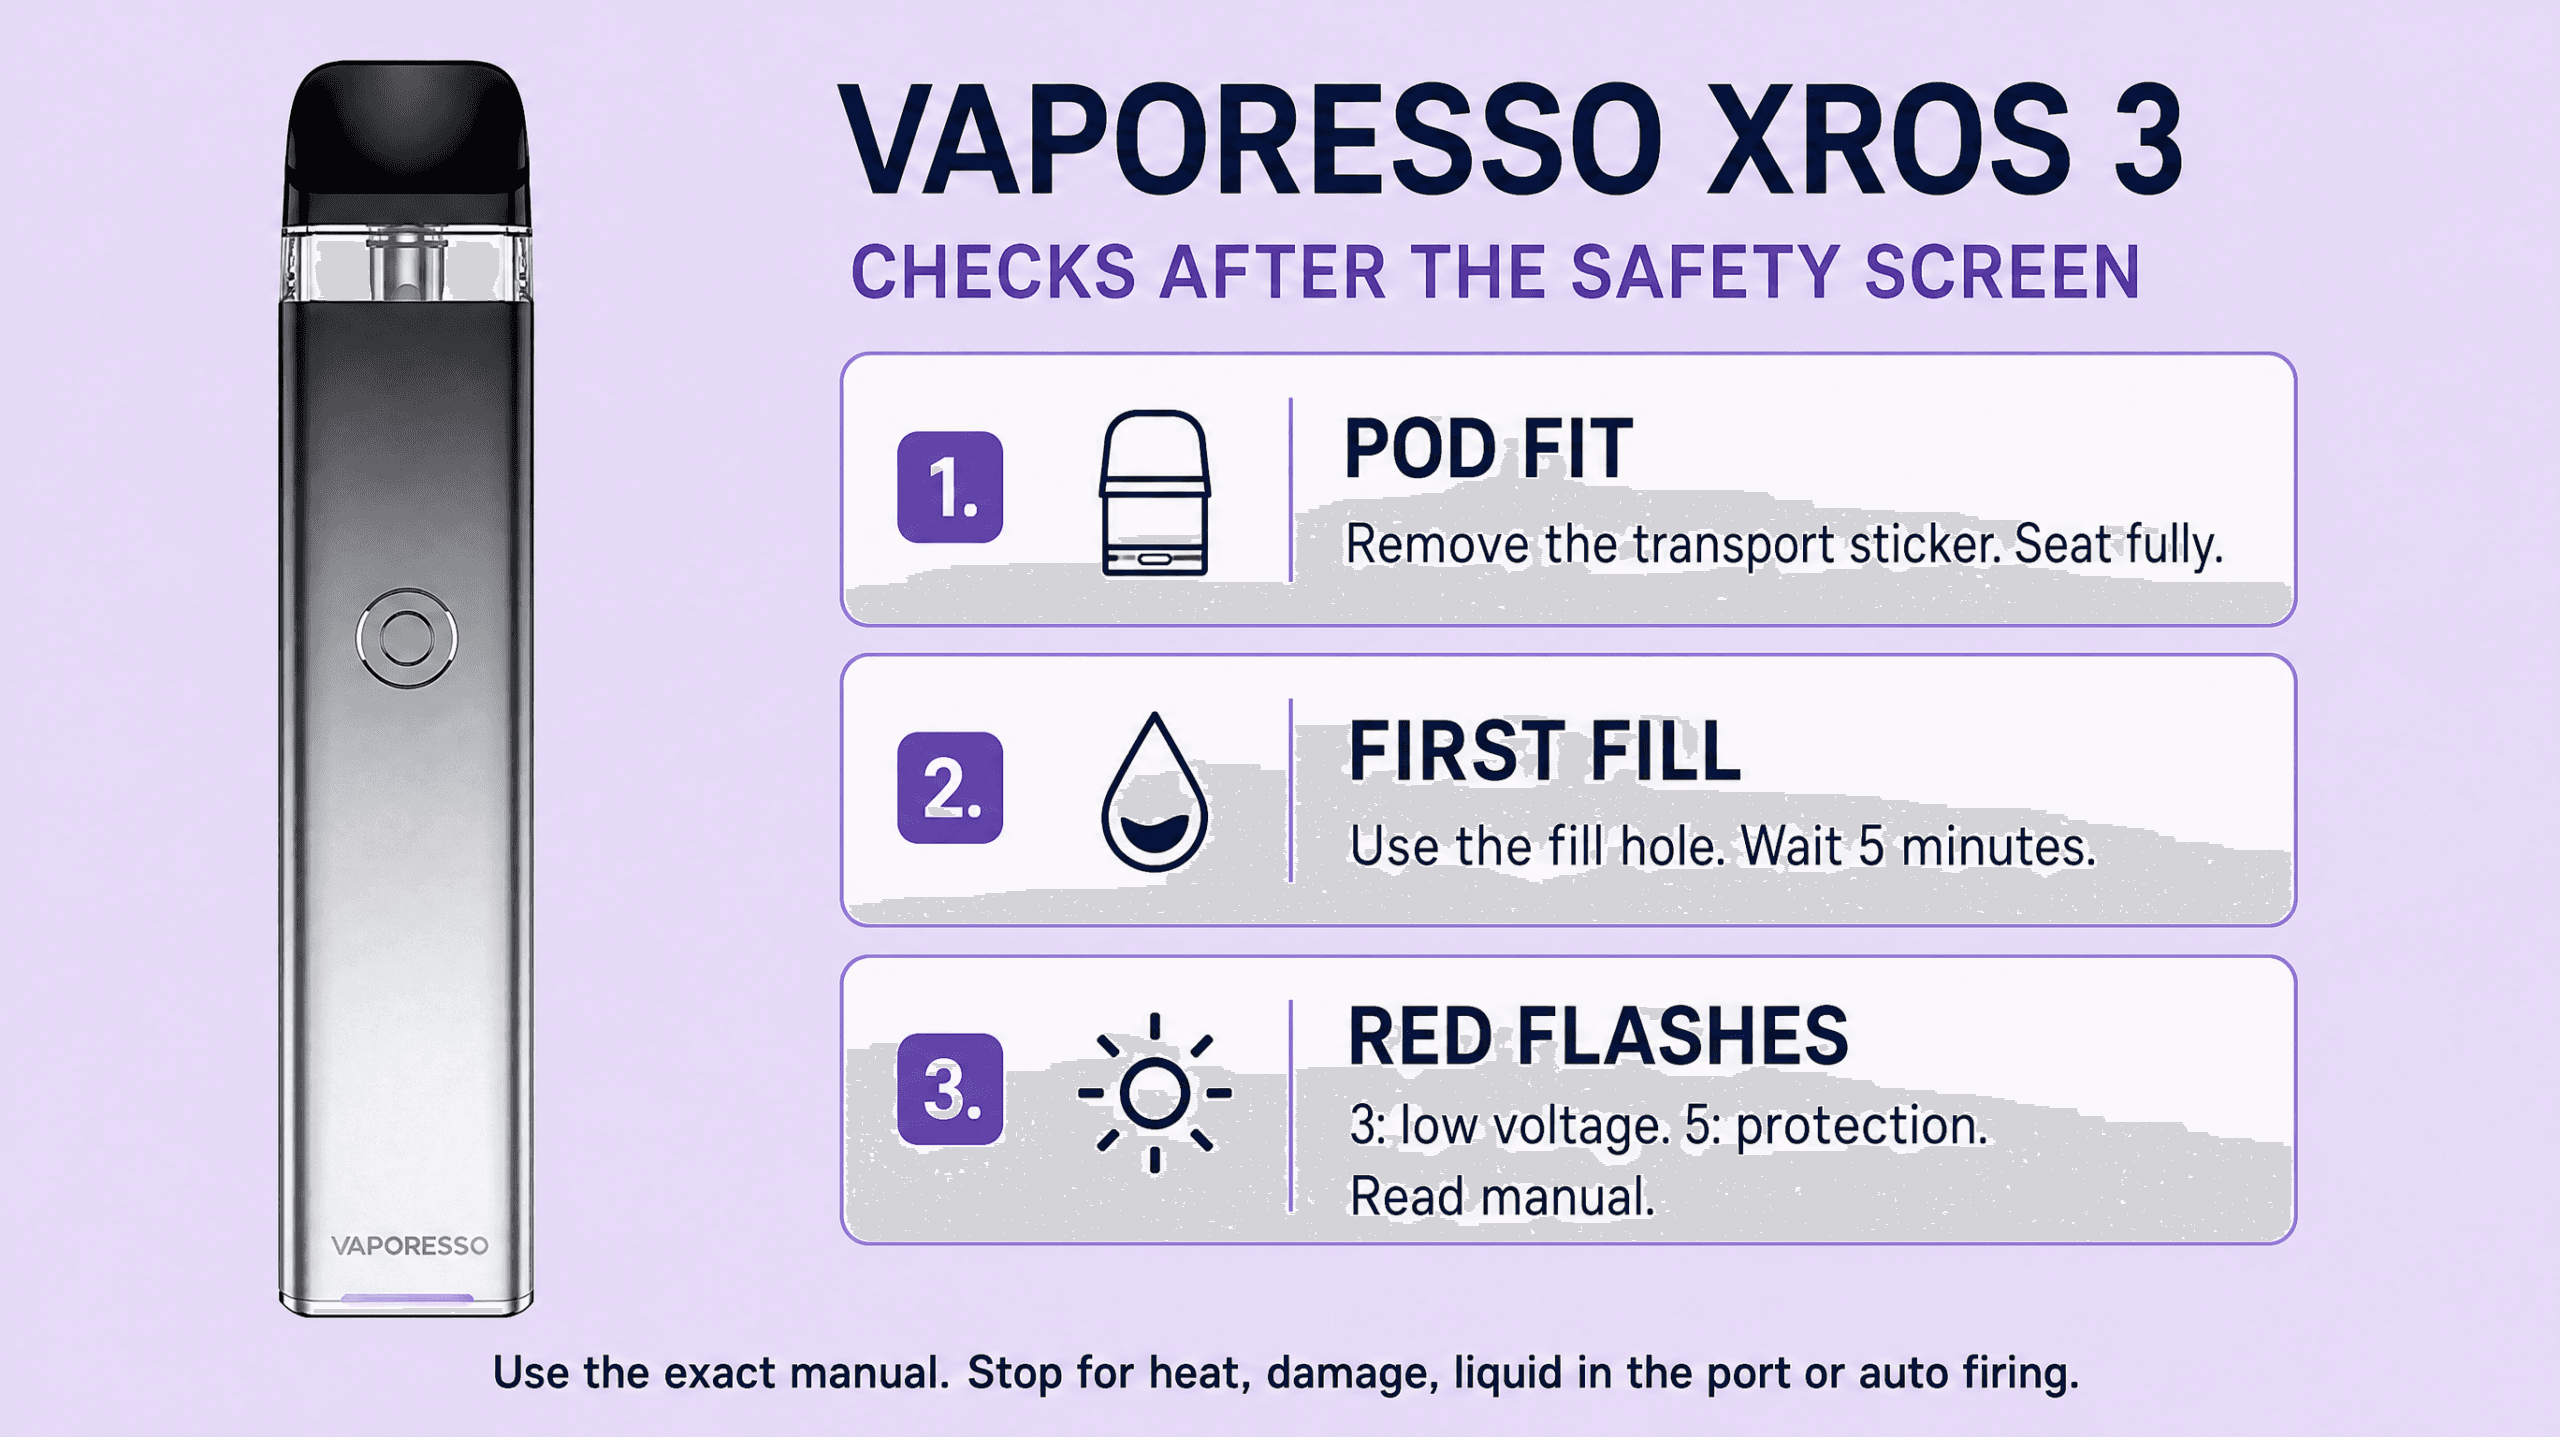
Vaporesso XROS 3 troubleshooting
Use these codes only for the Vaporesso XROS 3. Its manual describes both button and draw activation. Five button presses within two seconds switch power on or off. Do not borrow mode controls from another XROS model.
Pod fit and charging
Pull the pod out to replace it and remove its first-use transport sticker where indicated. Fill through the designated hole after removing the mouthpiece, close it firmly and wait five minutes after the first fill. The central air passage is not the filling hole. Seat the pod fully and set the rear airflow toggle as required.
The manual specifies Type-C charging at DC 5V/1A using the supplied cable. The light pulses through its neon pattern during charging and stays green when full. After a draw or pod insertion, the charge bands are green at 70 to 100%, blue at 30 to 70% and red at 0 to 30%. These overlapping boundary values reproduce the manual’s broad bands rather than an exact battery measurement.
Three useful fixes
- No output after a new pod: check its sticker, preparation and seating, then check whether the device is powered on. Do not hold the button against an empty new pod.
- Three red flashes: the manual identifies low voltage. Use the charging checks if there are no safety stops.
- Five flashes: stop firing and use the protection table below. Check only the cool, dry, user-accessible pod connection and compatibility. Do not assume every five-flash event means low charge.
Stop point: persistent protection with a correctly prepared supported pod, damaged contacts or repeated unusual heat needs Vaporesso or retailer support. Replace a worn integrated-coil pod as a complete pod. Do not attempt to rebuild its coil or modify the battery.
Vaporesso XROS 3 verified warning meanings
| Comparison point | Manual meaning | Next action |
|---|---|---|
| Red light, 3 flashes | Low voltage or over-discharge | Check charging safely. Do not leave a failed battery connected indefinitely. |
| Red light, 5 flashes | Low resistance, short circuit or high temperature | Stop firing. Check for heat and damage before any permitted pod inspection. |
| Current battery-colour light, 5 flashes | No load or high resistance | Check the correct pod, its sticker, dry contacts and seating. Red at low charge can make the signal ambiguous. |
| Green, blue and red after a long draw | The eight-second time limit | Release the button or stop drawing. Do not repeat long firing to clear a fault. |
| Green stays on while charging | Charge completion and charging cut-off | Unplug. This is not a liquid-level signal. |
Important context: On a narrow screen, scroll the table sideways to read Next action. Use these meanings only for the named model. A heat, damage, liquid-entry or auto-firing warning overrides ordinary checks.
Vaporesso XROS 3 source and limits
The exact XROS 3 manual supplies the five-click power sequence, five-minute first-fill wait, pod installation, 5V/1A USB-C input, battery colours and protection patterns shown below.
Vaporesso XROS 3 user manual, English instructions and protectionsEvidence checked 2026-11-11
Limitation: Five flashes can cover more than one fault, and the battery-colour no-load signal can overlap a red protection signal when charge is low. The light alone cannot identify a failed component.
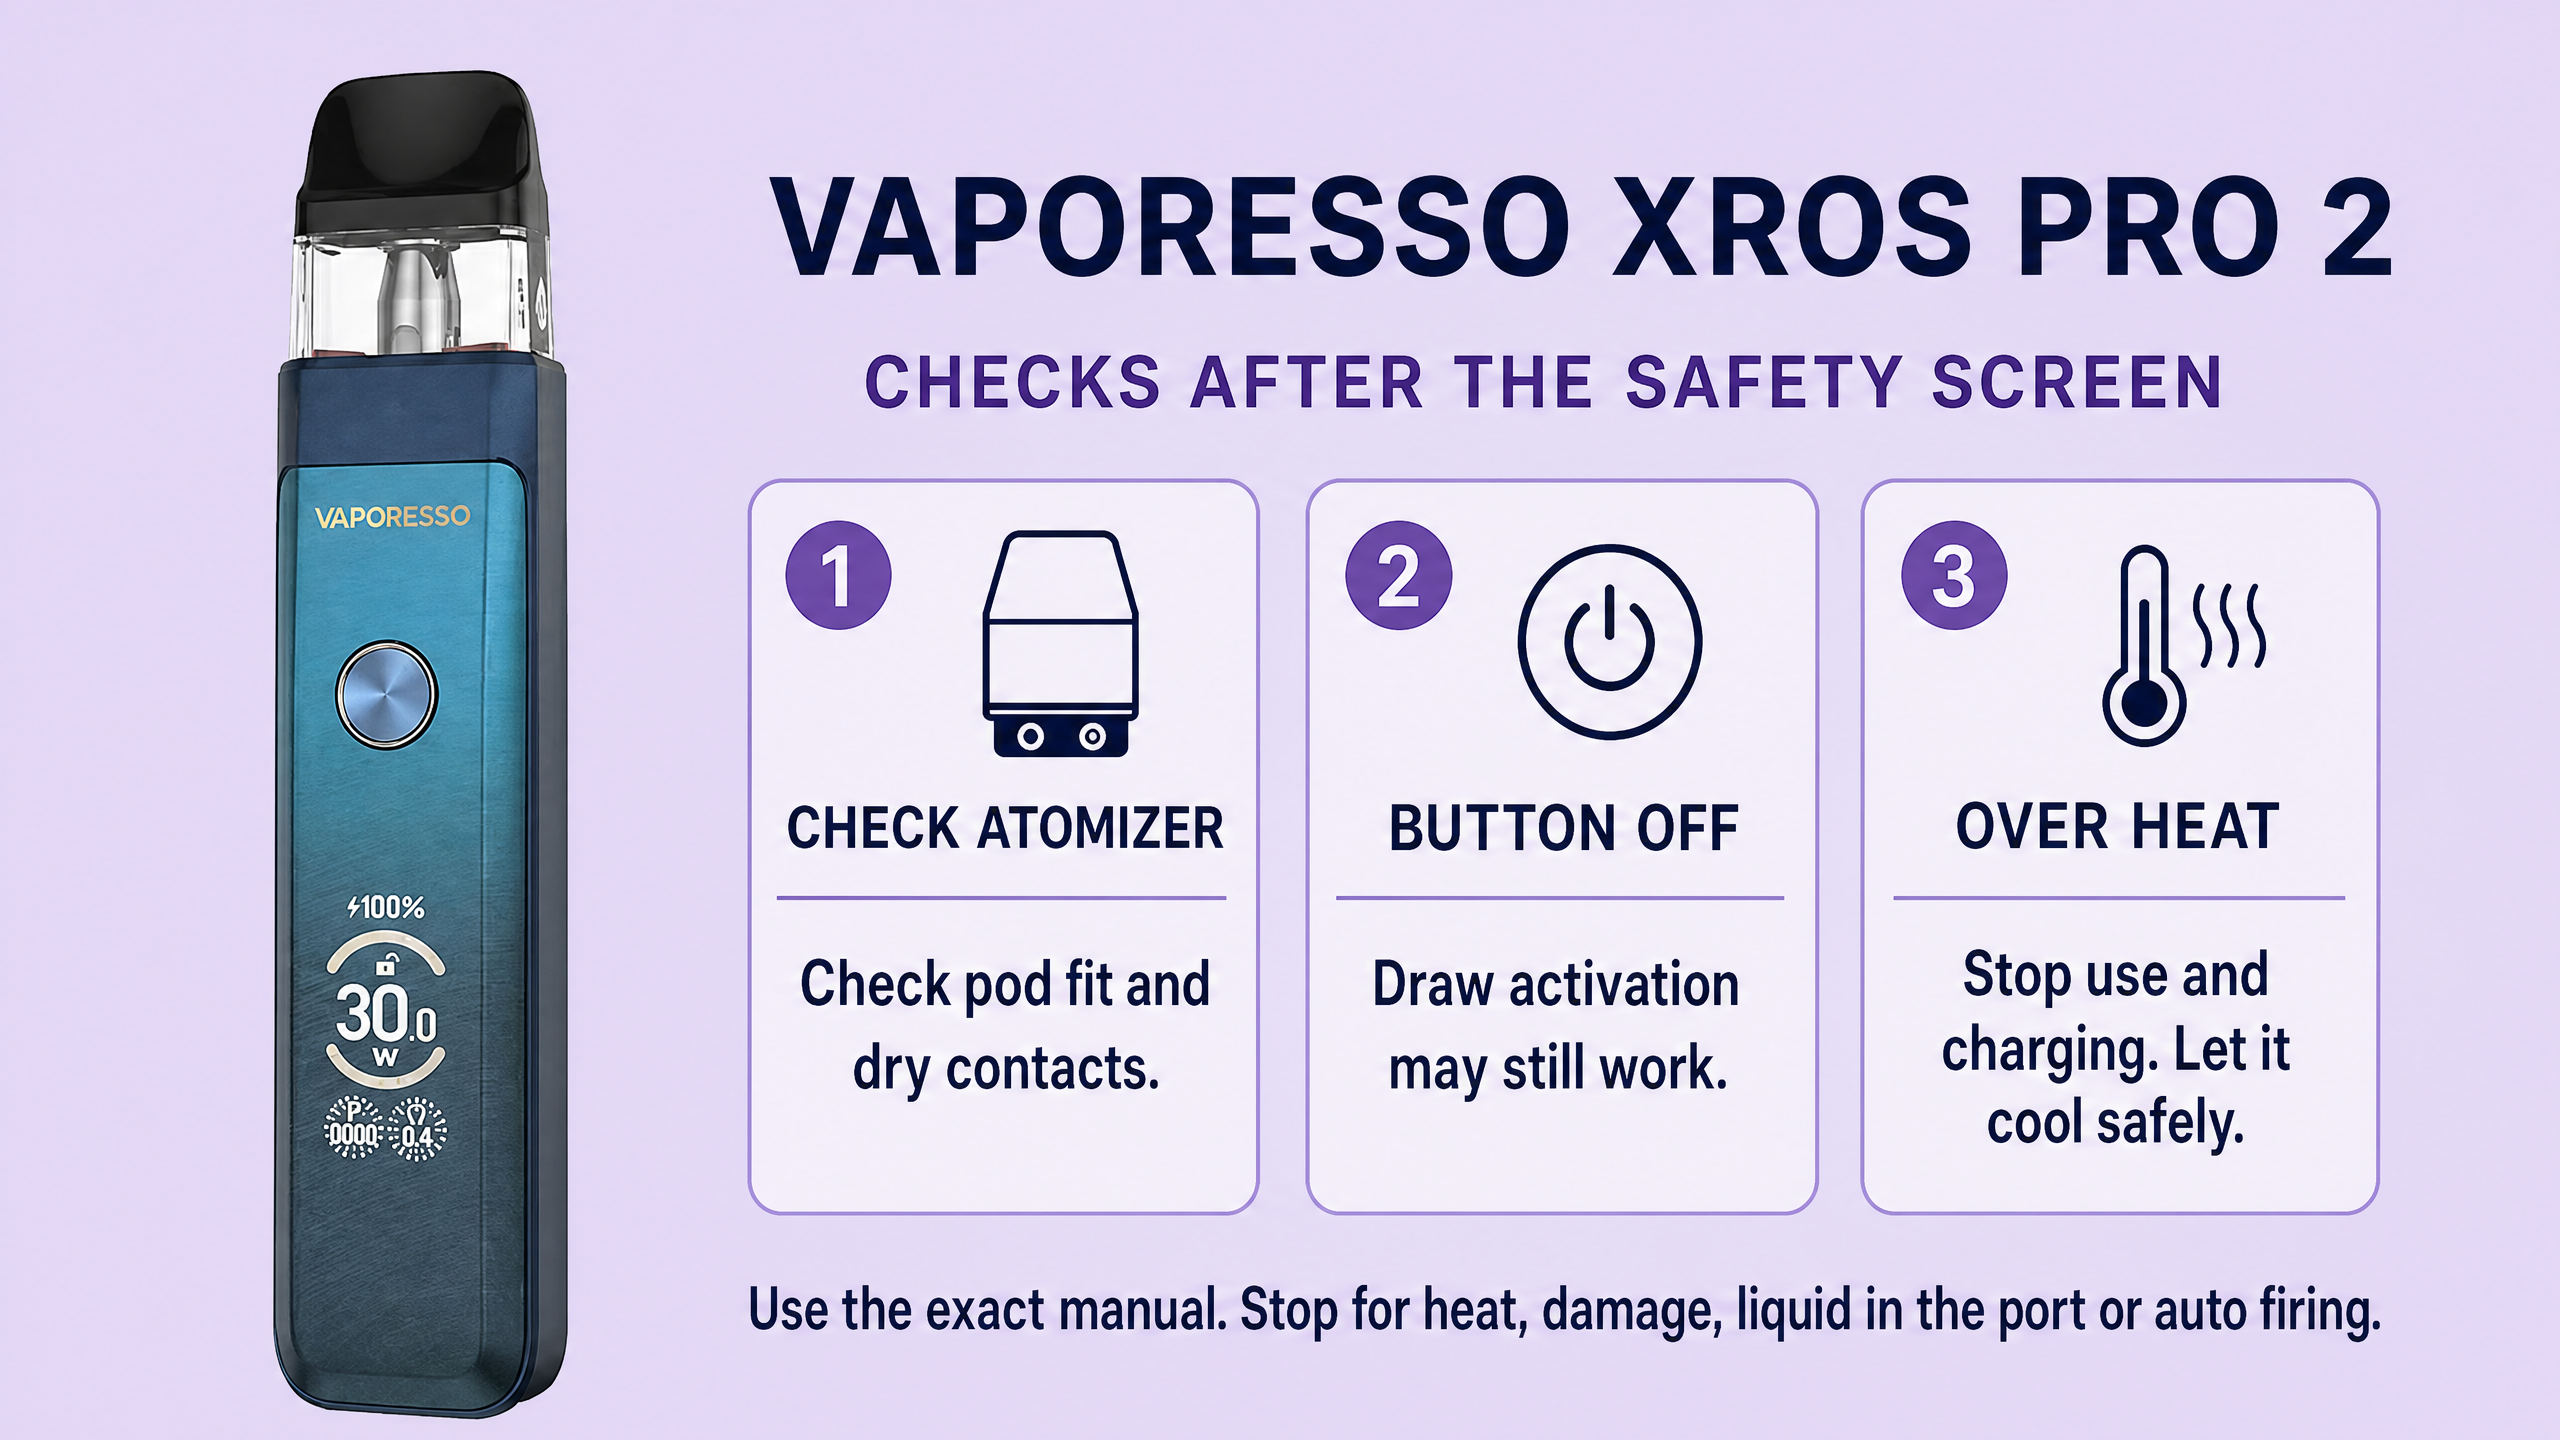
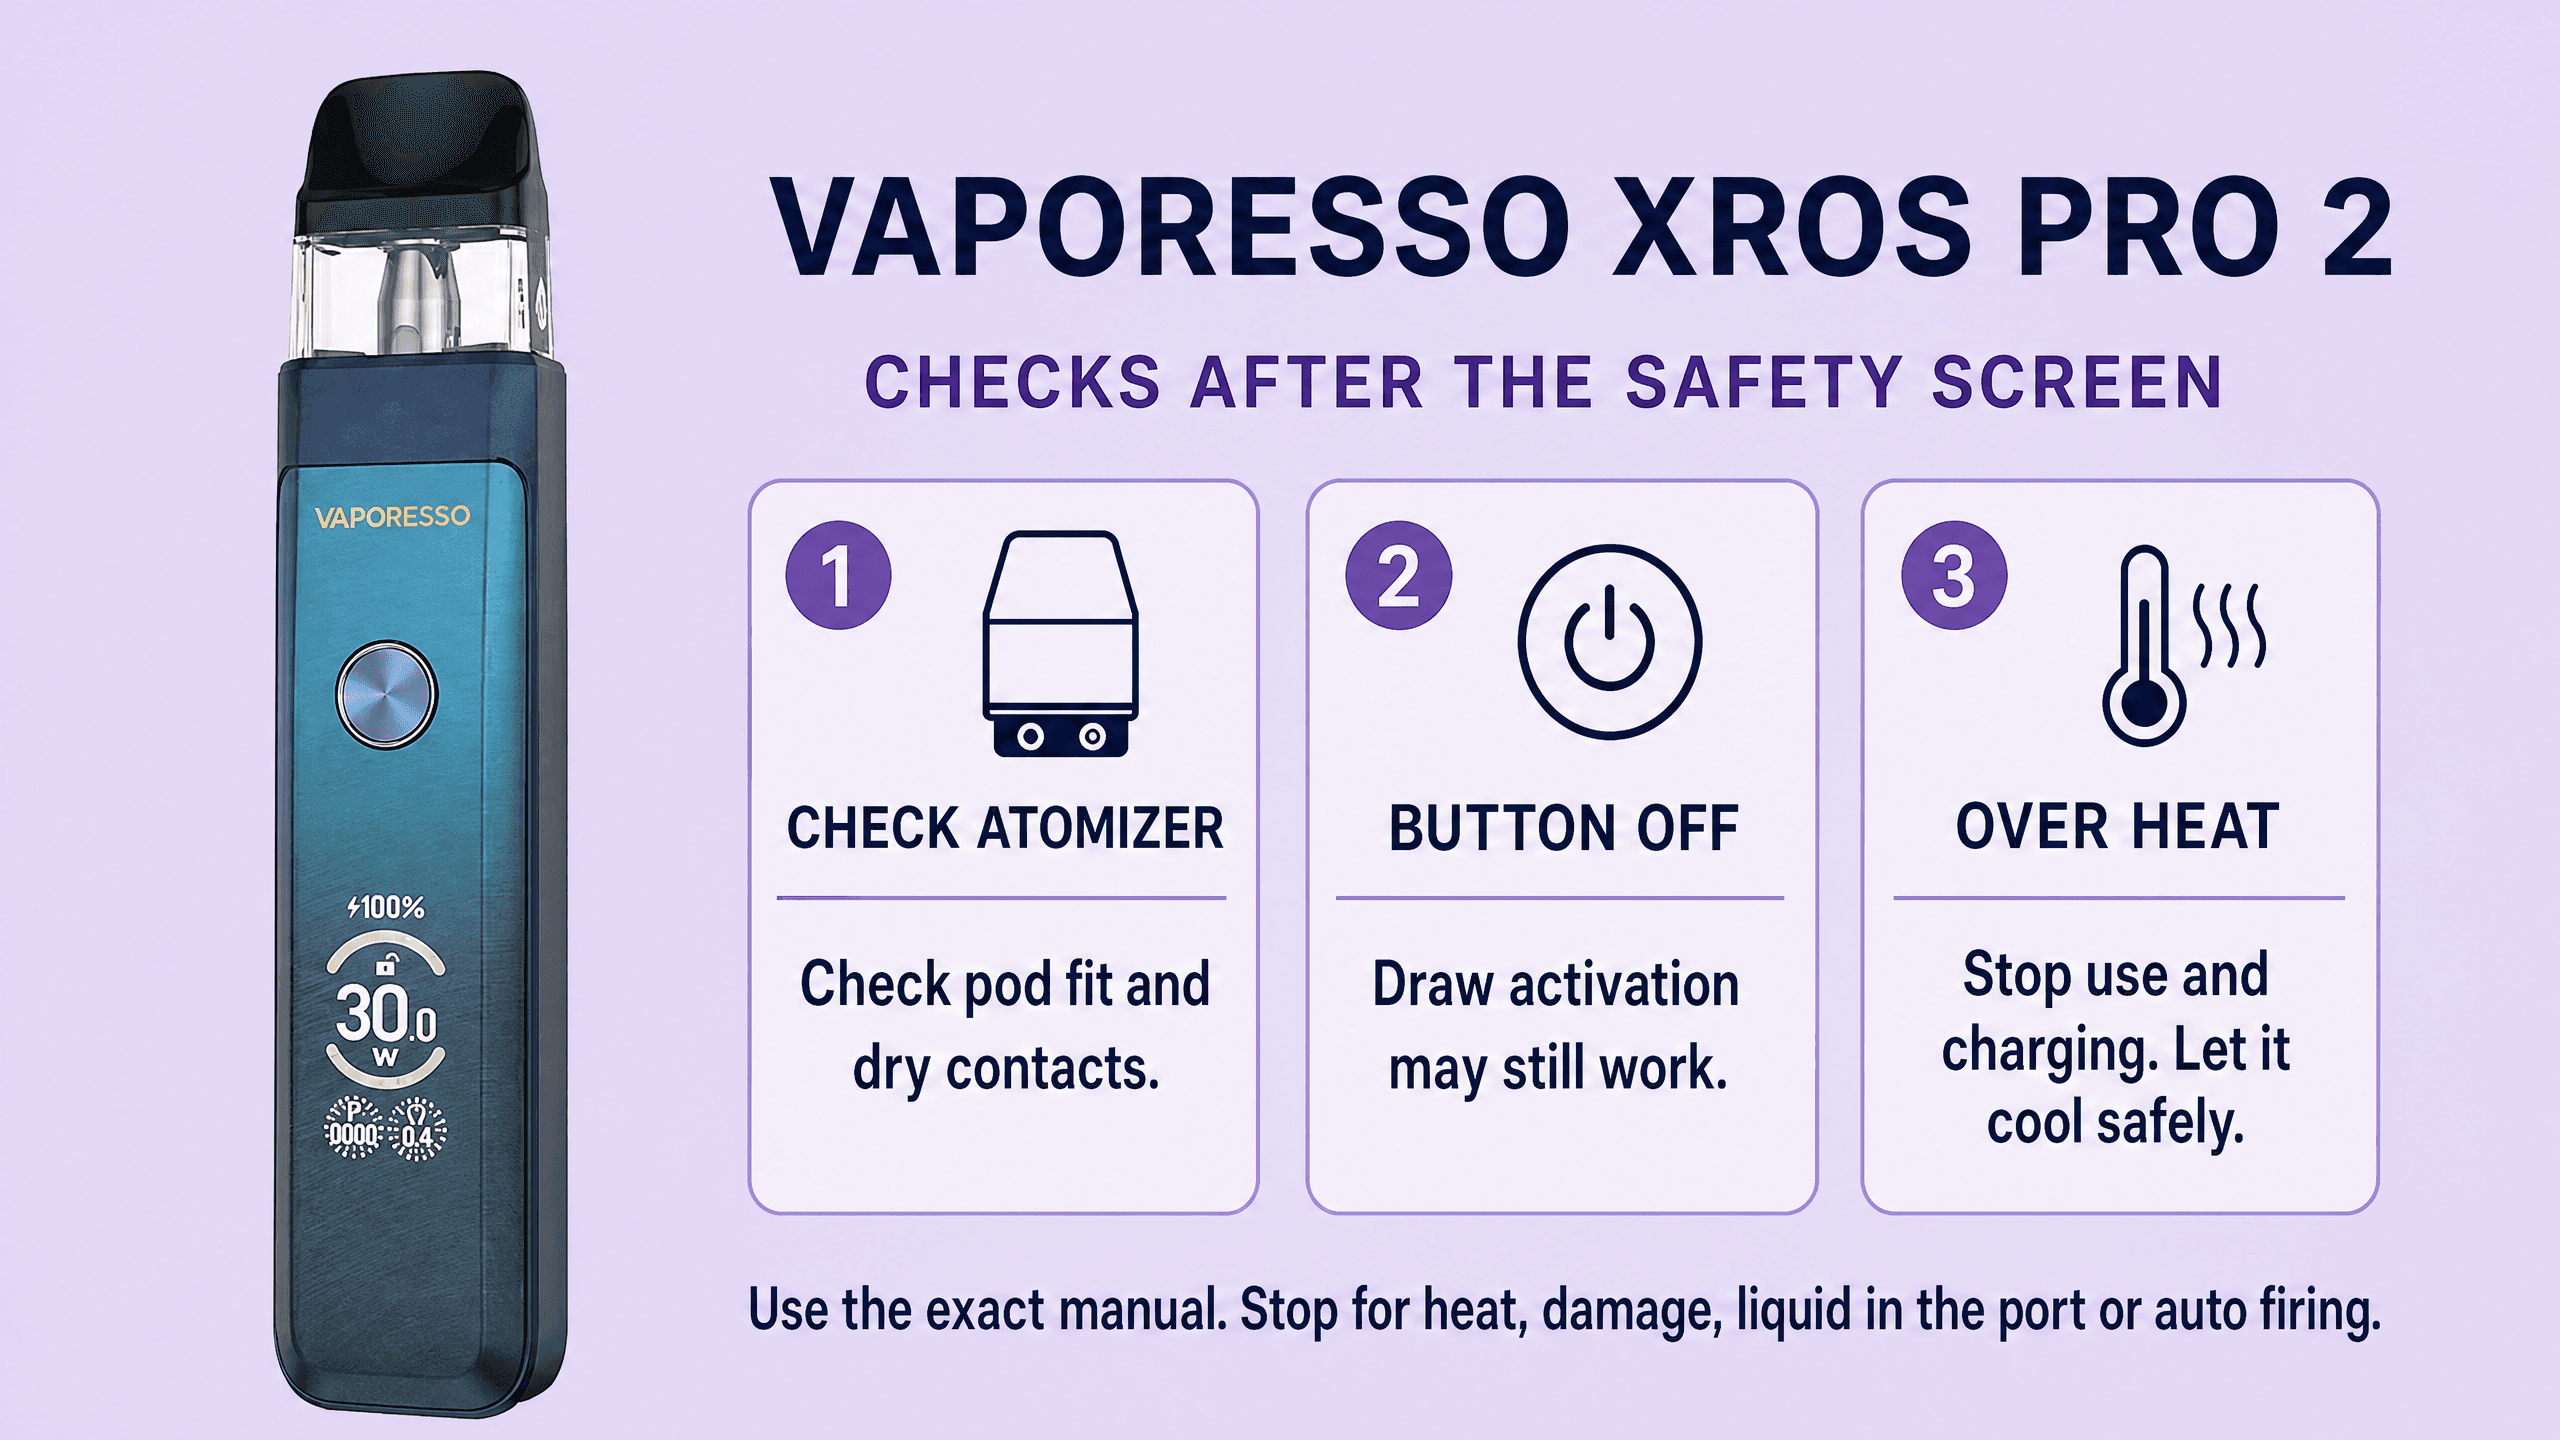
Vaporesso XROS Pro 2 troubleshooting
The Vaporesso XROS Pro 2 has separate power, screen-lock and button-activation settings. A device that still works on a draw but not on its button may have button activation switched off. That setting does not mean the whole device is off.
Screen, pod fit and charging
Five clicks within two seconds switch power on or off. Four clicks within two seconds open the relevant settings; the manual describes SCREEN LK and BUTTON ON/OFF, with a two-second hold to confirm. Four clicks also unlock a locked screen. Check the actual selected setting rather than repeatedly pressing buttons at random.
Fit a supported XROS pod, remove the indicated transport sticker and fill through its designated hole. Close the mouthpiece and wait five minutes after the first fill. USB-C input is DC 5V/2A. The screen shows charging progress. In power save mode, the separate LED uses green, blue and red charge bands after use or pod insertion.
Three useful fixes
- Draw works but the button does not: check BUTTON ON/OFF in the settings. Do not conclude that the switch is broken solely from this behaviour.
- CHECK ATOMIZER: switch off and inspect the cool, dry pod connection, sticker and correct seating. Use a supported, properly prepared pod.
- The expected power control is missing: the manual assigns adjustable wattage to the 0.4 ohm pod; the listed higher resistances use PWR, NOR or ECO mode selection. Check the installed resistance before diagnosing a menu fault.
Stop point: SHORT ATOMIZER or recurring OVER HEAT requires the stop rules below. Do not clear a short by raising wattage, and do not resume use after unexplained idle heat just because the screen becomes normal.
Vaporesso XROS Pro 2 verified warning meanings
| Comparison point | Manual meaning | Next action |
|---|---|---|
| SHORT ATOMIZER | Low resistance or short circuit | Stop firing. Inspect only the safe, dry, compatible pod connection as permitted. Persistent faults need support. |
| CHECK ATOMIZER | No load or high resistance | Check the transport sticker, supported pod, dry contacts and seating. |
| OVER HEAT | Temperature protection | Stop using and charging. Let it cool safely. Repeated or unexplained heat needs support. |
| BATTERY LOW | Low voltage or over-discharge | Follow the safe charging checks. |
| OVER TIME | The eight-second draw limit | Stop drawing or release the button. Use shorter draws once normal operation is established. |
Important context: On a narrow screen, scroll the table sideways to read Next action. Use these meanings only for the named model. A heat, damage, liquid-entry or auto-firing warning overrides ordinary checks.
Vaporesso XROS Pro 2 source and limits
The manufacturer manual supplies the precise screen warnings, five-click power control, four-click settings and lock controls, separate button activation setting, pod-dependent power modes, five-minute preparation and 5V/2A USB-C input.
Vaporesso XROS Pro 2 user manual, English pages 1 and 2Evidence checked 2026-11-11
Limitation: Screen locking and disabling button activation are not the same as switching the whole device off. The controls and messages here are for Pro 2, not a different XROS model.
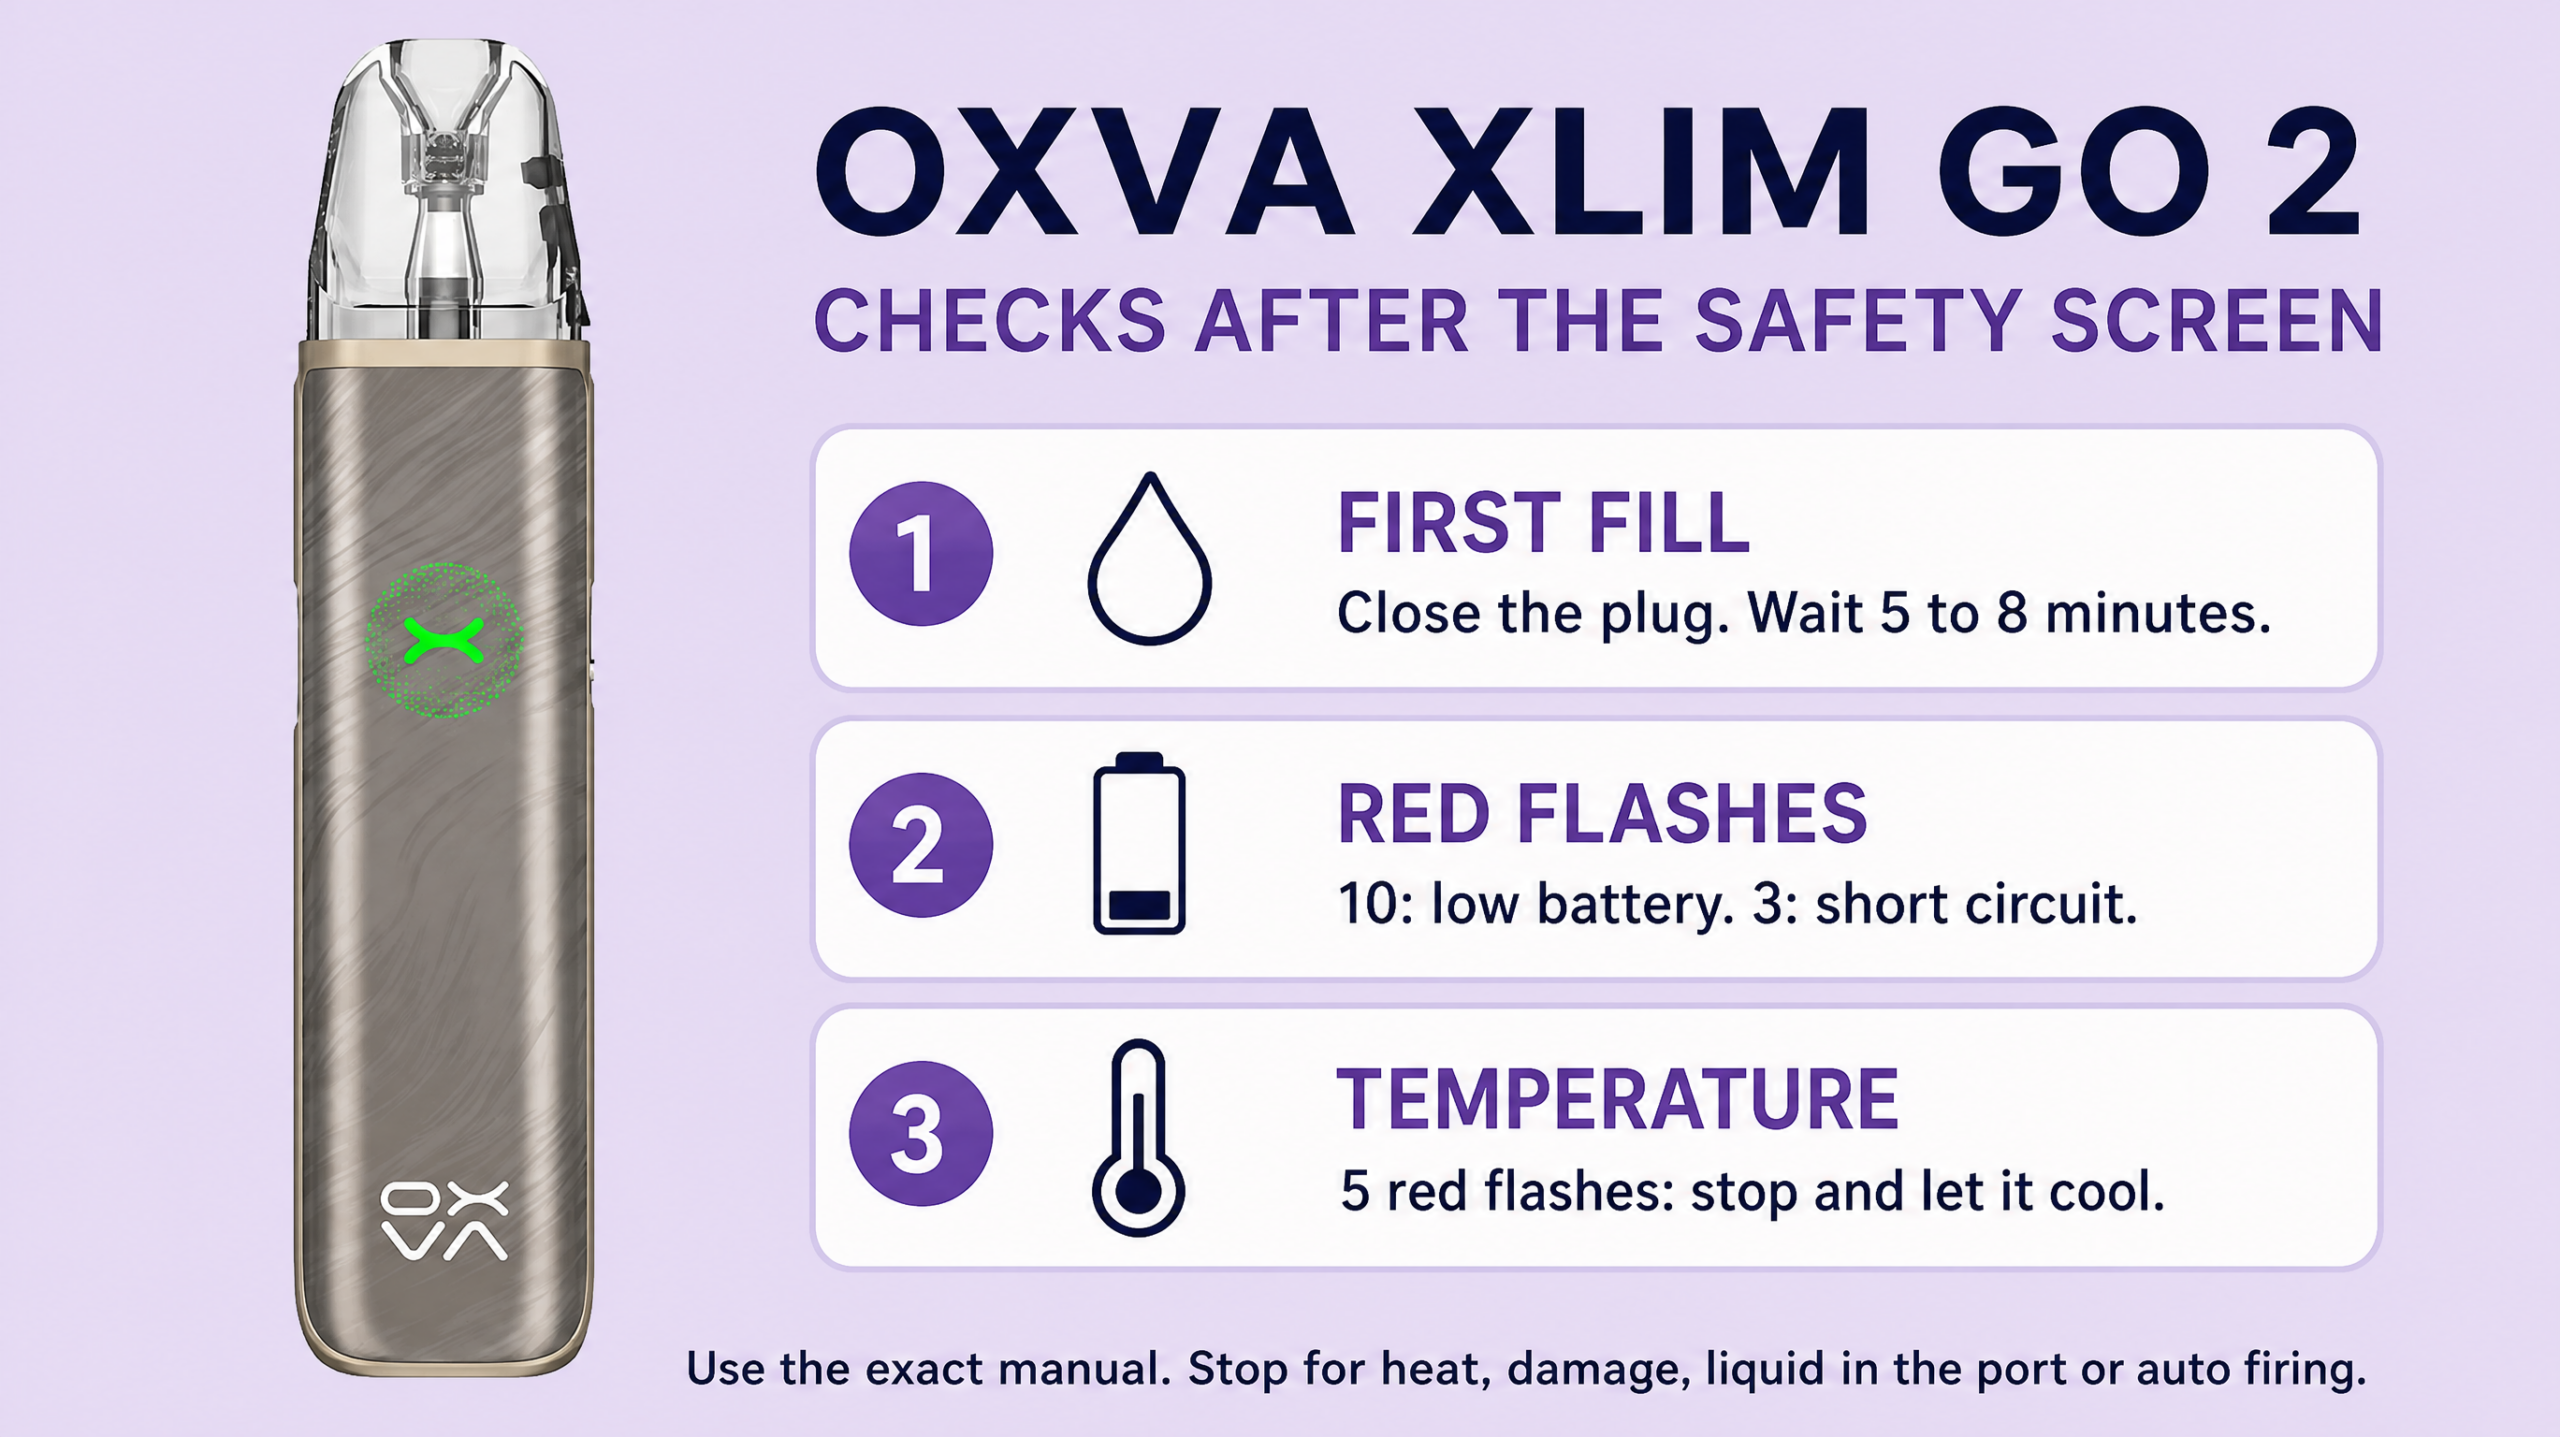
OXVA XLIM GO 2 troubleshooting
The OXVA XLIM GO 2 is buttonless and draw activated. There is no five-click power or reset routine. The manufacturer product page distinguishes the UK 2ml pack from its international 3ml version.
Light, pod fit and charging
Use the correct supported XLIM pod, align it with the socket and seat it normally. Open the designated filling plug, fill the pod and close the plug promptly. OXVA specifies a five-to-eight-minute wait after filling a new cartridge. Its side airflow control changes the draw; it is not a power switch.
The manual specifies a built-in 1500mAh battery and Type-C charging at 5V/2A. Its broad charge bands are green at 60 to 100%, blue at 20 to 60% and red at 0 to 20%. The protection patterns below are separate from those ordinary battery colours.
Three useful fixes
- New pod tastes dry or will not draw normally: check filling, the closed plug, first-use wait, correct seating and airflow. Stop using a pod that remains burnt.
- Ten red flashes: the manual identifies low battery. Follow the charging checks if the device is otherwise safe.
- Three red flashes: this is the manual’s short-circuit warning, not the three-flash low-voltage signal used by XROS 3. Stop firing and inspect only permitted pod fit and compatibility checks.
Stop point: repeated short-circuit signals, damaged contacts or high-temperature warnings need support. Do not open a buttonless device to look for a hidden reset. For an exhausted integrated-coil cartridge, the XLIM V3 top-fill replacement listing is a part reference; confirm the selected resistance against the GO 2 instructions before fitting it.
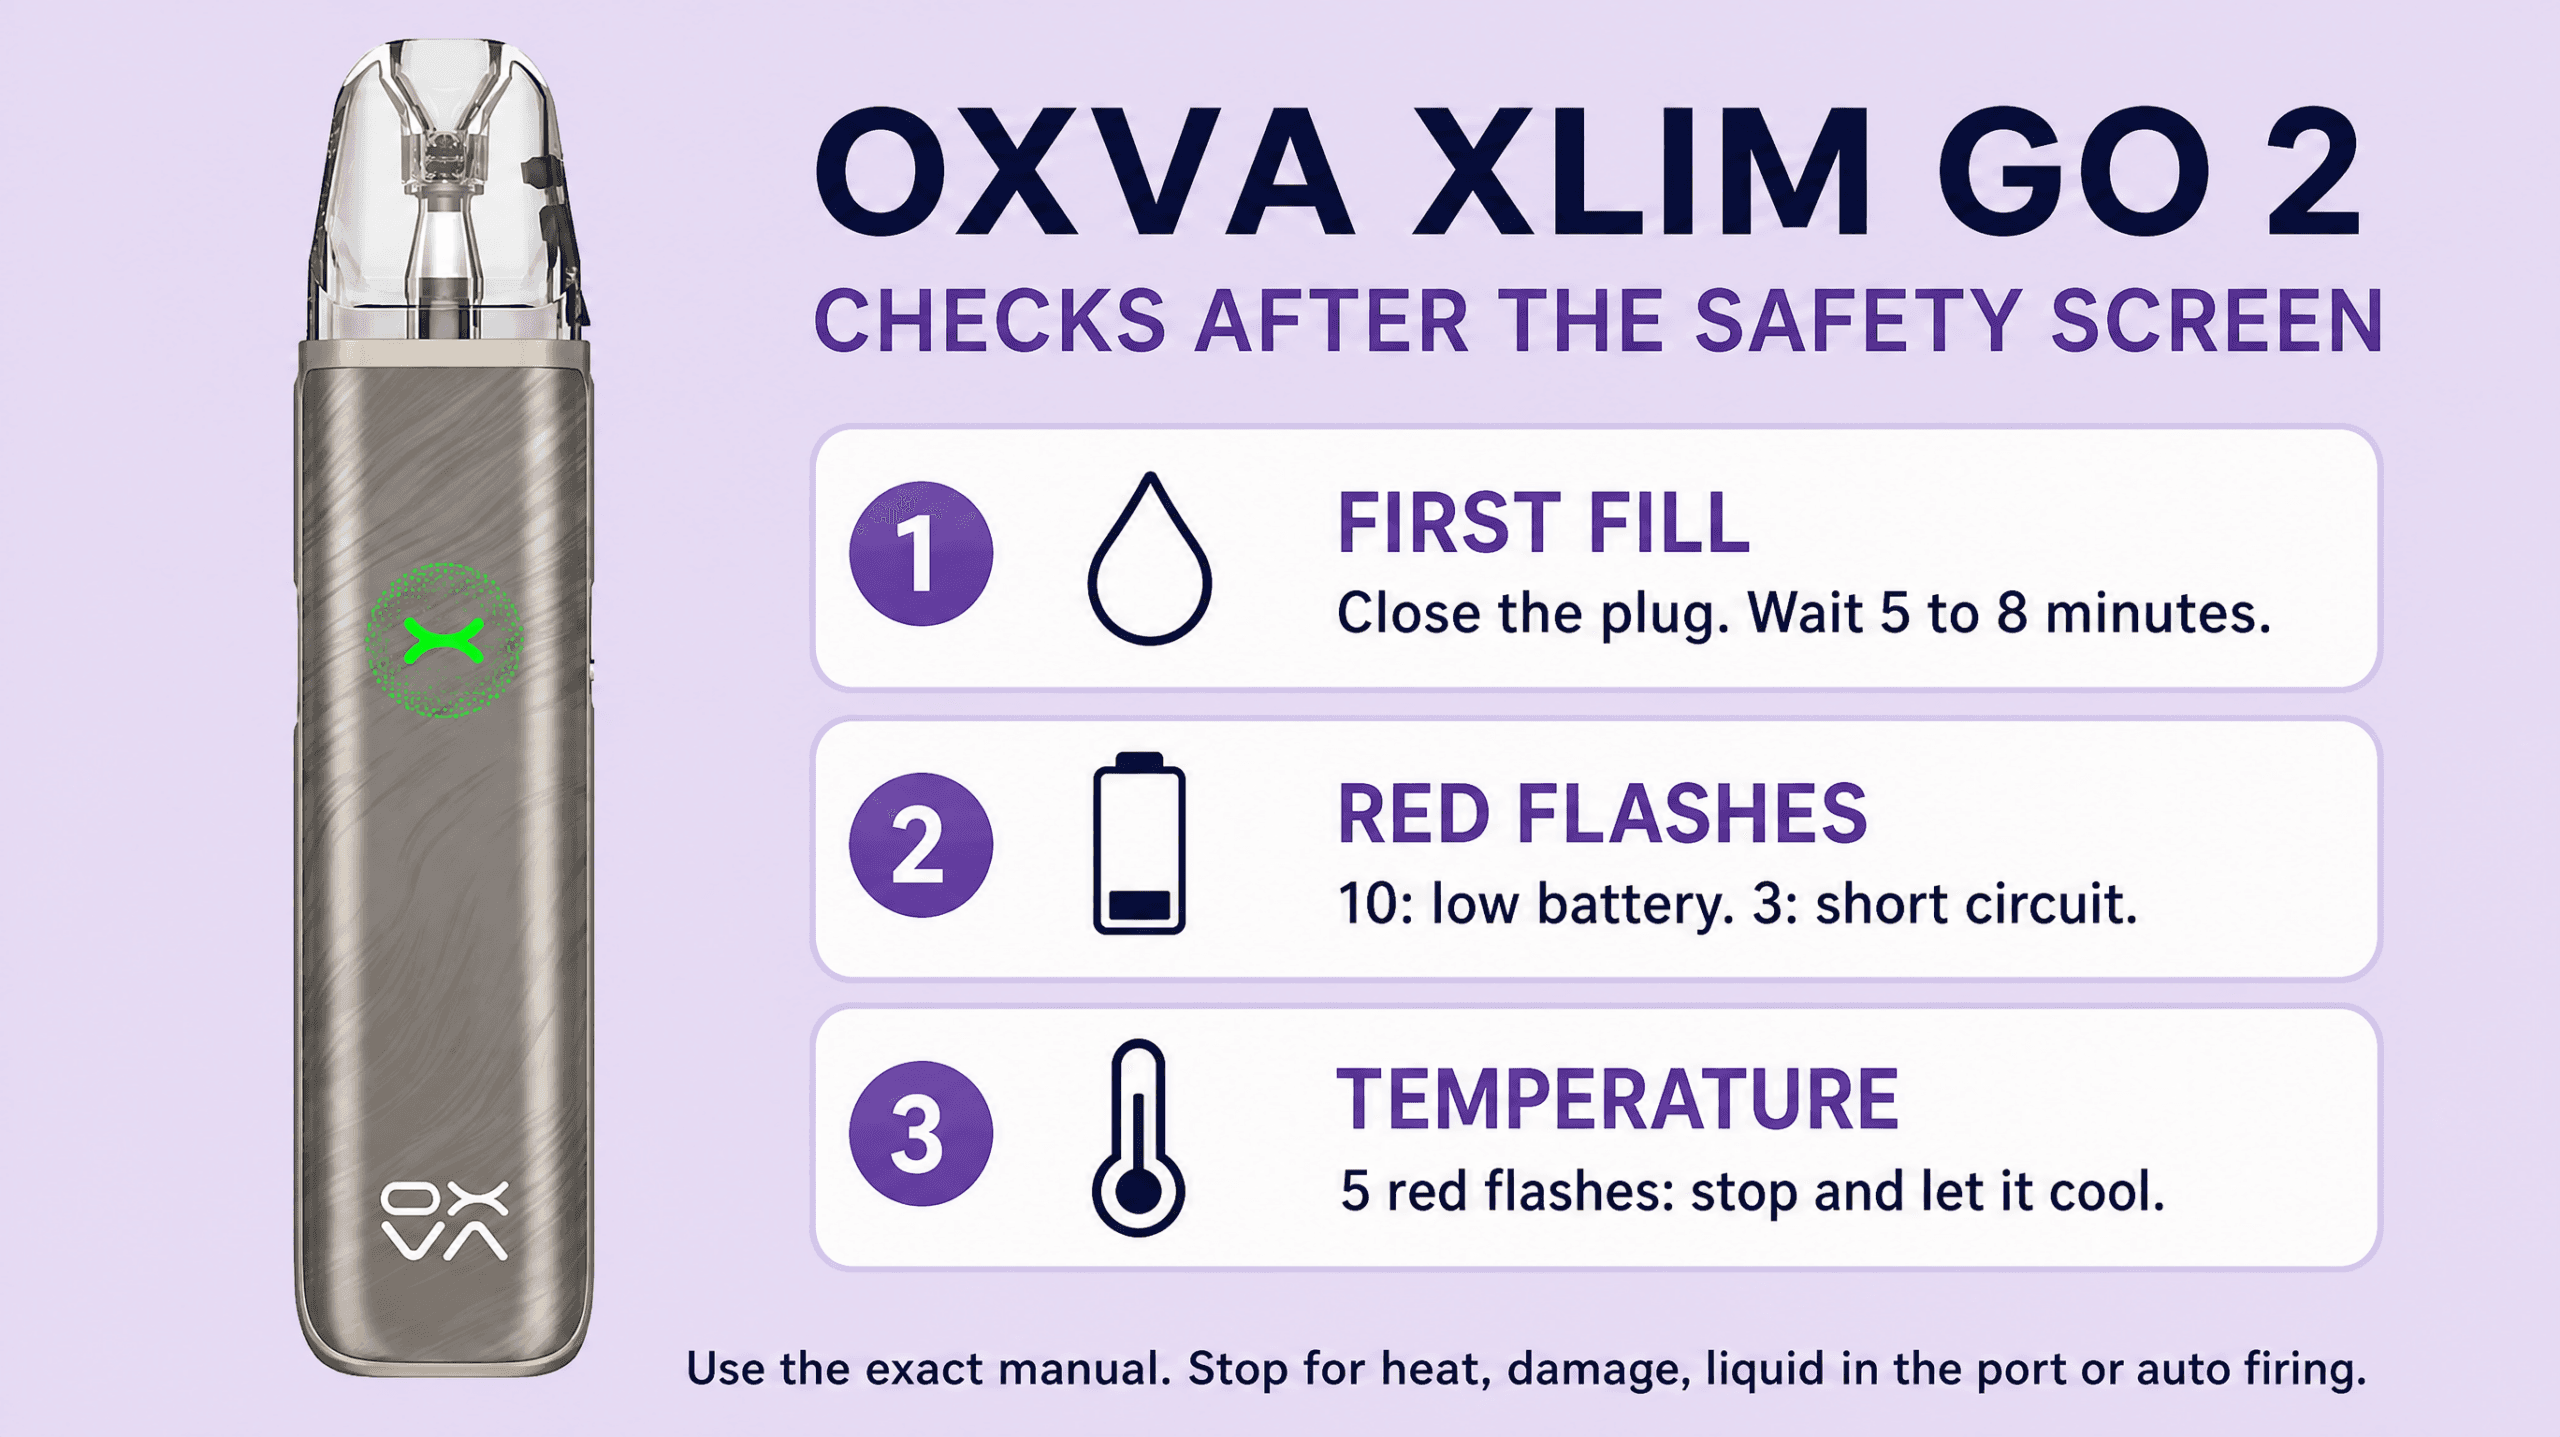
OXVA XLIM GO 2 verified warning meanings
| Comparison point | Manual meaning | Next action |
|---|---|---|
| Red, 10 flashes | Low battery | Use the specified charging setup after the safety screen. |
| Red, 3 flashes | Short circuit | Stop firing. Check only safe pod seating and compatibility. Persistent faults need support. |
| Red, 5 flashes | High temperature | Stop use and charging. Let it cool naturally and seek help if the warning repeats. |
| Blue, 3 flashes after a long draw | The eight-second draw limit | Stop drawing. Repeated brief-draw cut-outs need support. |
Important context: On a narrow screen, scroll the table sideways to read Next action. Use these meanings only for the named model. A heat, damage, liquid-entry or auto-firing warning overrides ordinary checks.
OXVA XLIM GO 2 source and limits
The exact GO 2 manual supplies the warning flash counts, broad battery bands, 5V/2A Type-C input and a five-to-eight-minute first-fill wait. The manufacturer product page identifies draw-only operation, side airflow control and the UK 2ml version.
OXVA XLIM GO 2 manual, English light prompt tableEvidence checked 2026-11-11
Limitation: These flash counts belong to GO 2. They are not a translation chart for other OXVA products. International 3ml illustrations do not change the UK 2ml pack specification.
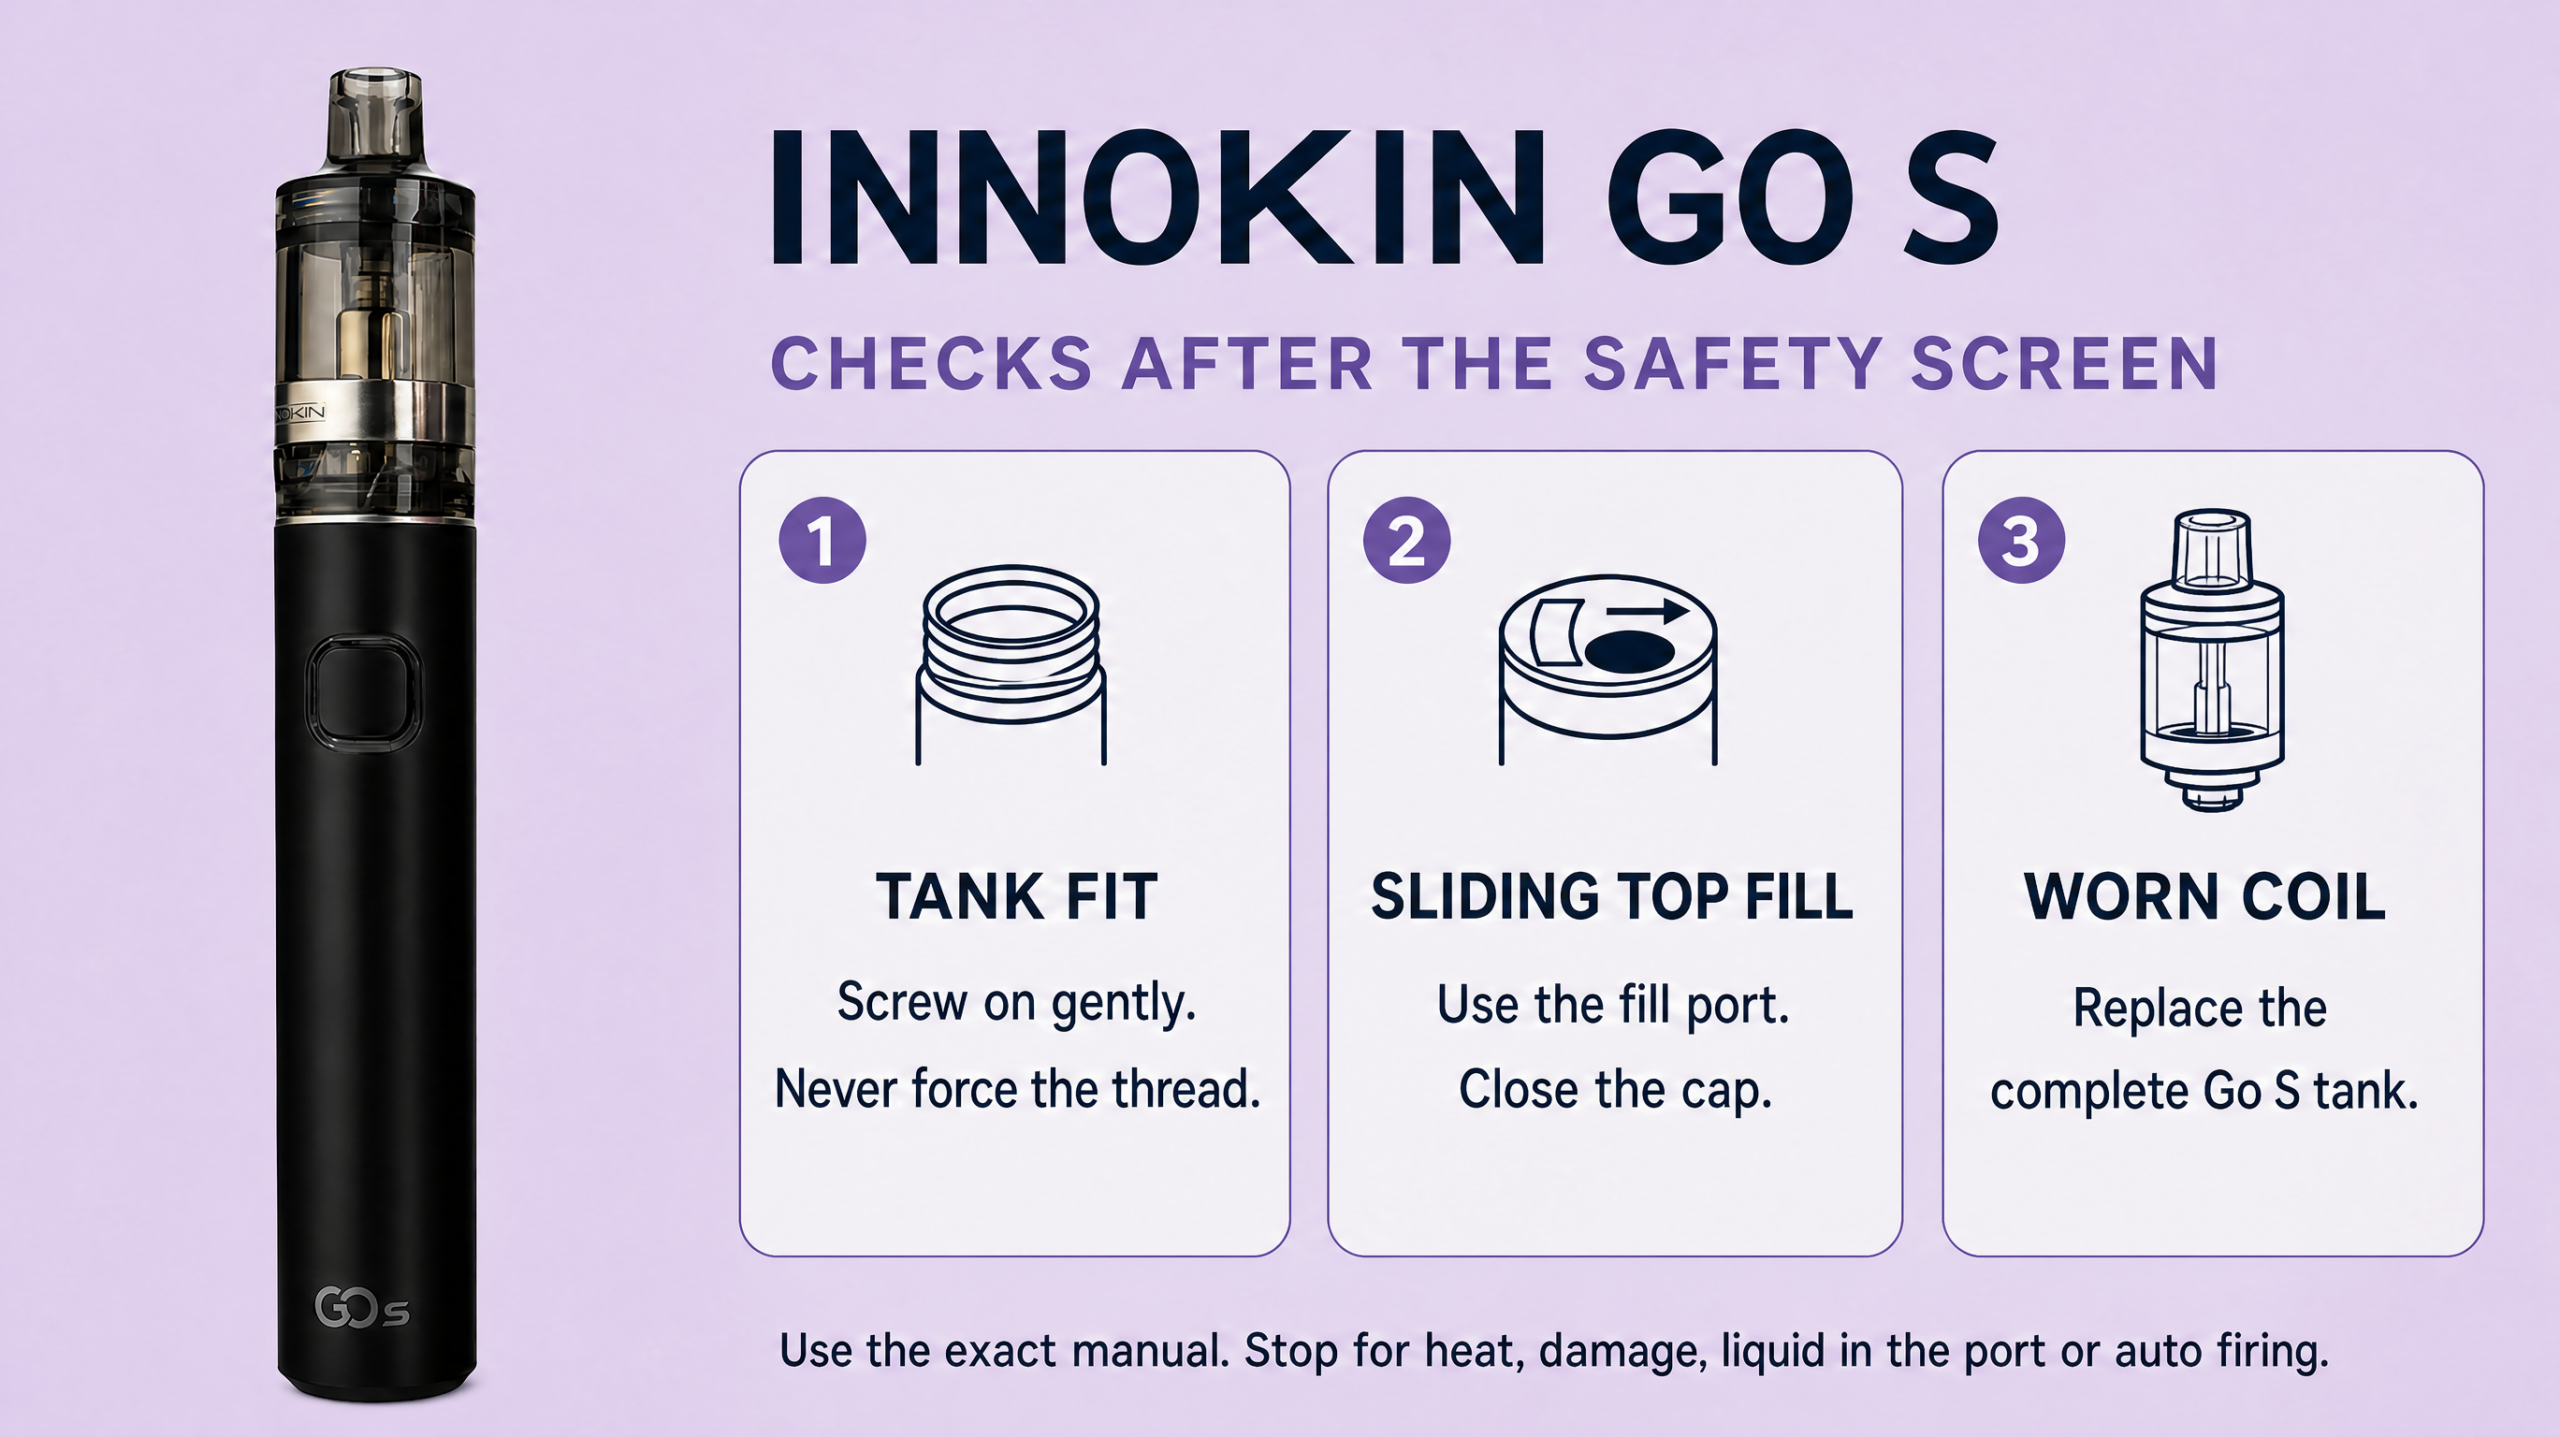
Innokin Go S pen troubleshooting
The Innokin Go S pen is a useful contrast to a push-fit pod. Its refillable tank screws onto the battery, and the coil is built into that tank. Our current listing specifies a 2ml tank with a 1.6 ohm coil. Replace the complete tank when that coil is exhausted.
Tank fit, light and charging
Switch off according to the supplied Go S leaflet. Screw the tank on gently and stop if the threads resist or sit crooked. Slide the top in the marked direction to uncover the filling opening, fill through that opening, then close it. The bottom airflow ring adjusts the draw. The manufacturer’s linked instructions specify a five-minute first-fill wait.
The Go S uses micro USB charging. A USB-C lead is not the same connector and must not be forced into the port. Innokin’s linked charging instructions specify a quality 5V supply and the included micro USB cable, with green indicating full charge. The normal charge bands are red below 20%, red and green at 20 to 70%, and green at 70 to 100%.
Three useful fixes
- No vapour: check the power state, charge indication and gentle threaded connection. Follow the supplied button sequence instead of assuming every pen uses the same number of clicks.
- Leaking after a refill: check the sliding cap is fully closed and liquid went into the filling opening. Inspect the tank for a crack and keep liquid away from the battery connection.
- Persistent burnt taste: replace the complete Go S tank. Do not use removable-coil diagrams for a different tank to dismantle this fixed-coil part.
Stop point: damaged threads, a loose micro USB port, repeated protection signals or liquid inside the battery need support. A replacement tank cannot repair a faulty battery. The vape pen guide explains the different filling methods without treating every pen as the same device.
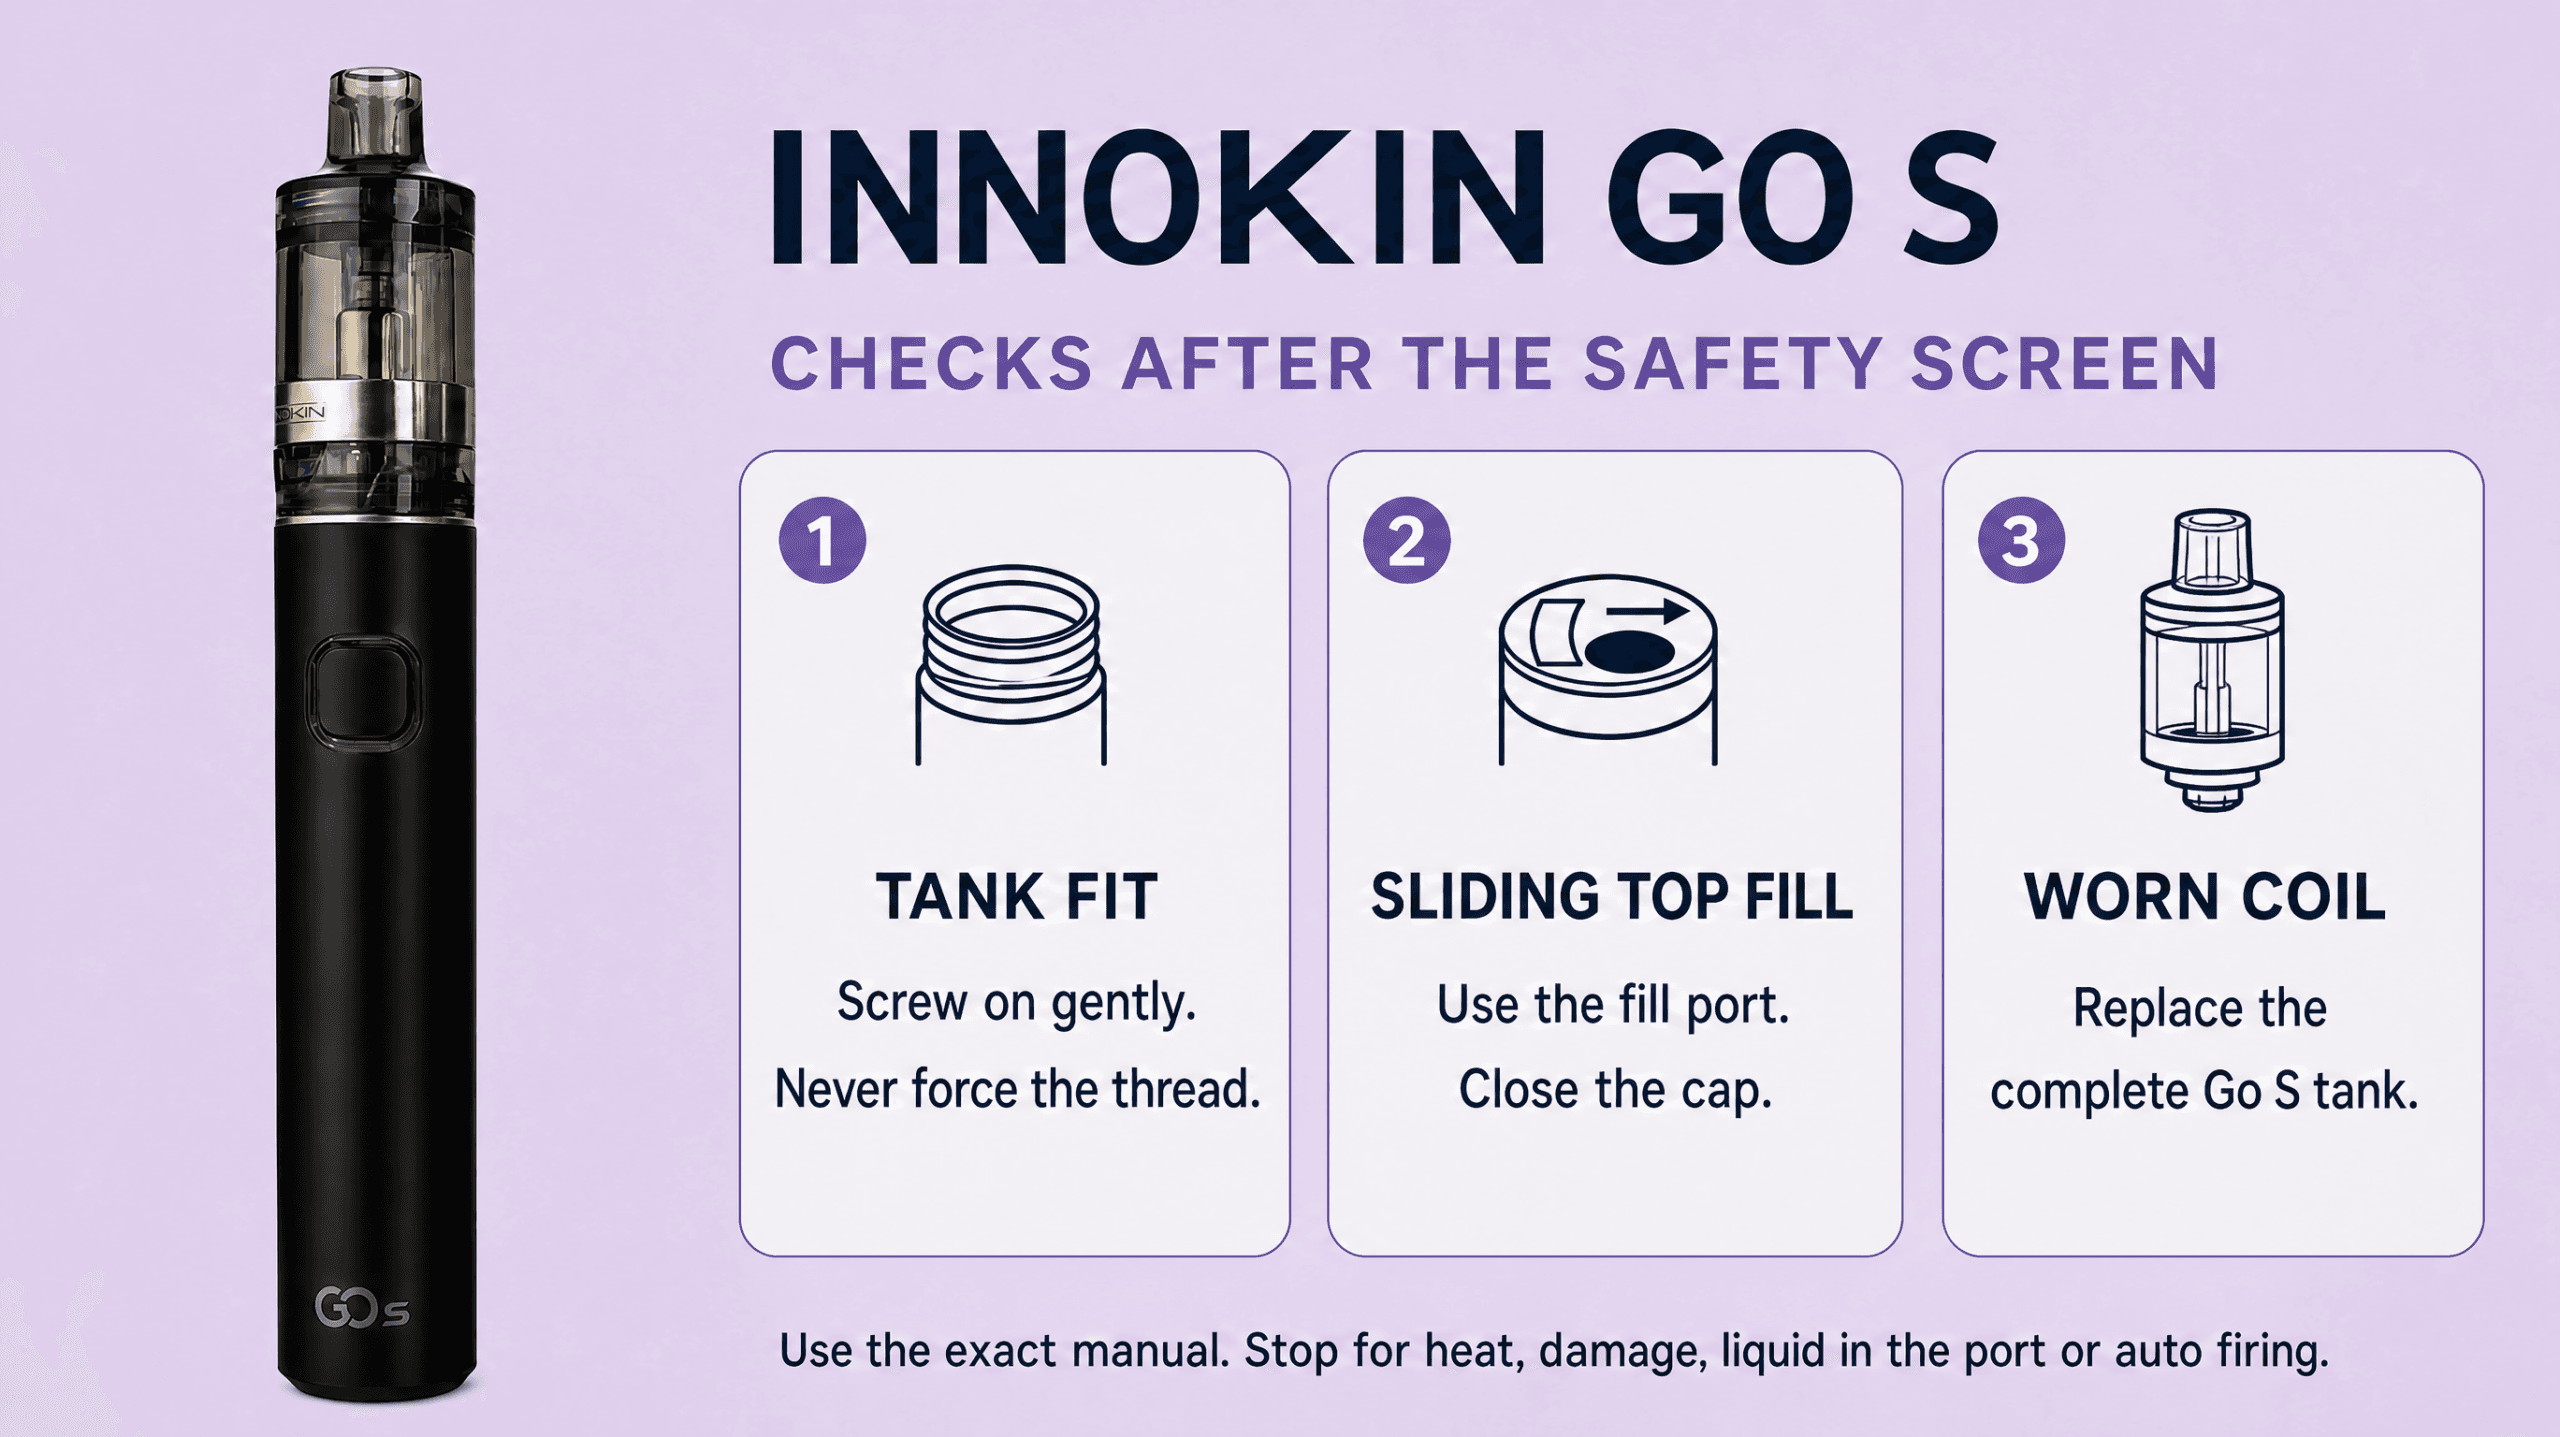
Innokin Go S pen verified warning meanings
| Comparison point | Manual meaning | Next action |
|---|---|---|
| Red, 4 flashes | Low voltage | Charge only after the device and port pass the safety checks. |
| Red and green, 4 flashes | Short-circuit protection | Stop firing. Check the permitted tank connection; a damaged fixed-coil tank is replaced whole. |
| Red and green, 3 flashes | Draw time limit | Release the button. Do not repeat long firing to clear a fault. |
| Green at charge completion | Fully charged | Unplug. This indication does not measure remaining e-liquid. |
Important context: On a narrow screen, scroll the table sideways to read Next action. Use these meanings only for the named model. A heat, damage, liquid-entry or auto-firing warning overrides ordinary checks.
Innokin Go S pen source and limits
Innokin describes the 2ml sliding-top-fill tank, bottom airflow ring and Go S specifications. The linked manual labels the Go S battery colours, protection patterns and micro USB charging advice. The current Vape Forest listing confirms the fixed 1.6 ohm coil within the replaceable whole tank.
Innokin Go S product page and linked user manualEvidence checked 2026-11-11
Limitation: The linked combined sheet includes illustrations for a different removable-coil tank. Those instructions are not applied to the Go S fixed-coil tank. Use the supplied Go S leaflet for its exact power-control sequence; no separate coil-change procedure is given.
Replacement parts only when the fault points to a consumable
Replace a consumable when the checks identify a spent, burnt, cracked or persistently leaking part. Replacement is not a treatment for an unsafe battery, a wet charge port, damaged contacts or auto firing. If a new device arrived faulty, ask the retailer to assess it before buying parts.
- Hyola Ultra 30K replacement packs address an exhausted or damaged Ultra 30K pack. They do not repair a stuck selector or a charging fault.
- Hayati Pro Ultra Plus 25000 pod and container packs replace the matching sealed consumable after supply and seating checks. Match the full Plus model name.
- Enjoy X 10000 replacement pods are the reference for a depleted or faulty Enjoy X pack. Assemble them according to their own leaflet.
- Current BM6000 pod and container packs are for the replaceable pod kit. They are not permission to open an older sealed device.
- Elf Bar Dual 10K replacement pods and containers address exhausted or damaged compatible liquid components. Check the pack matches the version you own.
- XROS COREX replacement pods replace an exhausted integrated-coil pod. Select a resistance supported by the exact device. The XROS 3 manual lists 0.6 and 1.0 ohm pods; do not assume a 0.4 ohm option in a shared listing suits every XROS.
- OXVA XLIM V3 top-fill pods provide a compatible part reference for the GO 2. Confirm the selected resistance and prepare the new pod before use.
The prefilled refill matching guide helps identify closed packs. If the model or generation is uncertain, send the retailer a photograph of both the device name and replacement packet instead of ordering by appearance.
When support or recycling replaces another test
Stop home diagnosis when there is a safety warning, a repeated protection code, visible damage or no improvement after the permitted checks and one appropriate compatible-part test. More attempts do not necessarily produce more useful evidence. A fault inside the battery body, charge port or sensor belongs with the manufacturer or retailer.
Prepare a short support record:
- The full device name, version and order reference.
- The pod or coil name and resistance where applicable, plus the batch or serial number.
- Whether it ever worked, and whether the problem began after a refill, replacement, drop, leak or charge.
- The exact message or flash colour and count, if you already observed it safely.
- The approved checks you completed and the result of each. Note the cable and supply specification for a charging problem.
- Clear photographs of the cool, stable device, packaging and affected part. Do not recreate auto firing or overheating for a picture.
Example support message: My new pod is the correct model and resistance. I removed the indicated sticker, filled it through the marked hole and waited the stated time. The device reports CHECK ATOMIZER. Its accessible contacts are dry, and reseating did not change the message. There has been no drop or liquid entry.
Ask for return instructions before sending a damaged or defective lithium device. Do not put a vape or battery in household rubbish or household recycling. Ask a retailer or local electrical-waste collection service which route accepts that particular item and whether damage changes the handling instructions. Do not dismantle an integrated battery to prepare it for recycling.
For suspected product safety concerns, use the MHRA consumer reporting guidance as well as contacting the seller. For an existing Jucce device, the separate Jucce Bar troubleshooting guide has its own pod and charging checks.
Common vape troubleshooting questions
Why does my vape light up but not hit?
The indicator can work while the pod is disconnected, the airflow is blocked or the working chamber is not supplied with liquid. After the safety and manual checks, inspect the correct pod, its transport sticker, dry accessible contacts, seating and liquid supply. Do not keep drawing through a burnt taste or a protection warning.
Why is my vape blinking three times?
The meaning depends on the exact model and colour. XROS 3 uses three red flashes for low voltage; XLIM GO 2 uses three red flashes for a short circuit. Record the sequence and use your manual. There is no reliable universal three-flash fix.
Why does a brand new vape not work?
It may have a transport seal still fitted, an unprepared pod, an empty battery or a setup error. It could also be defective. Check the supplied instructions without forcing parts. A new device that is damaged, wet, unusually hot or suspect should go straight to the retailer.
Why does my vape taste burnt when it still has liquid?
Liquid in a reservoir does not prove that it has reached the wick. Check assembly, the working pod, first-use preparation and supported settings. A persistently burnt wick needs the correct replacement pod or coil. Charging cannot repair it.
Can I fix a burnt pod by leaving it overnight?
A new unused wick needs the preparation time specified for its pod. A wick that already tastes persistently burnt is not restored by a longer wait. Stop using it and replace the compatible consumable rather than repeatedly trying it.
Why is there liquid underneath my pod?
A small amount may be condensation, but recurring pooling, a cracked seam or liquid escaping from the fill closure needs investigation. Switch off, blot accessible surfaces and inspect the pod. Liquid in the charging port or inside the body means stop and contact support.
Why does my vape spit liquid into my mouth?
A flooded air path, condensation, overfilling or a failed closure can contribute. Stop using it, check the cool pod and wipe accessible mouthpiece liquid. Repeated spitting needs correction or pod replacement. Do not use higher power or repeated draws to clear it.
Can I use a phone charger to charge my vape?
Only use a charging setup that matches the exact device instructions and input rating. A matching connector is not enough to decide. Check both cable and power source, stay present while charging and unplug when complete. Never charge through a wet or damaged port.
Why does my vape only charge when the cable is held at an angle?
That can indicate a damaged cable or loose port. Stop bending or wedging the plug. On an otherwise safe device, one known suitable cable can distinguish a cable issue. If the device still needs an angled connection, ask support to assess the port.
Can I refill a prefilled pod with bottled e-liquid?
Do not open a sealed prefilled pack unless its manufacturer explicitly designed it for that operation. The kits here use replacement sealed packs. Bottled liquid belongs in an open refillable pod or tank through its designated filling hole.
Does 100% battery mean there is still e-liquid?
No. A battery reading describes charge. Check the working pod and visible supply separately. Puff counters and advertised puff numbers are not liquid measurements either. Stop using a burnt or empty consumable regardless of the display.
Why will my replacement pod not click into place?
Check the full model and generation, remove only the indicated transport parts and assemble any container first. Align it without force. Some magnetic pods make little noise, so correct seating matters more than a click. Damaged guides, contacts or magnets need support.
Should I blow into a vape to unblock it?
Do not use blowing as a general repair. It can move liquid or debris towards a draw sensor or electronics. Check accessible inlets, the airflow control and pod seating, following the manual. An internal blockage needs support or replacement of the affected removable part.
Can I reset a vape that keeps auto firing?
Do not keep testing it or connect a charger. Auto firing is a safety stop. Switch off only if the device is cool and safe to handle, keep people away and contact the retailer or manufacturer. Smoke or fire means leave the area and call 999.
How do I know whether to replace the pod or the whole device?
An exhausted, cracked, persistently burnt or leaking consumable points towards the correct pod, coil or fixed-coil tank. A damaged port, battery problem, auto firing or a repeated fault with a properly prepared compatible part points towards device assessment. Do not buy parts to mask a safety problem.
How long should a vape last before it needs replacing?
There is no reliable universal number of days. Draw pattern, settings, liquid and the consumable all differ, and advertised puff counts are upper claims rather than personal guarantees. Use condition and the manufacturer instructions: persistent burning, damage, recurring leaks or a battery fault are more useful signals than a calendar.
Sources and verification
- Battery safety when using e-cigarettesOffice for Product Safety and StandardsChecked: 11 November 2026
Supports: Manufacturer instructions, compatible charging, supervision, charge surfaces and battery damage boundaries.
- Vaping and e-cigarette fire safetyLondon Fire BrigadeChecked: 11 November 2026
Supports: Charging precautions, damage warnings and evacuation rather than handling a burning lithium device.
- Safe vape usage and disposal campaignOffice for Product Safety and StandardsChecked: 11 November 2026
Supports: Unplugging after charge and using appropriate vape collection rather than household bins.
- Advice for consumersMedicines and Healthcare products Regulatory AgencyChecked: 11 November 2026
Supports: Consumer reporting route for suspected e-cigarette product safety concerns.
- Poisoning guidanceNHSChecked: 11 November 2026
Supports: Signpost for swallowed liquid or suspected poisoning. No treatment procedure is reproduced.
- Manufacturer device and atomiser FAQVaporessoChecked: 11 November 2026
Supports: General diagnostic categories including charging, liquid supply, pod fit and worn consumables. Model-specific manuals override generic flash descriptions.
- Causes of leaks and fill faultsVaporessoChecked: 11 November 2026
Supports: Fill closures, seals, liquid suitability and pressure or temperature changes as possible leak factors.
- Gurgling, crackling and poppingVaporessoChecked: 11 November 2026
Supports: Distinguishing ordinary coil noise from flooding, leakage and liquid projection.
- Ultra 30K device specificationsHyolaChecked: 11 November 2026
Supports: 800mAh battery, USB-C and replaceable dual-flavour format.
- Ultra 30K setup informationHyolaChecked: 11 November 2026
Supports: Magnetic pod seating and draw activation. Cable inclusion and charging time are not inferred.
- Pro Ultra Plus manufacturer descriptionHayatiChecked: 11 November 2026
Supports: Dual independent coils and tanks, twist selector, battery display, visible liquid and 850mAh battery.
- Current BM6000 pod kit instructionsLost MaryChecked: 11 November 2026
Supports: Current replaceable pod and container version, manufacturer feed sequence and removal directions.
- DUAL10K manufacturer instructionsElf BarChecked: 11 November 2026
Supports: Two container setup, selector toggle, three-level battery indication and USB-C charging.
- XROS 3 user manualVaporessoChecked: 11 November 2026
Supports: Exact XROS 3 controls, filling, charge input, battery colours and protection signals.
- XROS Pro 2 user manualVaporessoChecked: 11 November 2026
Supports: Exact Pro 2 screen messages, lock distinctions, pod-dependent settings and charging input.
- XLIM GO 2 user manualOXVAChecked: 11 November 2026
Supports: GO 2 light-prompt table, preparation time, battery bands and 5V/2A charging.
- XLIM GO 2 product specificationOXVAChecked: 11 November 2026
Supports: Draw-only operation, side airflow and separate UK 2ml pack specification.
- Go S product specificationInnokinChecked: 11 November 2026
Supports: Sliding top fill, airflow ring and Go S tank specification.
- Go S linked user manualInnokinChecked: 11 November 2026
Supports: Go S battery indications, protection patterns, micro USB charging and first-fill wait. Mixed removable-coil illustrations are excluded from the Go S fixed-coil procedure.